
Published October 13, 2026
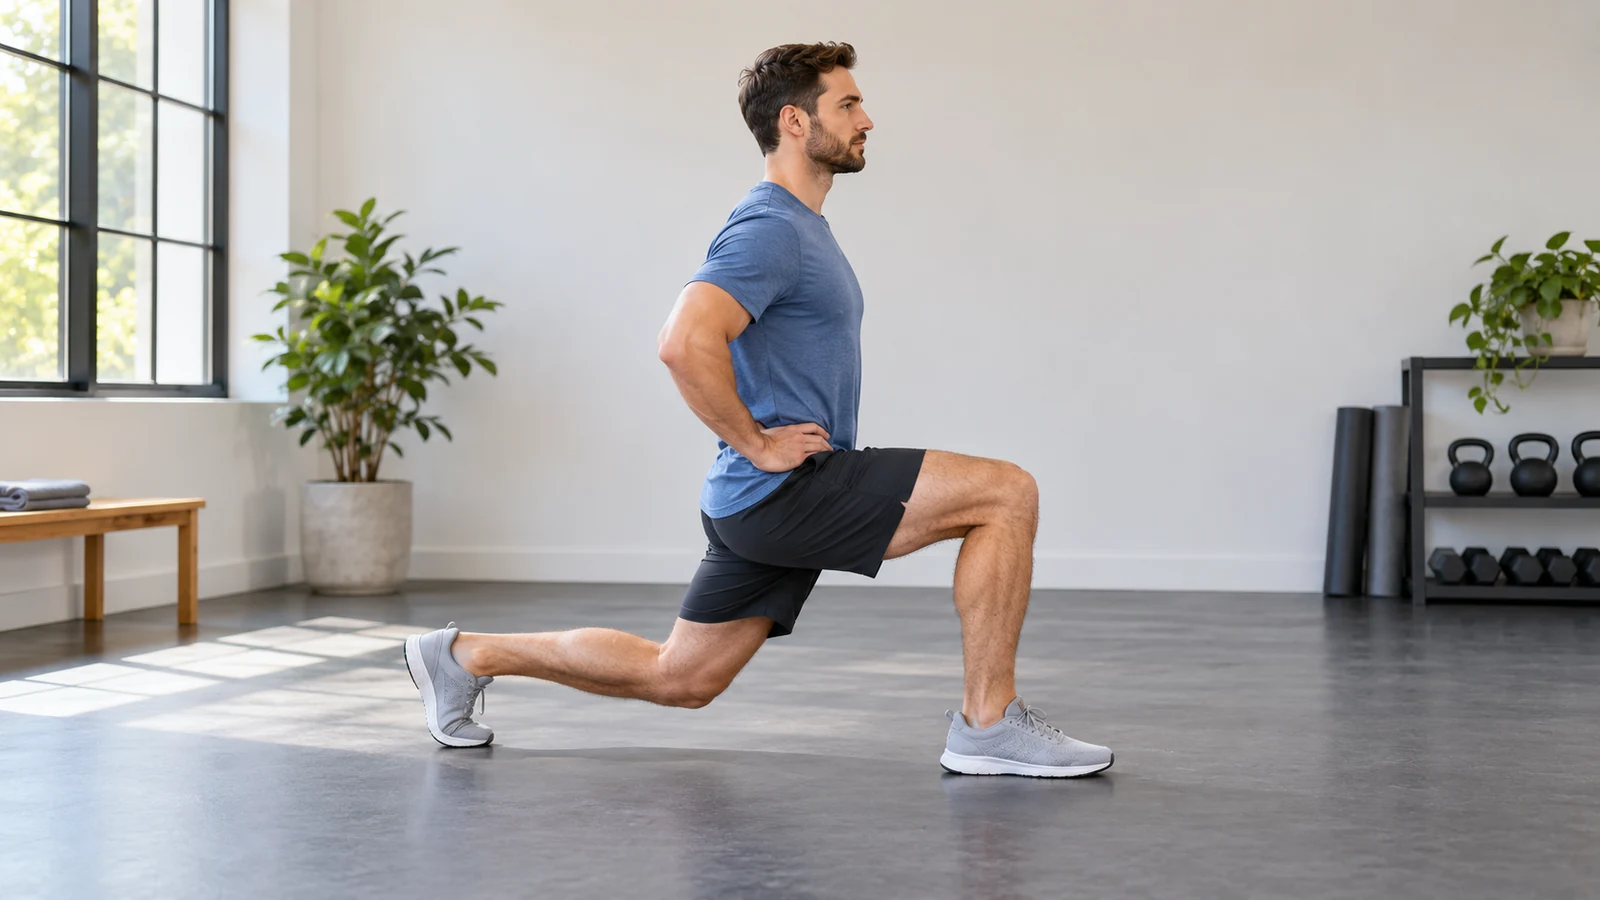
To do a reverse lunge, stand with your feet about hip-width apart, step one foot backward, and bend both knees to lower under control. Keep the front foot planted, then use the front leg to rise and bring the back foot forward. Start with bodyweight, a comfortable depth, and one or two sets of 5–8 repetitions per side. Hold a stable support if balance gets in the way.
The backward step is the defining part of this exercise. You need enough space to place the foot, enough control to lower smoothly, and enough balance to return without hopping or twisting. Getting those pieces consistent matters more than reaching the floor or picking up dumbbells immediately.
This guide focuses on learning and progressing the reverse lunge. If you are deciding between a stationary exercise and a stepping variation, see Workit’s split squat vs. lunge comparison. Here, the goal is to make each backward-step repetition reliable.
What muscles does a reverse lunge work?
The reverse lunge is a lower-body strength exercise involving the hips, knees, and ankles. The quadriceps help straighten the front knee, while the gluteal muscles contribute to hip extension. Other hip, leg, and trunk muscles help control the movement and keep you balanced.
Although both feet contact the floor, the front leg does much of the lifting in the version described here. The back leg provides support and helps you manage the transition. It is not supposed to be completely inactive, and you do not need to force all pressure off it.
Your stance, depth, trunk angle, external load, and individual build change how the exercise feels. Feeling your front thigh does not mean your glutes have switched off. Similarly, a strong stretch or burning sensation does not prove that a repetition is especially effective.
Use performance measures you can repeat: a planted front foot, a consistent backward step, controlled lowering, and a smooth return. Those observations are more useful for selecting a training load than trying to make every repetition produce an identical sensation.
Before you begin: floor, footwear, and support
Clear the space behind you. Check for bags, benches, pets, cables, and loose weights before stepping backward. Practice on a level surface with shoes that do not slip. A very soft or unstable surface adds a balance task that a beginner does not need.
If you want support, choose something fixed and strong enough for the purpose, such as an anchored railing or stable exercise station. A lightweight chair that slides or tips is not a good substitute. Position the support so you can use it without reaching awkwardly or rotating.
Begin with several minutes of easy movement, followed by a few comfortable squats and backward step-taps. A step-tap means moving one foot back, lightly contacting the floor, and returning without lowering into a deep lunge. This lets you check spacing before adding more knee and hip bend.
If you are recovering from an injury, have a condition that affects balance or exercise tolerance, or have been given movement restrictions, get advice specific to your situation. This article provides general exercise instruction, not a rehabilitation progression.
Reverse lunge form, step by step
- Stand in a comfortable stance. Place your feet roughly hip-width apart. Keep your arms at your sides, on your hips, or lightly on a stable support. Look ahead at a fixed point.
- Prepare the front leg. Shift enough weight onto the leg that will stay in place to allow the other foot to move. Keep the whole front foot in contact with the floor.
- Step backward on a separate track. Move the other foot straight back rather than crossing behind the front leg. Land on the ball of that foot with its heel lifted. Keep some side-to-side space between the feet.
- Lower smoothly. Bend both knees and allow the hips to descend. Keep your trunk controlled and your front knee generally traveling in the direction of your toes. Stop at a depth you can reverse without pain, bouncing, or losing balance.
- Rise through the front leg. Push the floor away with the planted front foot. Let the back foot assist with balance as needed while your hips and front knee straighten.
- Return and reset. Bring the back foot forward to the starting stance. Pause long enough to regain balance before the next repetition.
Exhale as you rise if that feels natural, and avoid holding your breath through a string of repetitions. You can take another breath at the top. At first, the pause between repetitions is part of good technique rather than wasted time.
Do not force your back knee to touch the floor. The lowest position is determined by your current control and comfort. If you use a padded target beneath the rear knee, place it carefully and approach it softly; it is a reference point, not something to strike.
How far should you step backward?
There is no correct distance in inches for everyone. Leg length, mobility, and preferred depth all matter. Choose a step that gives you room to bend both knees while keeping the front foot grounded and the rear heel elevated.
A very short step can feel cramped. Your feet may end up too close for you to lower comfortably. A very long step can leave you stretched out, tipping forward, or relying on momentum to return. Make small adjustments between repetitions rather than forcing either extreme.
Try this setup drill: take one backward step, use support, and lower only a few inches. If you feel stable, test a little more depth. Return to standing, then repeat the same distance. A floor seam or temporary visual marker can help you learn the placement, provided it does not create a slipping hazard.
Think of your feet as being on two parallel tracks. A narrow, heel-to-toe line often turns the exercise into a balancing act. Give yourself enough width to move smoothly without making the stance so wide that the knee or foot twists.
Front knee, torso angle, and depth
Keep your front knee moving in roughly the same direction as your foot, with the heel remaining grounded. Some forward knee movement can occur naturally as you lower. A universal rule that the knee must never pass the toes oversimplifies the movement; control, symptoms, load, and your proportions also matter.
A small forward inclination of the torso can be appropriate. Move as a controlled unit rather than rounding your back or diving your shoulders down to help you stand up. You do not need to pull your chest into an exaggerated upright position at the cost of arching your lower back.
Start with a shallow range if a deeper repetition is inconsistent. Once that range is comfortable, add depth gradually while keeping the same foot placement. A deeper lunge is a different training demand, even when the dumbbells have not changed.
Film a few bodyweight repetitions from the side and front if you want a form check for yourself. Look for a stable front foot, a back step that stays on its own track, and a return without a hop. A video can show movement patterns; it cannot diagnose the source of pain.
Are reverse lunges easier on the knees?
Some people find the backward step easier to control because the front foot stays in place. That can make a reverse lunge a useful option, but it does not mean the exercise is pain-free or appropriate for every knee.
A laboratory study of forward and backward lunges in 20 asymptomatic women found higher modeled patellofemoral loading measures during the forward lunge under the tested conditions. The authors specifically called for research in people with patellofemoral pain. That distinction matters: a biomechanics result in symptom-free participants is not a treatment guarantee.
Use your response to the exercise to guide the next step. If a bodyweight reverse lunge causes pain, stop the set. You can later reassess support, depth, and load if appropriate, but persistent pain, swelling, giving way, or symptoms that affect everyday activity deserve professional assessment.
Do not keep experimenting through sharp pain because an article called the movement “knee friendly.” An exercise name alone does not determine the right dose for your body.
Four common problems and how to adjust
You wobble on every backward step
Reduce the depth, use stable support, and pause at the top. Check whether the rear foot is crossing behind the front foot. Practice five backward step-taps per side before trying the full movement again. If stepping itself remains unreliable, use a stationary split stance temporarily.
Your front heel lifts
Slow down and check the step length. You may be lowering beyond the range you can manage with the heel grounded, or shifting too far forward as you rise. Reduce depth first. Avoid solving the issue by throwing your torso backward or lifting your toes to force all pressure onto the heel.
You spring forward off the back foot
Some rear-foot assistance is normal, but a large push can turn the return into a launch. Use a shallower lunge and focus on standing up through the front leg before bringing the back foot forward. If you need a hop to finish, the repetition is currently too demanding.
Your lower back takes over
Put down any weights and reduce the range. Keep your ribs and pelvis comfortably organized instead of flaring your chest upward. If you cannot find a comfortable position, stop the exercise. Back pain is not a requirement for training the legs and should not be treated as ordinary fatigue.
Beginner regressions that still teach the movement
You can make the exercise easier without abandoning the skill. The NSCA’s lunge coaching resource discusses stable support, reduced range of motion, and stationary foot placement as modification options. Choose the adjustment that addresses your actual limitation.
- Supported reverse lunge: hold a stable support lightly enough that your legs still do the work. Keep the same hand support on both sides when possible.
- Short-range reverse lunge: step back and lower only as far as you can return smoothly. Increase the bend gradually across sessions.
- Backward step-tap: practice placing and retrieving the rear foot without a deep bend. This is useful when the transition is the hard part.
- Stationary split squat: place the feet once and practice lowering and rising. Reintroduce the backward step after the split stance feels familiar.
Support is a training tool, not a score penalty. If it lets you use a consistent range and focus on the front leg, it may be the most productive option. You can reduce hand pressure later without simultaneously adding weight or extra repetitions.
If you want another lower-body pattern while learning the lunge, Workit’s goblet squat form guide covers a two-foot stance. You do not need to force one exercise to solve every training need.
Sets, reps, rest, and frequency
For a beginner, start with one or two sets of 5–8 repetitions per side. Use bodyweight or a supported version. Rest about 60–120 seconds between full sets, taking longer if your breathing, balance, or leg control has not recovered.
Count repetitions per leg clearly. “Eight per side” means 16 total lunges when alternating. Confusing total repetitions with repetitions on each leg can accidentally double the amount of work you intended.
Choose whether to alternate or finish one side at a time:
- Alternating: step back with the right foot, return, then step back with the left. This gives each front leg a brief break and requires switching the setup every repetition.
- Same side first: keep stepping back with the same foot until that side’s repetitions are complete. This can make the pattern easier to learn, but local fatigue builds more quickly.
Either approach works. Use the same format for several sessions so your log remains meaningful. If one side is clearly less coordinated, begin with it and match its controlled repetitions on the other side.
Two weekly sessions with recovery time between them are a reasonable starting arrangement. End sets with roughly two or three good repetitions still possible. Beginners do not need to reach failure, especially when fatigue would make the backward step less predictable.
How to add dumbbells without changing the exercise
First make the bodyweight version repeatable. A useful readiness check is completing your planned sets on both sides with steady balance, consistent depth, and no need to rush the return. There is no required bodyweight repetition record before adding load.
For the first loaded session, use light dumbbells held at your sides. Keep them close to your body and let your arms hang. The weights should not swing forward as you stand. Start with fewer repetitions than your best bodyweight set to see how the new load affects control.
If you need one hand for support, a single light dumbbell in the free hand is an option, but it adds an uneven loading demand. Record which hand holds it. Do not add that variation merely because it looks more advanced.
Workit’s guide to choosing dumbbell weight explains how to use technique and effort to choose a starting load. For reverse lunges, balance is part of that decision. A weight your legs could lift may still be too much for your current stepping control.
A simple progression over several sessions
Use a range of 6–10 repetitions per side once the movement is established. Keep the variation, depth, and rest reasonably consistent. Add a repetition when the previous session was comfortable and your recovery was normal.
- Establish the baseline: two sets of six per side with bodyweight and support if needed.
- Build repetitions: progress toward two sets of eight, then ten per side while retaining the same control.
- Change one demand: add a small amount of weight, reduce support, or increase depth. Choose one, rather than all three.
- Reset the repetitions: return to around six per side after adding the new challenge, then build again.
For example, you might complete six repetitions on both sides for two sessions, then seven, then eight. If the eighth repetition becomes a hop, keep seven as the working number. Progress is the repeatable work you can do, not the largest number you managed once.
If the smallest available dumbbell increase feels too large, keep the current weight. You can improve consistency, add a repetition within your range, or use a brief controlled pause near the bottom. Avoid making every repetition extremely slow just to manufacture fatigue.
Putting reverse lunges into a full workout
Place reverse lunges early enough that you can pay attention to foot placement. If they are your main lower-body exercise, do them after the warm-up. If a heavier squat or hinge is the priority, put lunges afterward and use a dose that accounts for the fatigue already present.
A simple full-body session might include a squat or hinge, an upper-body push, an upper-body pull, two sets of reverse lunges, and a short trunk exercise. You do not need several lunge variations in the same workout to make the session complete.
When you also want a separate hip-extension exercise, the glute bridge vs. hip thrust guide explains two options. Keep the combined lower-body workload manageable, particularly when introducing lunges for the first time.
A practical week could place strength sessions on Monday and Thursday, with easy walking on other days. If lunges leave you sore enough to alter your normal walking, reduce the next session’s volume. Soreness is feedback about the dose, not a target you must reproduce.
Record the details that make a set comparable
Write down the weight of each dumbbell, repetitions per side, number of sets, whether you used support, and any deliberate range limitation. “Two 10-pound dumbbells, two sets of eight per side, alternating” is clearer than “20 pounds, 16 reps.”
Add a short note only when it changes the next session: “Left side needed support,” “rear step crossed inward,” or “ready to try nine repetitions.” Avoid turning the log into a judgment about whether you worked hard enough.
Workit on the App Store offers workout programs and a journal with editable weights, reps, and sets. Use a consistent per-side convention so your recorded progress reflects the same exercise from one workout to the next.
Reverse lunge questions
Should the back knee touch the ground?
No. You can stop above the floor or at a shallower depth. A gentle touch to a padded reference may help some people repeat their range, but there is no need to kneel onto the floor or bounce out of the bottom.
Which leg am I training?
In the technique described here, the leg that stays in front does most of the lifting. If your right foot steps backward, the left leg is the front working leg. Both legs contribute, so use clear labels in your log rather than assuming the moving leg is the only one working.
Can reverse lunges build muscle?
They can contribute to a muscle-building program when the load, effort, total training, and recovery are appropriate. Bodyweight may be enough at first; later you may need added resistance. No specific lunge variation guarantees a particular body shape or rate of growth.
Why do they make me breathe so hard?
Doing repetitions on both legs takes time and uses several muscle groups. Longer sets, short rests, and rushed transitions increase the overall demand. Rest longer and use fewer controlled repetitions if breathlessness interferes with balance. Unusual breathlessness, dizziness, or chest symptoms call for stopping and appropriate medical attention.
Can I do reverse lunges every day?
Hard daily sets are unnecessary for a beginner. Start with two weekly sessions and observe recovery. Easy step-tap practice can be less demanding, but it should not quietly become another full workout. A repeatable weekly plan is more useful than soreness from adding too much too quickly.
Your first working set
Clear the floor, use bodyweight, and do five calm repetitions per side. Pause at the top. Keep the front foot planted and the backward step on its own track. If the return is smooth, repeat after a proper rest.
Build from that reliable baseline. Better balance, a more consistent depth, and an easier return are meaningful progress before the dumbbells get heavier.
Source note: The NSCA resource supports the discussion of lunge modifications. The linked biomechanics study explains why claims about knee loading need context. The sets, progression examples, and workout combinations are general training suggestions and are not a pain-treatment protocol.
Comments
One response to “Reverse Lunge: Backward-Step Form, Sets, and Beginner Progression”
[…] A lower-body exercise such as the reverse lunge. […]