
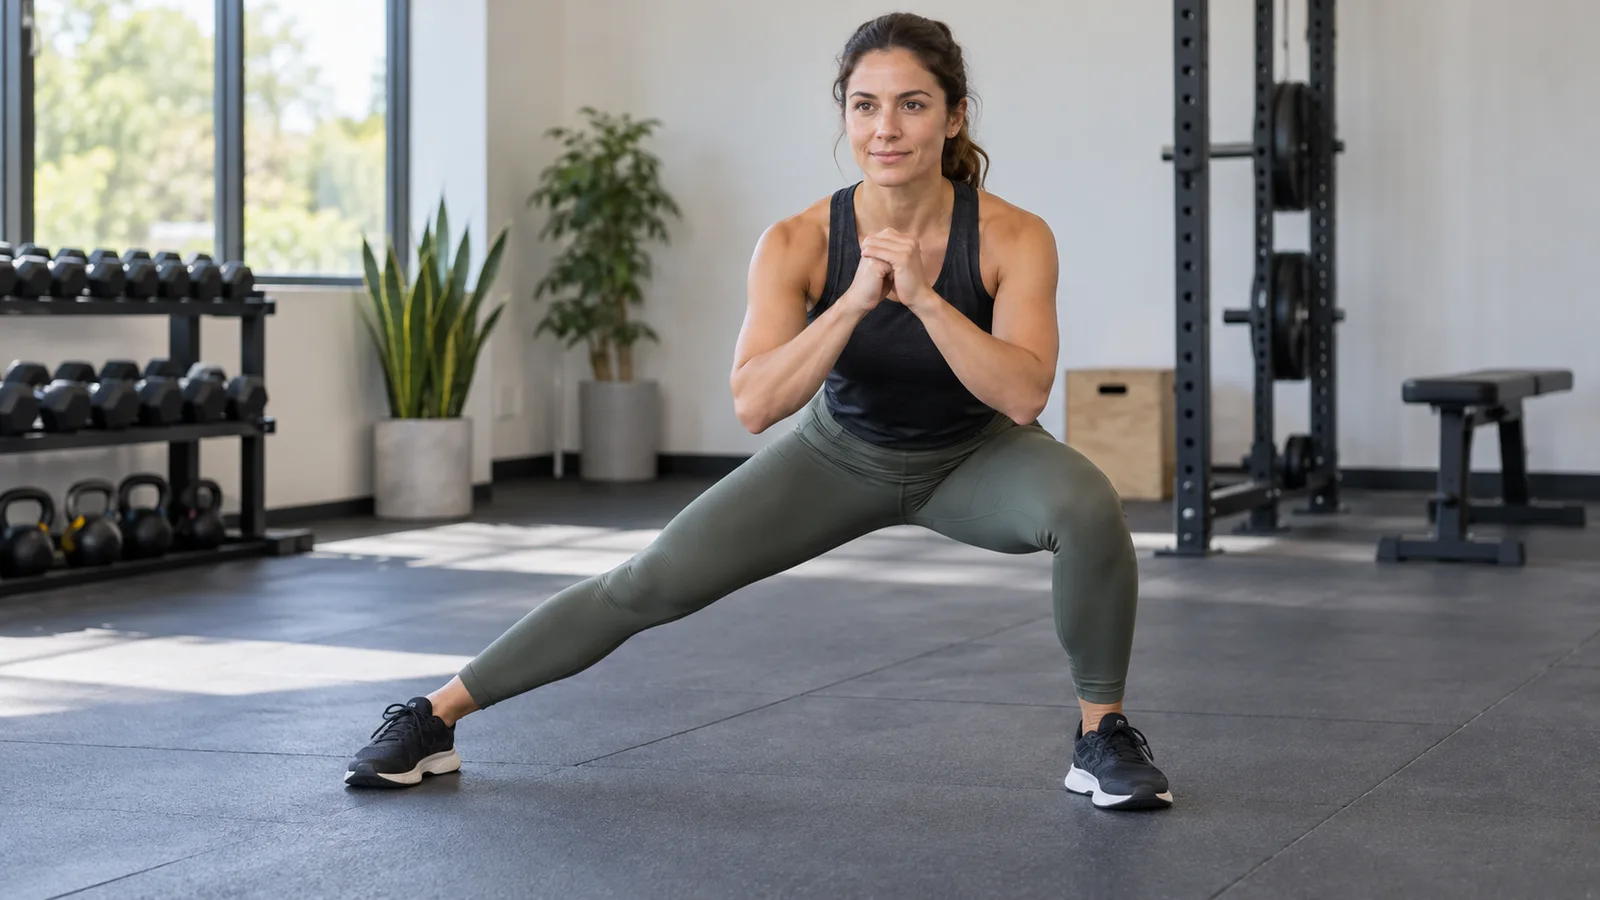
A lateral lunge is a sideways step followed by bending the stepping leg, sitting the hips back, and pushing through that foot to return to standing. Start with body weight, a comfortable step, and a shallow range you can control. Two sets of five to eight repetitions per side are a reasonable first practice session, with extra rest whenever balance or technique deteriorates.
Published October 14, 2026
The useful challenge is learning to accept your weight sideways without rushing. You do not need to reach the floor, use an unusually wide stance, or feel an intense inner-thigh stretch. This guide explains the movement, shows easier and harder options, and provides original sample sessions. The suggested sets and progressions are practical starting points, not a tested protocol or a substitute for individual instruction.
What makes a lateral lunge different?
In a forward or reverse lunge, the step travels mostly in front of or behind you. A lateral lunge, also called a side lunge, moves sideways. One knee bends while the other leg stays relatively straight, although it does not need to be forcefully locked. You then return to your starting stance.
That change of direction gives the exercise a distinct coordination demand. You must place the foot, shift into the hip, control the descent, and reverse the movement. A first session can therefore feel surprisingly awkward even if ordinary squats are familiar. Treat that as a reason to practice with less complexity rather than an instruction to add weight.
A stationary side-to-side weight shift is a useful related exercise, but it removes the stepping component. A deep Cossack squat typically uses a wider stance and substantially more depth, sometimes with the straight-leg toes lifting. Those are different choices. You do not have to turn a beginner lateral lunge into either one.
Which muscles does it use?
The bent leg’s quadriceps help straighten its knee, while the gluteal muscles contribute to returning the hip toward standing. Muscles around both hips, including the adductors on the inner thigh, participate as you shift and control your position. Your trunk also works to keep the torso organized while your base of support changes.
Exactly what feels most noticeable varies with step width, depth, load placement, familiarity, and individual proportions. Inner-thigh tension on the straighter leg does not mean you should force farther into the movement. Likewise, a strong burning sensation is not necessary evidence that a set was useful.
The American Council on Exercise’s side-lunge guide identifies the hips and thighs as the main target areas and highlights controlled foot placement. The practical aim here is a repeatable movement you can gradually challenge, rather than trying to isolate a single small muscle.
Set up a space that makes practice easier
Choose a level, non-slip surface with enough clear space on both sides. Keep pets, loose mats, dumbbells, and furniture out of the stepping area. Stable footwear is usually simpler than socks on a smooth floor. If using support, choose a fixed rail or securely anchored surface that will not tip or slide.
Begin with feet roughly hip-width apart and arms wherever they help you balance. Look ahead and slightly downward without forcing your chin up. Let your ribs sit comfortably over your pelvis. A gentle brace should still allow normal breathing.
Before the first set, walk or march for a few minutes, then try several small side steps and shallow weight shifts. This is a rehearsal, not a flexibility test. If the first repetitions feel stiff, use less depth and move gradually. You can decide whether a larger range feels appropriate after practicing.
How to do a lateral lunge step by step
- Stand tall. Start with an even, comfortable stance and both feet pointing mostly forward.
- Step to one side. Place the whole stepping foot securely before sinking into the movement. Choose a distance that lets you remain balanced.
- Shift back and across. Bend the stepping knee while moving the hips backward. The other leg stays relatively straight and its foot remains grounded.
- Stop at a controlled depth. Keep the bent knee moving broadly in the same direction as that foot. Allow a natural forward torso lean from the hips.
- Return smoothly. Press through the stepping foot and bring yourself back to the starting stance without bouncing or twisting.
- Reset. Regain balance before the next repetition. Repeat on that side or alternate sides with a pause between them.
You can breathe in during the descent and out as you return, or simply keep breathing comfortably. Avoid turning each repetition into a long breath hold. The pace should be slow enough to notice where your weight goes, but you do not need an exact number of seconds.
A useful first cue is “step, sit, stand.” Finish one part before rushing into the next. Once the sequence becomes familiar, the movement can become more fluid while remaining controlled.
How wide should the step be?
Start narrower than the widest position you can reach. Your ideal step is one that allows the bent-side foot to stay grounded, the knee to follow the foot, and the hips to move back without a sudden drop. There is no universal distance in inches because leg length, mobility, and comfort differ.
For a simple experiment, take a small step and perform three shallow repetitions. Rest, widen it slightly, and repeat. Choose the version that feels easiest to control. A larger step is not automatically a progression if it makes the return clumsy.
ACE specifically notes that stepping excessively wide can make knee alignment difficult. That is a good reason to check your stance before blaming your balance or assuming you need more stretching. Change one variable first. Reducing width and depth together temporarily is also reasonable when learning from scratch.
Do not force both feet into an exact angle if that feels unnatural. A small comfortable adjustment may help, but avoid twisting a planted foot under load. Persistent discomfort calls for individual assessment rather than continued experimentation.
Depth: earn a comfortable range
Your thigh does not have to reach parallel to the floor. Early repetitions may be only a shallow bend with a clear hip shift. Increase depth only while the entire movement, including the return, stays under control.
Watch for three practical stopping points: the bent-side heel starts to lift, the knee suddenly falls inward, or the torso collapses to reach farther. Those signs suggest that the current combination of width, depth, and difficulty is more than you can manage consistently. Make the movement smaller.
A stretch-like sensation can occur along the straighter leg’s inner thigh. It should not become sharp, pinching, or something you need to push through. This exercise is not a test of how much discomfort you can tolerate. Stop painful repetitions; seek qualified guidance if pain keeps returning.
If a mirror helps, use it briefly from a position that does not require turning your head during the movement. A short front-angle recording can also reveal changes in foot pressure or balance. Compare your own repetitions rather than copying another person’s exact depth.
Five common mistakes and practical fixes
1. Dropping straight down without shifting into the hip
If the movement feels like an awkward narrow squat, try a shallower repetition with the hips moving backward toward an imaginary chair behind the stepping side. You should not need to force the torso upright. A natural forward lean is part of many comfortable repetitions.
2. Reaching the foot too far away
A very long step can make it difficult to load the leg and return. Shorten the step enough that you can pause briefly at the bottom without wobbling. The objective is control over the usable range, not the largest footprint.
3. Letting the bent knee collapse inward
Check that the foot is fully planted and reduce depth. Think of the knee traveling in the general direction of the toes rather than driving inward or forcing it aggressively outward. If the pattern remains difficult, try supported stationary shifts first.
4. Pushing mainly from the straight leg
Some contribution from the other leg is normal, but avoid using it to bounce out before the bent leg does meaningful work. Slow the descent, pause briefly, and return with deliberate pressure through the stepping foot.
5. Adding weight before owning the return
A smooth descent is only half the repetition. If you stumble back, pivot, or need several small recovery steps, put the weight down. Practice returning to the same starting position with body weight before making the exercise heavier.
Easier versions when the step feels difficult
Supported stationary lateral shift
Stand in a moderately wide stance beside a secure support. Keep the feet planted and shift your hips toward one side while bending that knee. Return to center. This removes the challenge of landing a step and lets you explore a small range.
Use the support for balance rather than hanging your body weight from it. Start with four to six shifts per side and stop before the movement becomes rushed. You can reduce hand pressure gradually, but there is no deadline for removing support.
Shallow lateral lunge
Use the usual step-and-return pattern but bend the knee only a little. Keep the step modest. This can be a better next step than trying to make the stationary version deep immediately, because it practices the coordination you ultimately want.
Separate the step from the bend
Step sideways, pause with both feet stable, then shift into the bent leg. Return to an even stance before bringing the feet together. Breaking the movement into parts is useful when a continuous repetition feels hurried. Gradually shorten the pauses as the sequence becomes comfortable.
When and how to add resistance
Consider external load after you can repeat the same comfortable range on both sides without losing balance. A light dumbbell held close to the chest is one straightforward option. Keep enough room that the weight does not hit your thigh or change your foot placement.
Test the load for just a few repetitions. If it pulls your torso forward, shortens your range unexpectedly, or makes the return unstable, it is too much for that version today. Return to body weight or use a lighter implement.
You can also progress by making body-weight repetitions more consistent, adding a brief pause, or increasing a comfortable range. These changes are not interchangeable with heavier loading, but they provide useful practice when equipment is limited. Change one main feature at a time so you know what caused a difference.
For comparison, holding a weight at the chest also appears in our goblet squat form guide. The hand position may look familiar, but a lateral lunge adds a sideways weight transfer that deserves its own learning period.
A conservative first-session plan
Use this as an adjustable introduction if the movement is appropriate for you:
- Walk or march easily for three to five minutes.
- Practice four shallow stationary shifts per side.
- Perform one body-weight set of five lateral lunges per side.
- Rest about 60 to 90 seconds, or longer if needed.
- If balance and comfort remain good, repeat one set.
Count each side separately. Five right and five left repetitions equals ten total repetitions, not five. You can finish all repetitions on one side before changing or alternate sides. Choose the arrangement that makes concentration and counting simpler.
Finish with several controlled repetitions still available rather than testing your maximum. Our explanation of reps in reserve can help with effort language, although beginners do not need to estimate an exact number. “I could do a few more without changing my form” is enough for an introductory session.
A four-stage progression without a deadline
Stage one: learn the shift. Practice a supported or unsupported stationary version for one or two small sets. Move on when you can repeat it comfortably, rather than after an arbitrary number of days.
Stage two: add the step. Use two sets of five per side with a deliberate reset. Keep the range modest. Repeat this stage until both the landing and the return feel predictable.
Stage three: add repetitions. Build toward two sets of eight per side while keeping the same stance, depth, and pace. Adding one repetition per side to one set is a small enough change to evaluate.
Stage four: introduce a light load. Return to five or six repetitions per side with the new weight. You can then build again. If the available weight jump is large, continue practicing with the lighter option rather than forcing the next bell or dumbbell.
For example, a person who completes two comfortable sets of six might try seven in the first set and six in the second next time. If the final return becomes unstable, repeat the previous prescription. That is useful feedback, not a failed workout.
Where lateral lunges fit in a workout
Place them early enough that you can pay attention, usually after your general warm-up and before exhausting lower-body work. If another lift is the session’s priority, lateral lunges can follow it in a smaller dose. Avoid learning a new movement at the end of a breathless circuit.
Here is one example of a simple strength session: a squat variation, a row, a press, and then one or two controlled sets of lateral lunges. Alternatively, pair lateral lunges with the kettlebell deadlift for different lower-body movement patterns, while keeping the total session manageable.
You do not need every leg exercise in every workout. A two-day full-body plan can distribute movements across the week. CDC guidance recommends muscle-strengthening work covering major muscle groups on at least two days weekly; that is a whole-program recommendation, not a requirement to perform lateral lunges twice.
See the CDC adult activity guidance for the broader context. A single exercise does not fulfill every strength or aerobic need.
Lateral lunge, reverse lunge, or step-up?
Choose based on what you want to practice and what you can perform comfortably. Lateral lunges emphasize sideways stepping. A reverse lunge practices a backward step and split stance. A step-up introduces a raised surface and a different balance problem.
None is universally the best beginner choice. Someone with plenty of squat experience may enjoy learning lateral lunges; someone who finds sideways movement uncomfortable may prefer another option while getting advice. Exercise variety is useful only when the individual movements are manageable.
If choosing between them for a short session, select one and give it enough attention. You can keep that choice for several weeks before deciding whether a change would help. Constantly switching movements makes it harder to tell whether your control and capacity are improving.
What should you track?
Record the variation, sets, repetitions per side, and any external weight. Add a short note about support or depth when those factors change. “Body weight, two sets of six each side, shallow, light rail support” is more informative than writing only “lunges.”
It is also useful to note when one side needs a smaller range. Match the repetitions to the side that can do fewer controlled repetitions rather than automatically giving the other side a much larger workload. A marked, persistent difference or pain warrants individual guidance.
Progress might mean the same repetitions with steadier foot placement, less reliance on support, or a more comfortable return. It does not have to mean heavier weight each session. Look for a pattern across repeated practice rather than judging one unusually good or difficult day.
Frequently asked questions
Should I feel lateral lunges in my inner thighs?
You may notice inner-thigh effort or a mild stretch, but sensation varies. Do not chase a strong stretch by forcing a wider stance. Sharp pain, groin pinching, or discomfort that changes your movement is a reason to stop and reassess.
Can I use lateral lunges as a warm-up?
Yes, a few shallow, unweighted repetitions can be part of a warm-up if you already know the exercise and it feels comfortable. Keep them easy. A challenging loaded set is training work, even when it appears near the beginning of a workout.
How often should a beginner practice?
One or two modest sessions per week can be a starting point within a broader plan. Leave time to see how you respond before repeating hard lower-body work. Soreness is not a goal, and increasing frequency is unnecessary if your present schedule is working.
Do lateral lunges reduce inner-thigh fat?
They train a movement and its participating muscles; they do not allow you to choose where your body loses fat. Judge the exercise by control, strength practice, and how well it fits your routine rather than promises about changing one body area.
The practical takeaway
Begin with a comfortable sideways step, a small hip shift, and a controlled return. Build repeatable repetitions before depth or load, and use support when it makes practice more manageable. A few well-controlled sets are a more useful foundation than an aggressive first session you cannot comfortably repeat.