
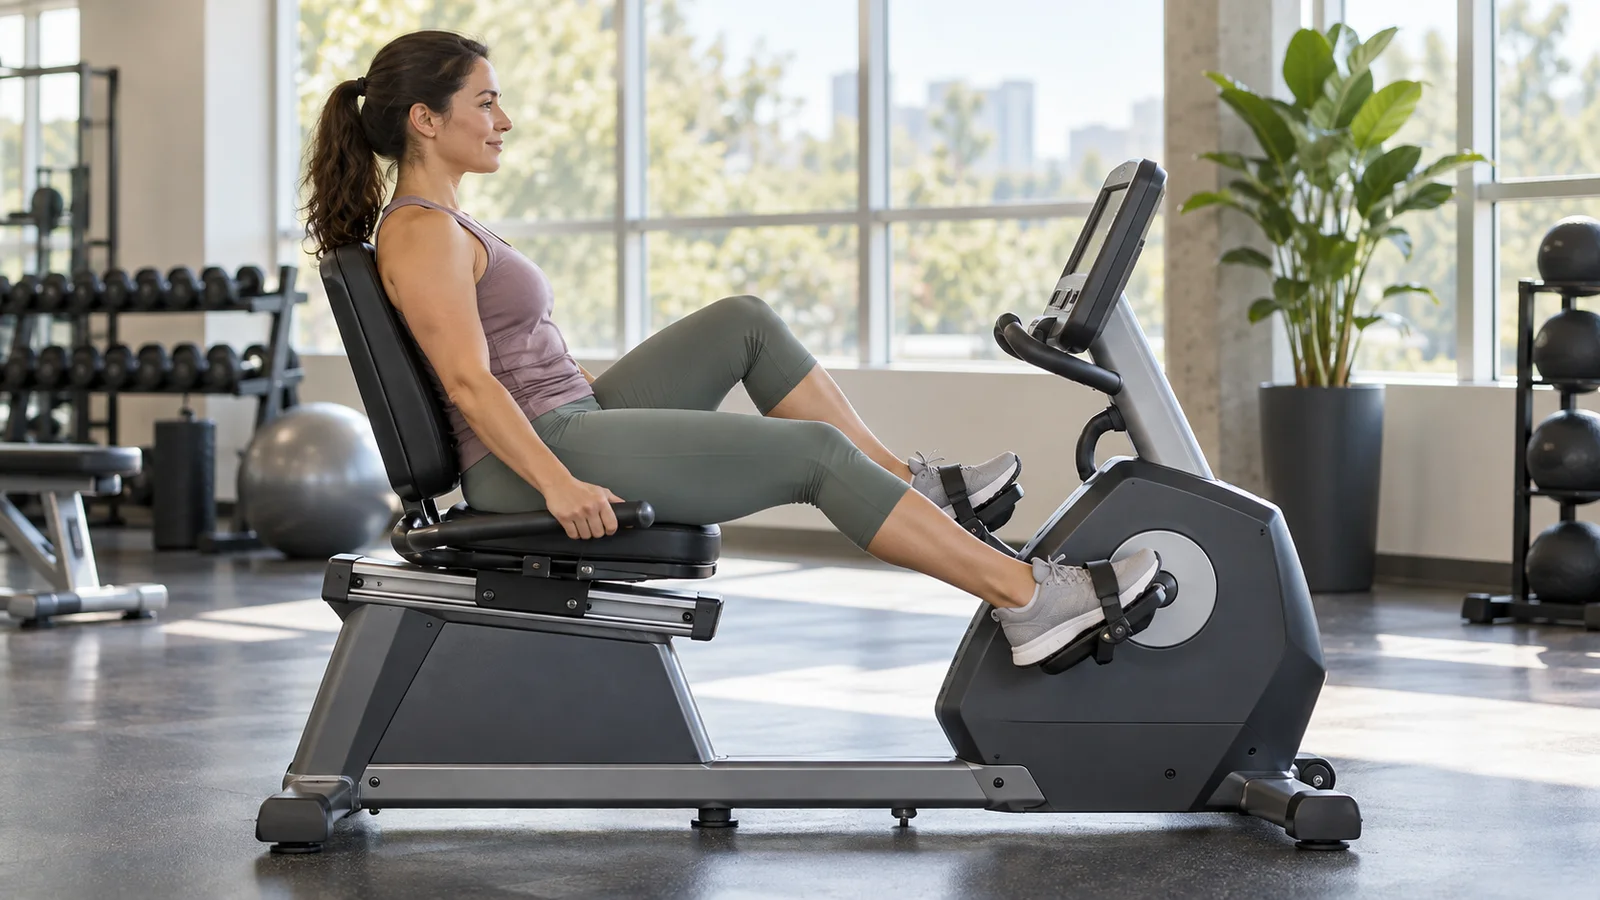
A beginner recumbent bike workout can start with ten to fifteen minutes of easy pedaling, including a gentle warm-up and cool-down. Adjust the seat so your knee stays slightly bent at the farthest pedal position, keep your back comfortably supported, and choose resistance that lets you pedal smoothly while speaking in full sentences.
Published:
The first goal is to find a setup and duration you can repeat comfortably. You do not need a high resistance level, a calorie target, or a hard interval session. If ten minutes is too much, a shorter easy ride is a reasonable place to begin.
This guide focuses specifically on recumbent bikes: the sliding seat, backrest, forward pedal position, and supported riding posture. It includes several complete beginner sessions and an adaptable progression. It is general fitness guidance, not a rehabilitation program or a substitute for instructions from your healthcare team.
What is a recumbent bike?
A recumbent exercise bike has a seat with a backrest and pedals positioned in front of you. Compared with an upright stationary bike, you sit farther behind the pedals and usually have more support for your torso. Many models also have a step-through frame and side handles.
That arrangement can make the bike appealing if you prefer a supported seated position. However, the presence of a backrest does not guarantee comfort, and the bike is not automatically appropriate for every person or medical condition. Seat fit, resistance, duration, and your own response still matter.
Recumbent cycling is generally described as low impact because it does not involve repeated foot strikes against the ground. Low impact does not mean no muscular effort or no force through the joints. You can make a recumbent ride easy or demanding, depending on how you pedal.
For a beginner, the supported position is useful only if you use it well. Sliding forward on the seat, reaching for the pedals, or pushing so hard that your hips rock can make an otherwise simple workout uncomfortable.
Set up the recumbent bike before starting
Check the bike and learn the controls
Choose a stable bike with intact pedals, straps, handles, and seat adjustments. Find the start, stop, and resistance controls before you begin. If you are using a gym model for the first time, ask staff to demonstrate the seat lock and how the console works.
Use the manufacturer’s instructions for that particular bike. Controls and adjustment mechanisms differ, and some consoles require pedaling to wake up. Keep loose clothing, shoelaces, and bags away from moving parts.
Adjust the seat distance
Sit against the backrest and place your feet on the pedals. At the point where one pedal is farthest from you, that knee should retain a slight bend. You should not need to straighten the knee forcefully or shift your pelvis forward to reach the pedal.
Life Fitness’s recumbent seat-adjustment guidance uses these same checks: a slight knee bend at fullest extension, no shifting in the seat, and a locked seat before pedaling. Stop the pedals before making adjustments; do not slide the seat while riding.
A seat that is too close can leave you feeling crowded at the top of the pedal stroke. A seat that is too far away can make you reach, point your toes excessively, or rock your hips. Change one setting at a time, then test a few easy revolutions.
Use the backrest without slumping
Settle your hips into the seat and let the backrest support you comfortably. Avoid perching on the front edge while your shoulders remain against the back pad. That position changes your effective reach to the pedals and can make the initial seat adjustment misleading.
If the backrest angle is adjustable, follow the machine’s instructions and choose a position that allows smooth pedaling and comfortable breathing. You do not need to flatten your lower back forcefully against the pad or hold a rigid, military-style posture.
Place your feet and relax your grip
Position each foot securely on the pedal, with the forefoot supported rather than only the toes. Adjust straps according to the bike’s instructions so they help retain your feet without feeling restrictive. Stop and loosen them if you notice pressure, numbness, or tingling.
Hold the side handles lightly if they help you feel steady. Do not pull hard against them to force the pedals around. Keep your shoulders relaxed and look forward rather than craning your neck toward a low screen.
Confirm the seat is locked
Before riding, check that the adjustment mechanism has fully engaged. A seat that moves unexpectedly can disrupt your position. If it will not lock reliably, use a different bike and tell staff or the manufacturer rather than trying to work around the fault.
Record the seat setting after you find a comfortable position. It is a useful starting point next time, although you should still check the fit rather than assuming that every bike’s numbered setting means the same thing.
Choose an effort you can repeat
For your first few sessions, use an easy pace that allows full sentences without needing to stop for breath. The bike should feel like activity, but you should not be straining to keep the pedals moving. Start below the effort you think you could manage for a short burst.
The CDC’s guide to exercise intensity describes moderate activity as an effort at which you can talk but not sing. It also places relative moderate intensity around five or six on a zero-to-ten effort scale. Beginners can spend time below that level while learning the bike and building tolerance.
Do not force your first session into a moderate-intensity category. A comfortable introduction is still useful practice. Over time, some of your steady riding may naturally reach a moderate effort without becoming breathless or frantic.
Resistance levels are machine-specific
Level three on one bike can feel different from level three on another. There is no universal beginner resistance setting. Start low, then make a small adjustment if the pedals feel uncontrolled or so light that your feet bounce.
At an appropriate easy setting, you should feel a smooth, manageable push through each revolution. If you have to brace hard against the backrest, hold your breath, or push in jerky bursts, reduce the resistance.
Cadence is a guide, not a test
Cadence is how many pedal revolutions you complete per minute. Some beginners find a comfortable rhythm around fifty to seventy revolutions per minute, but that is an example rather than a required range. Your bike, coordination, and comfort determine what is useful.
Do not chase a cadence number if it makes you bounce or lose control. Likewise, very slow, forceful pedaling is not automatically better for building strength. Start with a smooth rhythm and let speed become more consistent through practice.
Your first ten-minute recumbent bike workout
Use this session when you are new to the bike, returning after a break, or unsure how much riding feels comfortable. It includes all riding time; you do not need to add another warm-up on top.
- Minutes 0–3: pedal very easily at low resistance. Check that your hips stay settled and both feet remain secure.
- Minutes 3–7: continue at an easy, smooth pace. Increase resistance slightly only if the pedals feel too loose and the change remains comfortable.
- Minutes 7–10: ease the effort gradually. Finish with relaxed pedaling before allowing the pedals to stop.
You should finish feeling that you could have done a little more. If the session becomes harder than intended, reduce the resistance or shorten the middle section. Stopping at six or eight comfortable minutes is preferable to forcing the final minutes with poor control.
If ten minutes is beyond your current capacity, begin with about five easy minutes and reassess. The purpose of the first ride is to establish a useful starting point, not to prove that a published duration applies to you.
A fifteen-minute beginner steady ride
Once the ten-minute ride feels repeatable, try a slightly longer session without making it substantially harder. Keep the seat position and other settings familiar so duration is the main change.
- Four minutes easy: settle into the seat and find your smooth rhythm.
- Seven minutes steady: pedal at a comfortable effort that still allows conversation. Stay easy if moderate effort feels premature.
- Four minutes easy: reduce the effort gradually and finish without rushing to stand.
A steady ride does not mean the console numbers must remain perfectly constant. You can adjust resistance down if your legs become tired or the effort rises. The useful target is a controlled session, not an unbroken display of a particular speed.
Afterward, note whether the seat remained comfortable, whether your hips moved, and whether you felt ready for normal daily activities. These observations are more useful for planning the next ride than the machine’s calorie estimate.
A gentle twenty-minute interval option
Intervals can simply mean alternating a slightly more purposeful pace with easy recovery. They do not have to be sprints. Try this only after basic steady rides feel comfortable and you can adjust effort without losing your pedaling rhythm.
- Four minutes: easy warm-up.
- One minute: a little more purposeful, still controlled and conversational.
- Two minutes: return to easy pedaling.
- Repeat the one-minute and two-minute pair four times in total: twelve minutes of alternating effort.
- Four minutes: easy cool-down.
The total is twenty minutes: four minutes warming up, twelve minutes of intervals, and four minutes cooling down. Increase either resistance or cadence slightly during the purposeful minute, not both at once. There should be no need to grip the handles tightly or push through strain.
If the easy portion does not feel like recovery, make the purposeful minute easier or use a steady ride instead. Intervals are optional variety. You can build a consistent recumbent cycling habit entirely with steady sessions.
An adaptable four-week progression
The following schedule is a planning example, not a deadline. Repeat any week, shorten sessions, or return to an earlier stage if that better matches your response. Leave at least an easy or non-cycling day between early rides when helpful for recovery.
- Week 1: three rides of around five to ten minutes, mostly easy. Learn the seat adjustment and stopping controls.
- Week 2: three rides of around ten to fifteen minutes. Keep the effort similar while adding a little time.
- Week 3: three rides of around fifteen to twenty minutes if the previous week felt comfortable. One ride can remain shorter.
- Week 4: three rides of around fifteen to twenty-five minutes. Choose steady riding or replace one session with the gentle interval example.
For a twenty-five-minute steady ride, use five easy minutes, fifteen comfortable steady minutes, and five easy minutes to finish. That is an option for when shorter rides feel manageable, not the minimum amount required for success.
Increase one main variable at a time. Adding duration, resistance, and another weekly ride simultaneously makes it harder to tell what caused excessive fatigue or discomfort. A small change you can evaluate is more useful than a large jump you cannot repeat.
How often should beginners use a recumbent bike?
Two or three sessions per week can be a practical starting schedule. Choose days you can realistically repeat and allow room for recovery, walking, strength training, and other activities you enjoy. Daily riding is not required.
The CDC’s adult activity guidance recommends at least 150 minutes of moderate-intensity aerobic activity per week, or an equivalent combination with vigorous activity, plus muscle-strengthening activity on at least two days. That is a broader health target to work toward; it is not a first-week recumbent-bike assignment.
Short rides can help you build toward a more active routine. Easy familiarization minutes are not necessarily moderate-intensity minutes, and you do not need to pretend they are. Record them honestly and gradually build the time and effort that fit your circumstances.
Use the bike as one part of your week rather than the only activity that counts. Walking, other cardio options, and strength sessions can all contribute to a more varied routine.
What to track after each ride
A short log makes progress easier to recognize without turning every session into a performance test. Keep the details simple enough that you will actually record them.
- Duration: total riding time, including warm-up and cool-down.
- Bike and seat setting: useful for repeating a comfortable setup.
- Effort: easy, comfortable steady, or harder than intended.
- Control: smooth pedaling, stable hips, and relaxed grip.
- Response: how you felt afterward and before the next planned ride.
For example: “Fifteen minutes, seat seven, easy conversation, no hip rocking, ready for another similar ride.” That tells you more about the next step than a screenshot of distance alone.
Console calorie and distance figures are estimates that depend on the machine and its settings. Use them as optional reference points within the same setup rather than precise measurements of energy expenditure or outdoor cycling performance.
Notice what limits the ride
If your legs become tired while conversation remains easy, avoid assuming you need to pedal harder to make the session count. Try a slightly lower resistance and keep the rhythm comfortable. If breathing becomes harder than intended while your legs still feel fresh, reduce the overall effort rather than chasing the original speed.
These observations are practical workout feedback, not a way to diagnose a health issue. Write down what happened and repeat an easier session before increasing the workload. A good progression responds to how you actually ride, including how you feel afterward, instead of following console numbers without context.
Common beginner mistakes
Using the backrest as leverage for heavy resistance
Pushing hard enough that you brace forcefully against the seat can turn an easy cardio session into a grinding effort. Reduce resistance until you can pedal smoothly. The supported seat is there to support your position, not to justify a load you cannot comfortably manage.
Sliding forward during the ride
If your hips drift toward the front edge, your original seat setting no longer describes your actual reach. Stop, settle back into the seat, and reassess the distance. Persistent sliding may indicate that the position or bike does not suit you.
Trying to match another person’s settings
A nearby rider’s resistance, speed, or workout duration tells you little about what is appropriate for you. Their experience, body size, machine, and goals may differ. Choose settings from your own breathing and movement quality.
Skipping the easy finish
Give yourself a few minutes to reduce effort rather than abruptly ending a demanding section and immediately standing. Wait until the pedals have stopped before getting off, and use the bike’s support handles as intended. Take your time if you feel unsteady.
Progressing after one unusually good day
Repeat a comfortable session a few times before deciding it needs to become harder. A sustainable plan leaves room for days when sleep, stress, or other exercise affects your energy. Maintaining the current session can be the right decision.
Comfort, symptoms, and when to stop
General leg effort and increased breathing can be expected during cycling. Sharp pain, numbness, dizziness, chest discomfort, or unusual shortness of breath are reasons to stop. Seek prompt medical help for concerning symptoms, and emergency help for severe or potentially urgent symptoms.
If you have a health condition, recent surgery, an injury, or specific exercise restrictions, follow the advice of your healthcare professional. A recumbent bike’s supported seat does not make a generic internet workout a suitable rehabilitation plan.
For ordinary setup discomfort, stop pedaling before making a small adjustment. If discomfort returns despite a sensible setup and easy effort, do not keep experimenting through pain. Ask for individualized guidance or choose a different activity.
Pair cycling with a simple strength routine
Recumbent cycling gives you an aerobic option, but it does not cover every strength-training need. On other days, or in a short separate part of your session, practice familiar movements that challenge the major muscle groups.
A basic routine might include a sit-to-stand or squat variation, a pulling exercise, a manageable press, and a trunk-control movement. Choose exercises you know how to perform and keep the workload appropriate for your experience.
If you want a floor-based trunk exercise to consider, Workit’s bird-dog exercise guide explains setup and progressions. Add new exercises gradually rather than introducing a full strength circuit on the same day you substantially increase riding time.
When you need an indoor option without a bike, try the marching-in-place workout guide. Choose the version and duration that suit your balance and current capacity.
Frequently asked questions
Is fifteen minutes on a recumbent bike enough?
It can be a useful beginner session, especially if it is repeatable. Whether it is enough for a larger goal depends on your overall weekly activity, effort, and circumstances. Start with a manageable ride and build gradually rather than dismissing shorter sessions.
What resistance should a beginner use?
Use a low setting that allows smooth pedaling and comfortable conversation. There is no universal number because machines differ. Increase slightly only when the current setting feels uncontrolled or when you are ready for a small, deliberate progression.
Can a recumbent bike help with weight management?
It can contribute physical activity to a broader routine, but no specific ride guarantees weight loss. Avoid choosing your workout solely from a calorie display. Consistent activity, nutrition, recovery, and individual circumstances all affect longer-term outcomes.
Is a recumbent bike better than an upright bike?
It offers a different seated position and back support. The better option is the one that fits you, feels comfortable, and supports your goals. Neither design is automatically more effective for every rider or safer for every condition.
Start with a ride you can repeat
Adjust the seat, confirm the lock, and begin with easy pedaling. Keep your back supported, your hips steady, and your breathing comfortable. Add a little time only when the current session feels manageable, and let consistency guide the progression.
Explore Workit’s workout programs and fitness challenges. View Workit on the App Store.
Comments
One response to “Recumbent Bike Workout for Beginners: A Simple Plan”
[…] you want seated cardio that primarily uses your legs, compare the setup in our recumbent-bike workout for beginners. Neither machine is universally easier: comfort depends on your body, experience, and the specific […]