
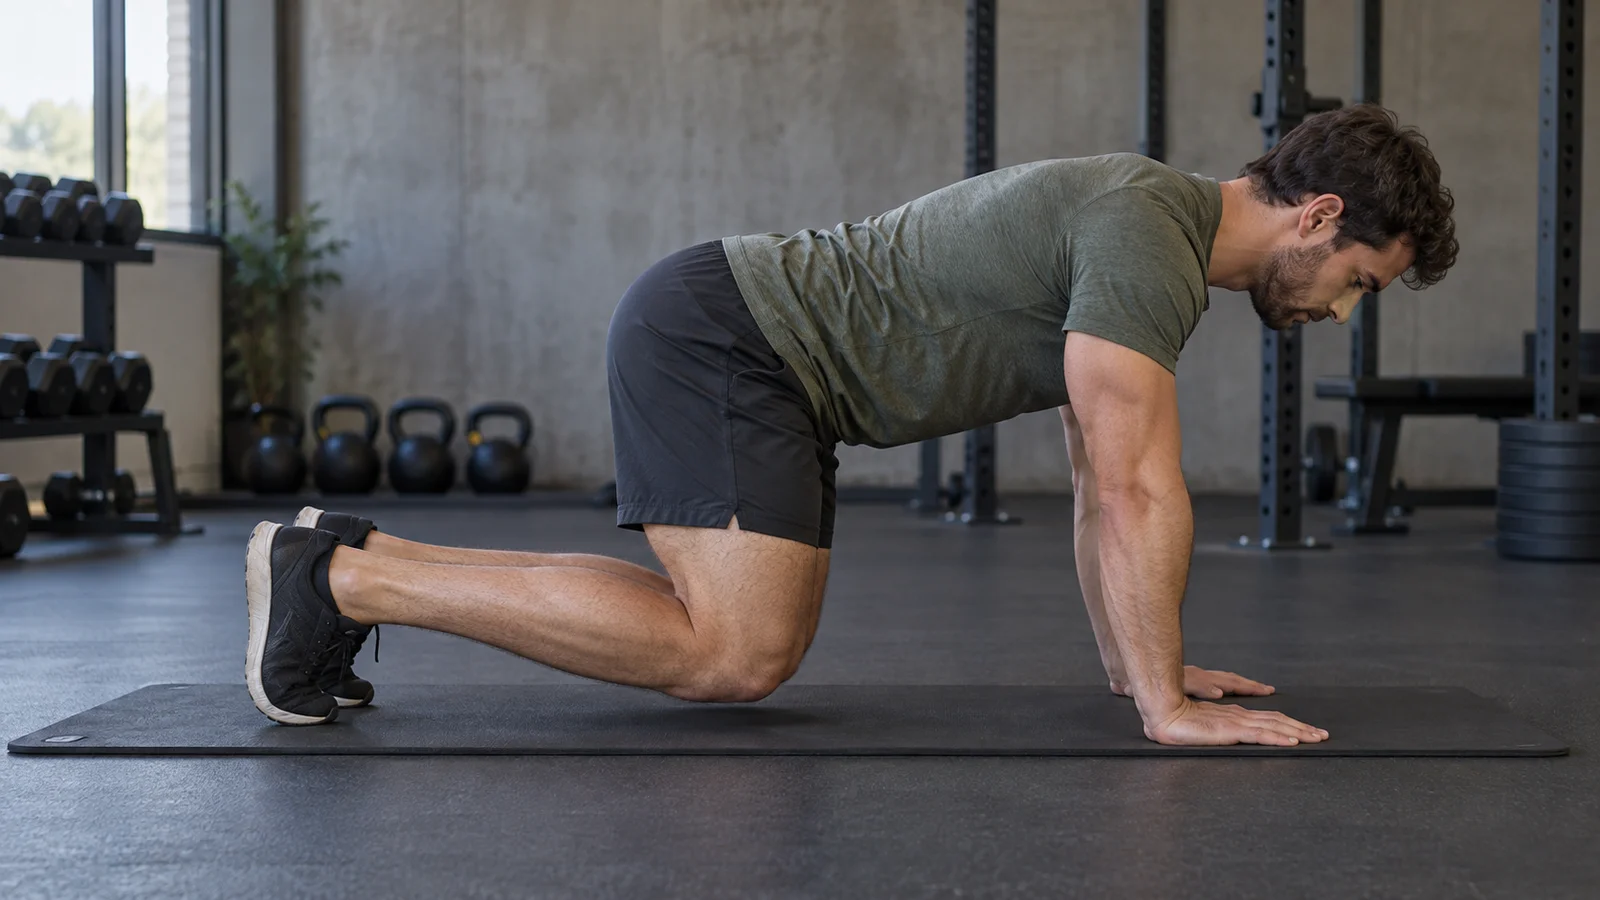
A bear plank is a hands-and-toes hold with your knees bent and hovering just above the floor. Start on all fours, place your hands under your shoulders and knees under your hips, brace your trunk, and lift your knees a small distance without raising your hips. Hold only as long as you can breathe and keep that position controlled.
Published:
The movement looks simple because very little moves. That is the point: your arms, legs, and trunk work together to maintain the hover. You do not need a long hold, a dramatic shake, or a complicated variation to get useful practice. A few clean seconds can be a better starting point than a minute spent gradually lifting your hips.
This guide explains bear plank form, muscles worked, beginner modifications, progressions, and ways to fit the exercise into a balanced workout. The examples are general fitness options, not a treatment plan for wrist, shoulder, knee, or back pain.
What makes a bear plank different?
In a standard high plank, your legs extend behind you. In a bear plank, your knees remain bent beneath your hips. Your hands and toes support you while your knees hover close to the floor. The shorter body position changes how the movement feels, but it still requires coordinated support through the shoulders and trunk.
The U.S. Masters Swimming dryland exercise guide demonstrates the same basic setup: hands below shoulders, knees below hips, and a small knee lift. You may also see the exercise called a bear hold, hovering tabletop, or quadruped hover.
A bear plank is usually stationary. A bear crawl adds steps. Shoulder taps and leg lifts also add movement, reducing the points of support while you try to control your body. Those are progressions, not parts you need to include in your first attempt.
The aim is not to freeze every natural movement. Your ribs move as you breathe, and a small amount of muscle tremor may occur. The useful question is whether you can maintain your intended position without pain, large shifts, or breath-holding.
Bear plank muscles worked
Your abdominal muscles contribute to keeping your trunk steady. Your shoulders and the muscles around your shoulder blades support your upper body. Your arms remain active, while your thighs help maintain the bent-knee hover. Your feet and toes provide the other contact points with the floor.
Because several areas are working together, you may notice fatigue somewhere other than your abdomen first. That does not automatically mean you are doing the exercise incorrectly. It may mean your shoulders, thighs, or tolerance for weight through the hands currently limit the hold.
- Abdominals and obliques: help control the trunk rather than repeatedly bending it.
- Shoulders and shoulder-blade muscles: help support your upper body against the floor.
- Arms: maintain a stable support position.
- Thighs: contribute to keeping the knees bent and elevated.
- Hips: help maintain the relationship between your pelvis and legs.
Muscle involvement is not the same as a guaranteed result. The bear plank can be one useful trunk-training exercise, but it does not selectively burn belly fat, guarantee visible abs, or replace a complete strength program. Avoid judging its value by how intensely one body part burns.
How to do a bear plank step by step
1. Choose a stable surface
Use a firm, non-slip floor with enough room to lower your knees comfortably. A thin exercise mat can cushion the setup, but a very soft surface may make your hands or feet less stable. Check that the mat will not slide as you press into it.
Wear shoes that grip the floor, or use another safe, non-slip setup that allows comfortable toe support. Loose socks on a polished floor are a poor match for an exercise that relies on your feet staying in place.
2. Establish the tabletop position
Place your hands approximately beneath your shoulders, with fingers comfortably spread. Position your knees under your hips and your feet about hip-width apart. Tuck your toes so the front of each foot can help support the hover.
Keep your gaze toward the floor a little ahead of your hands. Let your neck follow the line of your torso rather than lifting your chin to watch a timer across the room. If you use a timer, put it where you can hear it without turning your head repeatedly.
3. Find a manageable brace
Gently tighten your abdomen as though you are preparing to keep your torso steady during a small push. You should still be able to breathe. Avoid sucking your stomach inward as hard as possible or clenching every muscle before you have even lifted your knees.
Push the floor away enough that your chest does not sag between your arms. Keep your elbows comfortably straight without forcing them backward. Your shoulders should feel supported rather than shrugged tightly toward your ears.
4. Lift the knees a small distance
Press through your hands and toes and lift both knees just clear of the floor, roughly an inch or two if that suits your proportions. Keep your knees beneath your hips. The lift should be small enough that you remain in a bent-knee tabletop shape.
If your hips rise substantially, lower your knees and reset. You are not trying to make an inverted V. The height of the hover is less important than keeping a repeatable relationship between your shoulders, hips, and knees.
5. Breathe and hold briefly
Begin with around five to ten seconds, or only a few comfortable breaths if that is easier to monitor. Keep your hands and feet planted. End the hold before you have to shift your weight dramatically, hold your breath, or raise your hips to stay off the floor.
Lower both knees gently, release the effort, and rest. A controlled landing matters: do not collapse onto your knees when the timer sounds. Repeat only when you can recreate the same starting position.
A quick form checklist
Before counting seconds, check the shape. A short side-view recording can be useful if you have a safe place to set your phone. Review it afterward rather than twisting your head to look at the screen while holding.
- Hands are under or close to the shoulders.
- Knees stay bent and positioned beneath the hips.
- The knees hover close to the floor instead of climbing higher.
- The neck remains comfortable and the gaze stays down.
- The chest does not sink heavily between the arms.
- Breathing continues throughout the hold.
- The exercise produces effort without joint pain or other concerning symptoms.
You do not need to create a perfectly flat back. Bodies have natural curves. The practical goal is a stable, comfortable trunk position that does not change substantially as fatigue builds.
How long should you hold a bear plank?
Use the shortest hold that lets you practice consistently. For a beginner, two or three holds of five to ten seconds can be enough for a first session. Rest around twenty to forty seconds between attempts, or longer if your breathing and support muscles need it.
As the position becomes familiar, try two or three holds of ten to twenty seconds. Some people will comfortably build toward twenty to thirty seconds. You do not need to keep extending the timer indefinitely, and these ranges are examples rather than a universal test of fitness.
Choose a duration you can finish with control. If your hips rise at twelve seconds, an eight-second hold may be more useful than forcing yourself to reach twenty. Multiple short holds also give you repeated opportunities to practice the setup.
Keep track of total quality work. Three ten-second holds provide thirty seconds of controlled practice, with resets between them. That is different from a single thirty-second attempt that loses its shape halfway through.
Common bear plank mistakes and how to adjust
Lifting the hips too high
This often happens when you focus only on keeping the knees off the ground. Lower your knees, rebuild the tabletop position, and lift only enough to clear the floor. A smaller hover can make the intended shape easier to recognize.
If your hips still rise immediately, shorten the hold or return to a knees-down drill. There is no benefit to repeatedly practicing a different shape while calling it a bear plank.
Holding your breath
Some people create so much tension that they cannot breathe normally. Reduce the effort, lower the knees, and practice a gentle brace with breathing first. Counting a few breaths can help keep the focus on control, although you should not force unusually slow or deep breathing.
If you need to hold your breath to remain up, the current duration or variation is too demanding for this practice. Choose an easier version rather than treating breath-holding as proof of effort.
Rocking from side to side
Check that your feet and knees are not almost touching. A hip-width base usually gives you more room to balance. Also check that you have not placed one hand much farther forward than the other.
When a basic hold becomes steady, small weight shifts can be an intentional progression. Large, uncontrolled shifts during the basic version are a reason to reset.
Letting the chest collapse
Press the floor away gently and keep your upper body supported. This does not require rounding your entire back as much as possible. Think about maintaining space between your chest and the floor while allowing your shoulders to stay relaxed enough for normal movement.
Chasing a shaking finish
A small tremor can occur during effort, but shaking is not the objective. If it comes with a loss of position, slipping hands, or inability to breathe, end the hold. The last five seconds do not become more valuable simply because they look harder.
Beginner modifications
Knees-down tabletop brace
Keep both knees on the floor. Establish your hand position, gently support your chest, and practice maintaining your trunk position for several comfortable breaths. This removes the hover while preserving the setup you will use later.
Try two or three brief rounds. If even the knees-down position is uncomfortable through your hands or shoulders, choose another exercise rather than trying to force tolerance through pain.
Brief hover repetitions
Instead of one long hold, lift the knees for two or three seconds and set them down. Rest briefly, then repeat three to five times. Each repetition is an opportunity to lift without raising your hips.
Keep the lowering quiet and controlled. Do not bounce the knees off the mat or turn the exercise into a fast conditioning drill. Add a little holding time only when each lift looks similar.
A different trunk exercise
If hand support is the limiting factor, a floor exercise performed on your back may be a better fit. If you want to practice controlling the trunk while moving a limb, Workit’s bird-dog exercise guide explains another option, though it also places weight through the hands.
A modification should make the movement accessible, not disguise persistent pain. If symptoms continue, ask a qualified healthcare professional what activities fit your situation. You do not need to perform a bear plank to have a useful core routine.
Bear plank progressions
Progress only when the basic hover is comfortable, repeatable, and easy to end under control. Change one feature at a time. A longer hold, a smaller base of support, and moving limbs all add challenge in different ways.
Progression 1: More consistent holds
Before making the exercise more complicated, aim for the same knee height and breathing on every set. For example, repeat three fifteen-second holds without the final one becoming noticeably different. Consistency is a meaningful improvement even when the timer does not change.
Progression 2: Gentle weight shifts
From the hover, shift a small amount of pressure toward one hand and then the other without lifting either hand. Keep the movement slow and your hips mostly level. Return both knees to the floor before fatigue changes the shape.
This introduces a small coordination challenge without immediately removing a support point. A few controlled shifts are enough; there is no need to sway across the full width of your stance.
Progression 3: Brief hand lifts
With feet slightly wider if needed, momentarily lift one hand a very small distance and replace it. Alternate sides for a few repetitions. Keep the knee hover low and resist a large twist through your torso.
If you cannot lift a hand without tipping, return to the weight-shift version. Avoid adding a shoulder tap until the hand lift itself is controlled. Reaching farther is not automatically better.
Progression 4: Short bear crawls
A crawl adds coordinated steps and requires clear, non-slip floor space. Take small steps while maintaining a low hover, and stop before the movement becomes rushed. Learning the stepping pattern separately can be useful before combining it with sustained effort.
Do not use backward crawling in a crowded area where you cannot see obstacles. Keep advanced loaded or unstable-surface variations out of a beginner progression unless you have appropriate instruction and a clear reason to use them.
A simple practice plan
The following stages are examples. Move forward based on control rather than the date on a calendar, and repeat a stage as long as it is useful.
- Learn the setup: two or three knees-down breathing rounds, followed by three brief hovers if comfortable.
- Build short holds: three holds of five to ten seconds, with generous rest.
- Repeat a longer hold: two or three holds of ten to twenty seconds while preserving the same position.
- Add one small challenge: use a few weight shifts or hand lifts instead of adding more holding time.
Practice on two or three days within your broader routine if recovery and comfort allow. Hard daily holds are not necessary. If your wrists or shoulders are already fatigued from other exercises, use shorter practice or choose a different day.
Write down the version, hold duration, number of sets, and one quality note. “Three ten-second holds, breathing steady” is more useful than “core destroyed.” The note helps you make a sensible adjustment next time.
Where to put bear planks in your workout
A few easy hovers can be used during a warm-up to rehearse body control, provided they do not tire you out before the main session. More challenging holds can go later as a small piece of trunk training. Avoid turning the warm-up into a maximal endurance test.
For a simple full-body session, perform familiar lower-body, pushing, and pulling exercises, then finish with two or three bear-plank holds. Rest enough between exercises to maintain quality. A circuit is optional; moving continuously is not required.
Do not place demanding bear planks immediately before a movement that already challenges your hands or shoulders if the fatigue makes that movement less controlled. The exercise order should support the session’s main goal.
A short standalone practice session
- One minute of comfortable walking or other easy movement.
- Two knees-down tabletop rounds of a few breaths.
- Three bear-plank holds of five to fifteen seconds, resting as needed.
- A brief check of how your hands, shoulders, and trunk feel before finishing.
This is skill practice, not a complete workout. You can stop after it without adding a punishing finisher. A small session that you can repeat comfortably may fit better than an elaborate routine you avoid.
For another floor-based abdominal movement, the reverse crunch guide covers controlled pelvic movement while lying on your back. It has different demands from supporting your body through your hands.
Bear plank versus regular plank and bear crawl
The regular plank uses straighter legs and a longer body position. The bear plank keeps the knees bent beneath the hips. Either can be challenging, and people differ in which feels more manageable. Do not assume that one is always the beginner exercise and the other is always advanced.
A forearm plank changes the support position again. It can reduce the amount of wrist extension compared with a hands-supported plank, but it is still a different exercise with its own demands. It is not an automatic solution for shoulder or back symptoms.
The bear crawl adds travel and coordination. It may fit a movement circuit, whereas a stationary bear plank is easier to contain in a small space. Choose based on the skill you want to practice rather than which variation looks more impressive.
Frequently asked questions
Why do I feel bear planks in my thighs?
Your thighs help maintain the bent-knee hover, so leg effort is expected. Check that your knees remain under your hips and that you are not lifting them excessively high. Feeling the thighs does not mean your abdominal muscles are doing nothing.
Are bear planks good for belly fat?
They are a trunk-training option, not a way to choose where body fat is lost. Use them for the movement skills and muscular work they provide. Body-composition changes depend on broader factors and cannot be guaranteed by adding one exercise.
Should my knees be exactly two inches off the floor?
No exact height is required. Lift just enough to clear the floor while maintaining the bent-knee position. Body proportions, footwear, and the surface affect the visible gap. A small, steady hover matters more than measuring it precisely.
Can beginners do shoulder taps immediately?
There is no need to. First establish a stable two-hand hold. Brief hand lifts offer a smaller next step than reaching all the way to the opposite shoulder. Return to the basic hold if tapping causes a large twist or loss of balance.
What if my wrists hurt?
Stop the exercise rather than pushing through wrist pain. Check whether simple positioning or a different exercise is more comfortable, and seek professional guidance for persistent symptoms. Do not use a new grip or piece of equipment to ignore pain that remains unexplained.
Make the next hold a better one
Begin with a low knee hover, a manageable brace, and steady breathing. Keep the hold short enough that you can finish as deliberately as you started. Progress by improving control first, then adjusting time or movement when you are ready.
Explore Workit’s workout programs and fitness challenges. View Workit on the App Store.
Comments
One response to “Bear Plank: Proper Form, Hold Times, and Progressions”
[…] a separate bodyweight exercise that practices holding your trunk steady, see our beginner bear-plank guide. Choose a comfortable version rather than adding fatigue before a demanding […]