
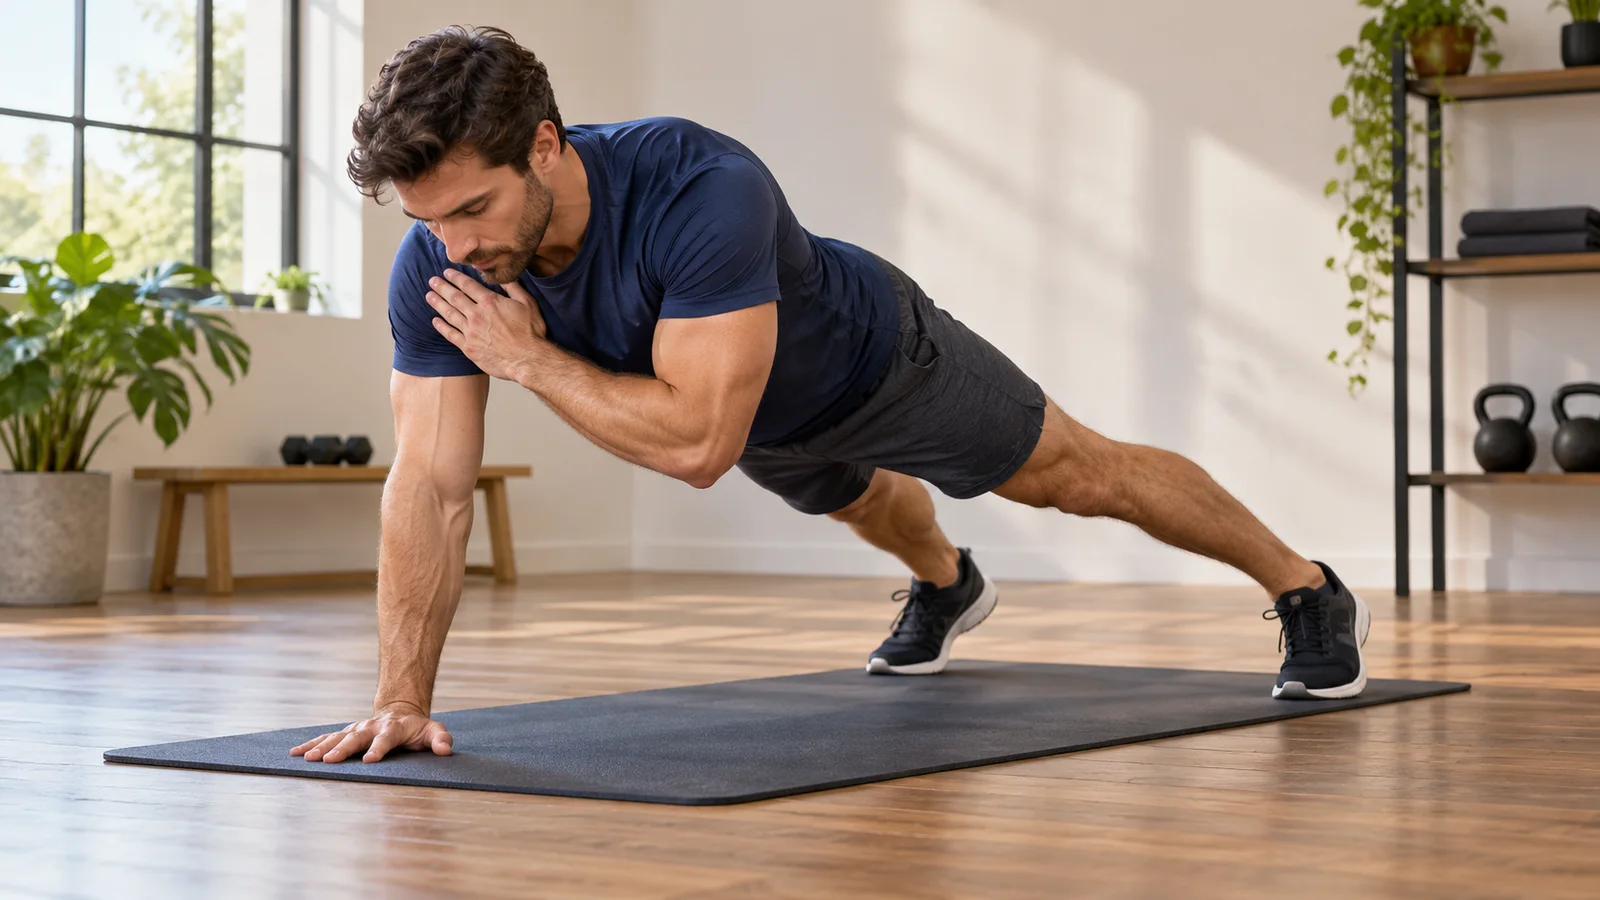
Plank shoulder taps are a high-plank exercise in which you lift one hand, touch the opposite shoulder, and return the hand to the floor before switching sides. Keep your feet comfortably wide, move slowly, and limit how much your hips turn. The goal is a controlled weight transfer while your trunk stays reasonably steady.
If the floor version makes you twist, rush, or strain your wrists, put your hands on a secure elevated support. Start with two short sets of six total taps, meaning three touches with each hand. Choose the version that lets you replace each hand quietly and breathe throughout the set.
Published October 19, 2026. This is general exercise education for healthy adults, not a diagnostic test or rehabilitation program.
What shoulder taps add to a plank
A stationary high plank gives you four main contact points: two hands and two feet. Lifting a hand changes that support pattern. Your trunk and hips have to manage the change while the opposite arm supports more of the upper body.
This is commonly described as an anti-rotation task. Your hand moves, but you try to avoid letting that movement turn your whole body. There is also an anti-extension demand: keep the lower back from progressively sagging as the set continues.
A little weight transfer is normal and necessary. Trying to freeze your body so completely that you cannot lift a hand misses the practical aim. You are looking for small, deliberate adjustments rather than a large side-to-side swing.
What the evidence supports
An NSCA article on shoulder taps describes their trunk, hip, and shoulder-stability demands and controlled alternating execution. It also acknowledges limitations in using the movement as a screening tool. A difficult set does not diagnose a weak muscle, predict an injury, or establish that your spine is unstable.
For training, the useful question is simpler: can you perform a comfortable version with repeatable control, and can you gradually improve it? Treat changes in your own execution as practice feedback. Avoid turning a single shaky repetition into a medical conclusion.
Which muscles are involved?
Your abdominal wall, including the obliques, helps manage trunk position as the supporting side changes. Muscles around the shoulders and shoulder blades support the upper body, and the triceps help maintain the supporting arm. Your glutes and legs contribute to keeping the pelvis and lower body organized.
You may feel the shoulders working more than expected. That is understandable because this is a weight-bearing arm position, even though it is often listed as a core exercise. It is not an abdominal isolation exercise, and it does not need to produce a strong abdominal burn to be useful.
The movement also asks your hands and wrists to tolerate pressure. A version that is manageable for your trunk can still be too demanding for your wrists or shoulders. Choose the variation according to the whole task rather than deciding that your abs should be strong enough.
Choose your starting level before counting repetitions
Level 1: Hands against a wall
Stand facing a solid wall and place your hands near shoulder height. Step back a comfortable distance and establish a straight, supported body position. Shift gently toward one hand, lift the other just enough to touch the opposite shoulder, and return it to the wall.
Start close enough that the pressure through your arms feels modest. Use a nonslip floor and keep your feet planted. A wall version is an exercise option in its own right, especially when you are learning the sequence or returning to general training after a break.
Level 2: Hands on a secure raised surface
Use a fixed, weight-bearing counter or a stable exercise bench designed for the task. Test the support before stepping back. Avoid wheeled chairs, folding furniture, glass surfaces, or anything that might slide, tip, or detach when you lift a hand.
The higher support changes your body angle and usually reduces the demand compared with a floor plank. Keep your body in a long line rather than bending at the hips to reach the surface. If your feet slide as you tap, stop and correct the setup.
Level 3: Knee-supported floor taps
Place your hands under your shoulders and your knees on a comfortable mat, then position your body in a line from head through hips to knees. Keep the knees on the floor as you alternate touches. Avoid sitting the hips back toward the heels, which changes the task substantially.
This can be a useful option when a suitable elevated support is unavailable. It is not compulsory to use it between a wall and full plank. Choose the arrangement that is comfortable for your joints and allows the clearest control.
Level 4: Full high-plank taps
Support yourself on both hands and the balls of your feet, with your legs extended. Set the feet roughly shoulder-width apart or a little wider if helpful. A narrow stance adds a balance challenge, so there is no need to start with the feet touching.
If you are still learning the high-plank position, the push-up progression guide explains how elevated hand positions can make upper-body support more manageable. You can practice the setup without adding a push-up to every tap.
How to do a controlled plank shoulder tap
1. Build the starting position
Place your hands about shoulder-width apart, with the shoulders approximately over the hands. Spread your fingers comfortably and press through the whole hand rather than concentrating all pressure in one small area. Set your feet wide enough to provide a dependable base.
Look toward the floor or support in front of your hands so your neck follows the line of your torso. Gently tighten the abdomen and glutes while continuing to breathe. Keep the hips near the line between shoulders and heels rather than lifting them into a pronounced pike.
2. Shift a little before lifting
Transfer enough weight onto the left hand to make the right hand light. Do this slowly. Your body may move a small amount toward the supporting side, but the pelvis should remain generally facing the floor.
If the first hand lift immediately makes you roll onto the side of a foot, widen your stance or use a higher support. Trying to fix a poorly matched starting level by moving faster usually makes the set harder to evaluate.
3. Touch the opposite shoulder gently
Lift the right hand and touch the left shoulder lightly. A brief touch is enough. Keep the reach compact rather than throwing the arm across your chest or lifting the elbow as high as possible.
The contact itself is not the training goal. If reaching the shoulder is initially too difficult, practice lifting the hand a small distance and replacing it. That shorter task lets you work on the weight transfer without adding a hurried reach.
4. Replace the hand before switching
Return the right hand to its starting spot and let both hands share the load again. Then shift toward the right hand, lift the left, and touch the right shoulder. Keep alternating only while the placement and body position remain controlled.
Think of placing your hand quietly rather than slapping the floor. A short pause with both hands down helps prevent a continuous rocking rhythm. Let your breathing flow through the pauses and taps instead of trying to hold one breath for the whole set.
5. End the set deliberately
When control begins to fade, return both hands to support and lower your knees before coming out of a floor plank. For an elevated version, step closer to the support before standing upright. The final transition should be as controlled as the first.
Count taps clearly
One hand touching the opposite shoulder counts as one tap in this guide. A right-hand touch followed by a left-hand touch equals two total taps. Six total taps therefore means three with each hand; ten total taps means five with each hand.
Some workout plans count a left-and-right pair as one repetition. That convention is also workable, but it doubles the number of individual touches compared with our convention. Always write “total taps” or “per side” in your log so you know which target you used.
For example, two sets of eight total taps produce sixteen touches for the session, eight with each hand. Two sets of eight taps per side produce thirty-two touches for the session. Those sessions are meaningfully different even if a hurried note calls both of them “2 × 8.”
Repetition targets versus timed sets
A repetition target is often easier while learning because you can pause and reset between taps. A timer may tempt you to keep moving after your position has deteriorated. If using time, treat it as a maximum practice window and stop early whenever control is lost.
At roughly three seconds per tap, eight total taps take about 24 seconds. The pace is illustrative, not a performance standard. Someone who uses a longer reset may need more time for the same number, and that can be entirely appropriate.
How steady should your hips stay?
Aim to keep the front of the pelvis generally facing the floor. Small shifts do not make the repetition useless. Larger rotation, repeatedly lifting a foot, or needing to rush the hand back to catch yourself suggests that the version or set length is too demanding.
A short video taken from behind at a slight angle can show whether the waistband turns substantially with each touch. A side view can help you notice a sagging back or rising hips. Put the phone safely out of the movement area and review the recording between sets rather than craning your head toward it.
Choose one observation at a time. For one set, focus on quiet hand placement. For the next, watch whether the feet stay planted. Trying to correct five things during every repetition can make the movement more tense without making it clearer.
You do not need to balance a glass, plate, or other object on your back to prove steadiness. Those props can distract you and create an unnecessary cleanup or injury hazard. A stable setup and a simple visual check provide more useful feedback.
Common problems and their fixes
Your hips swing from side to side
Widen the feet slightly and slow the transition. If that does not help, elevate the hands or return to small hand lifts. Reduce the number of taps so you stop while the pattern is still organized. A shorter clean set is a useful training dose.
Your hips rise higher with every tap
Reset the plank line and shorten the set. If you immediately return to the elevated-hip position, choose an easier level. Raising the hips may make it easier to unload a hand, but it changes the position you are trying to practice.
Your lower back sags
Return both hands to the support, lower the knees, and rest. Start the next set with an easier angle or fewer taps. Think about keeping the ribs and pelvis organized together instead of squeezing the abdomen as hard as possible while continuing to sag.
Your supporting shoulder collapses
Use a higher support and press gently away from it through the supporting hand. Avoid letting the chest sink toward that shoulder as the opposite hand lifts. If this position feels painful or unstable even at an easier angle, stop the exercise and seek individual guidance.
Your wrists hurt
Stop the set rather than trying to ignore the discomfort. An elevated version may be more comfortable, but it should still be pain-free. Do not automatically switch to knuckles or balance on loose dumbbells; those arrangements introduce different pressure and stability demands.
If loading through your hands remains uncomfortable, a non-hand-supported exercise may be a better option. The dead bug guide offers a different way to practice trunk control while lying on your back. Persistent wrist pain deserves assessment rather than repeated experimentation under load.
You cannot breathe and stay steady
Reduce the demand until you can take ordinary breaths. Try fewer taps, a higher support, or a brief static hold. Bracing should help you organize the position; it should not require holding your breath until the set ends.
A four-week beginner progression
Choose a comfortable version and practice it twice weekly on nonconsecutive days. Begin each session with easy general movement and a short rehearsal of the supported plank. Rest approximately 45 to 75 seconds between tap sets, taking longer if breathing or shoulder fatigue has not settled.
- Week 1: Two sets of six total taps per session. That is twelve taps per session and 24 per week, with twelve weekly touches by each hand.
- Week 2: If control is consistent, use two sets of eight total taps. That is sixteen per session and 32 per week, with sixteen weekly touches by each hand.
- Week 3: Work toward two sets of ten total taps. That is twenty per session and 40 per week, with twenty weekly touches by each hand.
- Week 4: Repeat week 3, or try a slightly lower secure support and return to two sets of six total taps. Do not lower the support and add taps in the same session.
This is an illustrative practice plan, not a validated shoulder-tap protocol. Repeat a week whenever needed, and keep the easier version if it suits your goals. A lower support is only a useful progression when you can preserve the movement quality that made the previous version productive.
The ACSM’s 2026 resistance-training update emphasizes consistent participation and notes that complex training methods are not consistently needed for the average healthy adult. Apply that principle here by making the exercise repeatable before making it more elaborate.
Ways to progress after the basics
Lower the hand support gradually
Move from a higher fixed surface to a lower stable exercise support when the current version feels comfortably controlled. Check the new setup first and reduce the tap target. Surface height changes the exercise enough that a new baseline is sensible.
Use a slightly narrower foot position
Once floor taps are consistent with wide feet, bring them a little closer while keeping the same short set. Make a small adjustment rather than moving directly to feet together. The ability to handle a narrower stance is optional, not a requirement for calling the exercise successful.
Add a brief controlled pause
A short pause with the hand near the shoulder increases the time you manage the asymmetrical support. Start with fewer total taps. Do not add a pause if it causes breath-holding, major twisting, or a hurried hand return.
Keep other variations separate
The bear plank guide covers a bent-knee hovering position with a different setup. Shoulder taps can eventually be added to some other plank variations, but changing knee position, hand support, and foot width together makes the task harder to compare. Learn each arrangement separately.
Where shoulder taps belong in a workout
If you want to practice a controlled diagonal resistance pattern instead of supporting your body on one hand, our cable woodchop guide explains a standing alternative. The two exercises ask different things of the trunk, so select one for a clear purpose rather than adding extra work automatically.
Use them early enough that you can pay attention to the weight transfer, or after your main exercises if you still have good shoulder control. They can fit near the end of a full-body session as a short trunk-control exercise. They do not need to become a high-speed finisher.
Consider the work your arms have already done. Several hard sets of push-ups or overhead pressing may leave the supporting shoulders tired. On that day, a higher support or a different trunk exercise may be more useful than insisting on your usual floor version.
For a brief practice session, rehearse a comfortable plank, perform two sets of six to eight total taps with adequate rest, and finish. For a larger strength workout, add that same small dose rather than automatically doubling it. Practice quality should remain similar whether the exercise stands alone or follows other training.
Shoulder taps do not cover every fitness goal. Keep suitable lower-body training, pulling movements, and aerobic activity in the broader plan. A few controlled touches can be a helpful component without being a complete workout by themselves.
Questions before your next session
Are shoulder taps better than a regular plank?
They create a different challenge. A static plank lets you practice holding position with both hands supported; taps add a changing support pattern. Use the version that matches your current control and the purpose of the session. You can keep both without treating one as obsolete.
Should I do them as fast as possible?
For learning trunk control, use a pace that lets you place each hand deliberately. Moving faster may increase the number on a counter while making the body sway more. If speed is part of a sport-specific plan, it should be introduced with appropriate coaching and a clear reason.
Can I do them every day?
Daily hard sets are unnecessary for a beginner. Two separated practice days make it easier to observe recovery and maintain quality. If wrists or shoulders remain tired, allow more recovery or reduce the dose rather than adding extra daily work.
Will they remove belly fat or fix back pain?
Do not expect shoulder taps to selectively remove fat from the abdomen or treat an undiagnosed back problem. They train a movement-control task. Pain, recent surgery, or a known condition affecting weight-bearing exercise calls for individualized advice about whether this exercise is appropriate.
What if one side is shakier?
Use the easier level that both sides can manage and keep the count balanced. A difference may reflect coordination, fatigue, or other factors; it is not a diagnosis. If one side feels painful, unstable, or markedly different over repeated sessions, seek qualified assessment.
Record the variation as well as the taps
A useful entry might read “hands on fixed counter, feet shoulder-width, two sets of eight total taps, quiet hand returns.” Without the support height and counting convention, the repetition number alone tells you little. Record a level change as a new comparison rather than assuming fewer taps means lost progress.
If you prefer a training app, Workit for iPhone offers personalized workout programs and a workout journal with editable weights, reps, and sets. Keep your own variation notes clear, and let steady, comfortable execution guide the next step.
Comments
One response to “Plank Shoulder Taps: Form, Easier Variations, and a Beginner Plan”
[…] option that emphasizes resisting trunk rotation rather than guiding a diagonal cable, try plank shoulder taps. Choose the version that fits your available equipment and comfortable shoulder support; you do not […]