
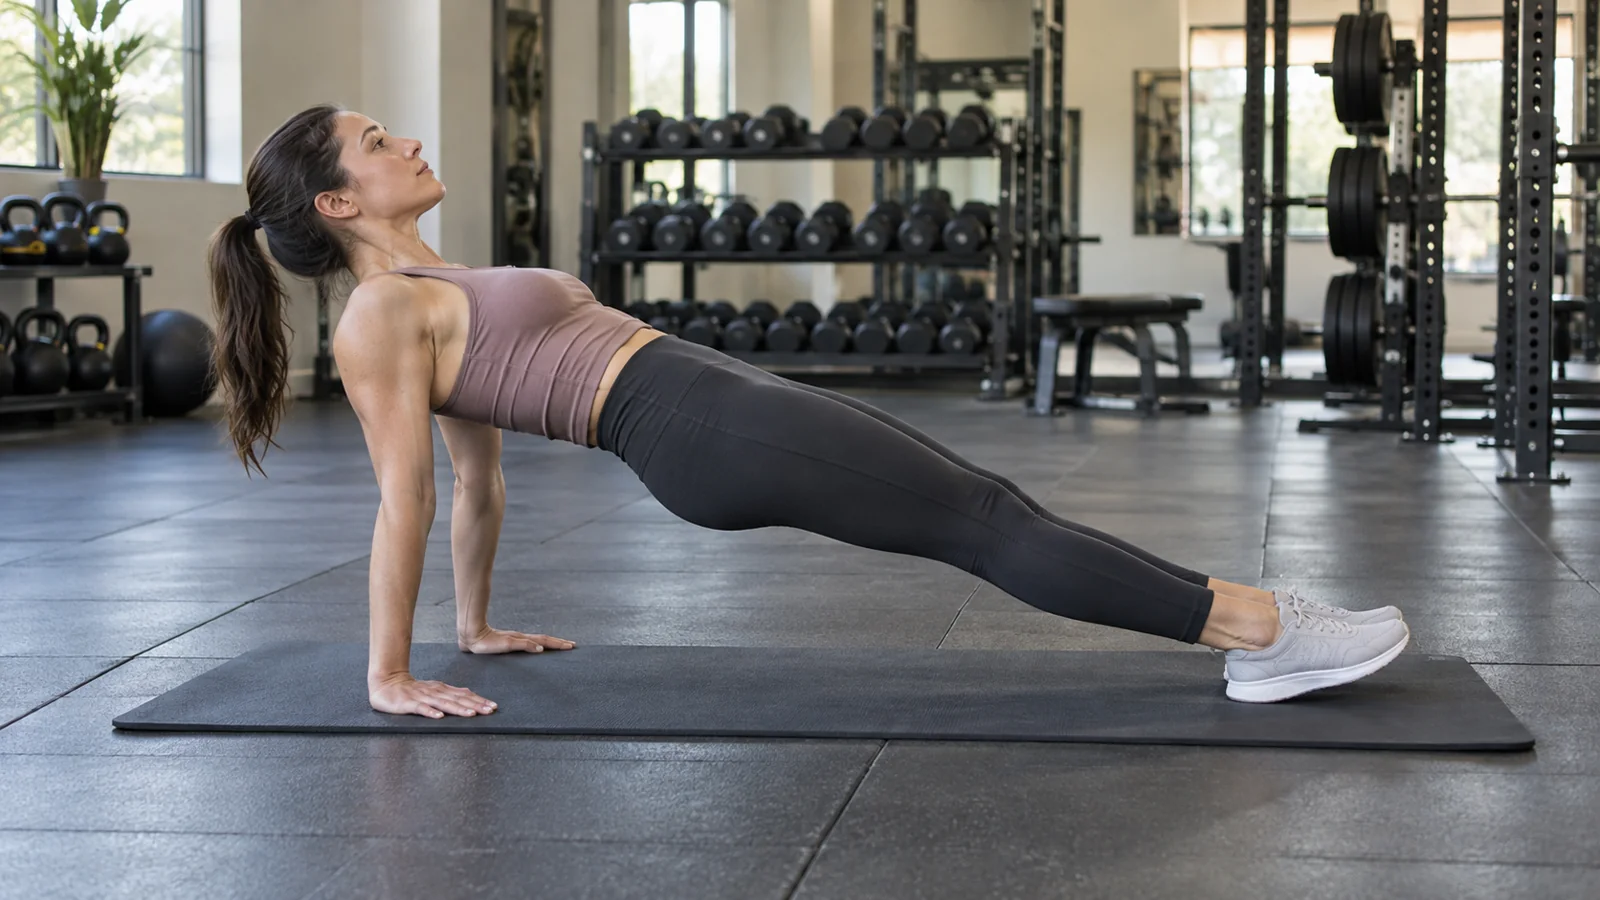
A reverse plank is a face-up body-weight hold supported by your hands and heels. From a seated position, place your hands behind your hips, press into the floor, and lift until your torso and legs form a comfortable, nearly straight line. Keep your neck aligned with your body, breathe normally, and lower before your hips sag or your shoulders become uncomfortable.
Published October 18, 2026.
The exercise combines hip extension with upper-body support. It can be useful in a home workout, but it is not automatically easier than a conventional plank. Your wrists and shoulders must tolerate a different position. Start with a short hold or a bent-knee version, and use another exercise if the support position does not suit you.
What muscles does a reverse plank work?
Your glutes and hamstrings help keep the hips extended while the muscles around your trunk keep your body from folding or overarching. Your arms and shoulder muscles support your upper body. Rather than treating the movement as an isolated abdominal exercise, think of it as maintaining a coordinated shape between the hands and heels.
The challenge is partly about position. Your hands are behind your torso, so the shoulders are in extension. That can feel unfamiliar even if push-ups and ordinary planks are comfortable. The wrists also bear weight with the palms on the floor. Being strong in one plank does not guarantee that this different support arrangement will feel appropriate.
The American Council on Exercise discusses reverse or supine planking as part of a broader approach to plank variations. Its useful general principle is that plank practice involves coordinated trunk, hip, and shoulder control. It does not establish that reverse planks are superior to every other core exercise or that a longer hold always means better training.
What the exercise can and cannot promise
Practicing a manageable reverse plank can improve your ability to hold that position. It also adds a face-up support exercise to a routine that may otherwise emphasize face-down work. Those are practical reasons to use it. You do not need claims about fixing posture, preventing all back pain, or targeting belly fat to justify including it.
No single exercise reliably corrects every person’s posture or resolves an unexplained symptom. Likewise, a static hold is not a complete lower-body program. Squatting, hinging, stepping, and other movements provide different challenges. Use the reverse plank as an accessory when it fits your goals and comfort, rather than expecting it to replace a balanced routine.
Before you lift: choose a secure setup
Use a level, nonslip surface with enough room to extend your legs fully. A thin exercise mat may improve comfort, but a soft mattress or deep cushion makes support unpredictable. Your hands and heels should stay where you put them. Clear nearby furniture and weights so that lowering your hips does not become an awkward landing.
Clothing and footwear matter mainly because they affect traction. Socks on a smooth floor can let your heels slide. If you use shoes, check that the soles grip the surface. If you exercise barefoot, keep the floor dry and make sure the contact feels comfortable. There is no special shoe requirement for this hold.
Set a timer where you can hear it instead of twisting your neck to watch a screen. You can also count a few relaxed breaths for the first rehearsal. The purpose is to learn a stable position, not to hold until an alarm gives you permission to stop. Lower immediately when your planned technique is no longer available.
Check the arm-support position first
Sit with your knees bent and feet on the floor. Place your palms behind you and gently shift a small amount of weight into them while keeping your hips down. If that alone produces wrist pain, shoulder pinching, tingling, or instability, do not add a full-body lift. Choose a different exercise and seek individual advice if symptoms persist.
This check is not a medical clearance test. It is simply a way to avoid discovering an obviously uncomfortable position under more load. A recent injury, surgery, or known shoulder or wrist problem warrants a conversation with your clinician or rehabilitation professional before using this guide.
How to do a reverse plank
- Start seated. Extend your legs in front of you with the heels comfortably separated. Keep a little natural softness at the knees rather than forcing them backward.
- Place your hands. Put your palms behind your hips, approximately shoulder-width apart. Begin with the fingers generally toward your feet, adjusting slightly only if that feels more natural and comfortable.
- Prepare the lift. Keep your chest comfortably open and your shoulders away from an exaggerated shrug. Take a normal breath and gently brace your trunk.
- Press and lift. Push through the hands and heels while tightening the glutes enough to raise the hips. Aim for a long line through the shoulders, hips, and legs.
- Hold briefly. Keep the head in line with the torso and continue breathing. Avoid trying to gain extra height by arching the lower back.
- Lower with control. Bring the hips back to the floor before the hold becomes a struggle. Release the hands, rest, and reset completely before another attempt.
The starting hand position is a suggestion, not a rule to force through discomfort. Small changes in hand angle or distance can alter how the shoulders and wrists feel. If you cannot find a comfortable position without contorting the arms, use a regression or another exercise. A photograph is not a reason to override a clear pain signal.
Keep the elbows long without aggressively pushing them into hyperextension. The same applies to the knees. You want active support, not a sensation of hanging on the end of a joint’s range. If you are unsure what that looks like in your body, a qualified trainer can help you find an appropriate variation.
Where should you look?
Let your gaze follow the angle of your torso so that the neck stays comfortable. Do not throw your head backward to make the chest appear higher, and do not tuck your chin tightly to stare at your feet. The neck should not become the limiting factor in a hold intended to challenge the rest of the body.
ACE’s coaching notes for a related reverse-plank tuck also emphasize a neutral cervical spine. The exercise in that article uses specialized equipment; the relevant point here is head alignment, not copying its advanced movements or workout volume.
Start with a bent-knee reverse tabletop if needed
The bent-knee version shortens the position and often makes it easier to practice lifting the hips. Sit with the feet flat, knees bent, and hands behind you. Press through the hands and feet to lift your hips into a comfortable tabletop-like shape. Your knees remain bent rather than extending into the long reverse plank.
You do not have to lift until your thighs and torso are perfectly horizontal. Begin with the height you can reach without shoulder pinching or a pronounced back arch. Hold for a few seconds, lower, and rest. If the arms feel comfortable but the full version is too demanding, this gives you a useful starting option.
A shorter lever does not remove the arm-support demand. If the wrist or shoulder position is the problem, a bent-knee version may still be unsuitable. In that case, a floor glute bridge offers hip-extension practice without supporting your torso on hands placed behind you. Workit’s glute bridge versus hip thrust guide explains those alternatives.
Can you use your forearms instead?
A forearm-supported reverse plank is a different variation. It reduces the need to load an extended wrist, but it changes the shoulder position and body angle. It should not be presented as a universal solution for wrist pain. If you try it, begin with a very short, comfortable rehearsal and stop if the new setup creates symptoms elsewhere.
Do not improvise support with rolling dumbbells or unstable stacks of objects. Purpose-built handles may be useful in an individually coached setup, but equipment does not guarantee comfort. For a beginner training alone, choosing an exercise that already feels secure is usually more practical than engineering a complicated workaround.
How long should a beginner hold a reverse plank?
Start with approximately five to ten seconds, or less if that is what you can control. A short hold can be enough to identify whether you can breathe, keep the hips lifted, and support the upper body comfortably. You do not need a thirty-second or one-minute hold before the exercise counts.
Use technique as the stopping rule. End the set when the hips begin dropping, the shoulders collapse toward your ears, the neck strains, or you need to hold your breath to continue. Discomfort or pain is a separate reason to stop immediately. A timer can describe your practice; it should not overrule what is happening.
For an otherwise healthy beginner, the following is an original conservative practice template. It is not a rehabilitation prescription or a research-tested optimum for this specific exercise.
- Frequency: two nonconsecutive days per week.
- Variation: bent-knee tabletop or full reverse plank, depending on comfort and control.
- Sets: two short holds to begin.
- Duration: five to ten seconds per hold initially.
- Rest: about forty-five to ninety seconds, longer if needed.
- Finish: lower while you still have control rather than waiting for collapse.
If the first hold is comfortable and the second is much worse, shorten the second rather than forcing equal times. If even a brief hold feels too demanding, use a smaller lift or a glute bridge. The template describes a starting experiment; it is not a test of whether you are fit enough to exercise.
A progression that does not turn into a hold-time contest
Stage 1: learn a repeatable lift and landing
Practice two short holds with a complete reset between them. Place the hands and feet deliberately, lift without jerking, and lower quietly. Your goal is to make the entry and exit feel predictable. This matters because a shaky final second often begins with a rushed setup rather than insufficient determination.
Stage 2: add a little time
When the same short holds are comfortable across several sessions, add a few seconds to one or both. For example, two eight-second holds might become two ten-second holds. Keep the variation and rest unchanged. If the added time makes the shoulders uncomfortable, return to the previous amount instead of assuming you need to push through adaptation.
Stage 3: lengthen the lever if appropriate
If you began with bent knees, you can gradually place the feet farther away during a new, brief trial. This changes the leverage, so reduce the hold time while you learn it. You do not need to straighten the legs fully in one jump. Keep the movement recognizable and avoid sliding the feet while your weight is already supported.
Stage 4: maintain or choose a purposeful next challenge
Once you can perform comfortable holds of roughly twenty to thirty seconds, decide what you actually want next. You might maintain the exercise as a brief accessory, add a third short set, or choose another movement that better fits your goals. There is no requirement to accumulate minutes or attempt single-leg variations.
If you eventually try lifting one foot, first be confident with ordinary holds and make the trial very short. Removing a support point adds a different control challenge and may cause the hips to rotate. It is optional advanced practice, not the next compulsory step for every beginner.
Common reverse-plank mistakes
Chasing height by arching the lower back
A higher hip position is not automatically better. If you feel that you are bending mostly through the lower back, lower a little and reset. Think about lifting the hips while keeping the ribs and pelvis coordinated. Use the bent-knee version or a glute bridge if you cannot find a comfortable long-body position.
Holding the breath for the entire set
A hold that only works with prolonged breath-holding is too demanding for this introductory practice. Shorten the duration and try a gentle exhale while maintaining the position. You do not need a special breathing pattern; you need to be able to breathe without losing control or creating unnecessary strain.
Letting the shoulders sink
Press into the floor enough to remain supported rather than collapsing between the arms. Avoid exaggerating the opposite cue by forcing the shoulder blades together as hard as possible. If you cannot stay supported comfortably, shorten the set or choose a different exercise instead of trying to solve everything with stronger muscle squeezing.
Placing the hands too far behind you
Reaching far backward can make the shoulder position more demanding. Reset with the palms closer to the hips and test gently before lifting. Hand distance is worth adjusting, but repeated experiments should remain comfortable. Stop if a small setup change cannot resolve the issue; the exercise does not need to fit every body.
Ignoring slipping heels
If the feet creep away, stop and fix the surface or footwear. A reverse plank should not become an accidental sliding exercise. Do not try to compensate by gripping the floor harder with the toes while the heels continue moving. Secure contact points are part of the exercise, not an optional convenience.
Adding instability too early
A ball, suspension trainer, or moving platform creates a different task. It can make the position harder without making it more useful for your current goal. Learn the floor version first if it suits you. Progression should solve a specific training need rather than make an exercise look more impressive.
Reverse plank versus regular plank and side plank
A conventional face-down plank supports the front-facing body between the arms and feet. A reverse plank changes your orientation and asks you to maintain hip extension with the arms behind you. A side plank introduces a side-support task. Each uses trunk control, but the contact points, leverage, and joint positions differ.
Choose by purpose and tolerance rather than ranking them from best to worst. Someone may find a regular forearm plank comfortable while disliking the reverse plank’s shoulder position. Another person may enjoy short reverse holds but prefer a modified side plank over a full one. Those differences are useful information for building a sustainable routine.
The side-plank guide and bear-plank guide offer other ways to practice support and trunk control. You do not need to perform all three in one workout. Start with one or two appropriate patterns, and leave room for the rest of your strength training.
Where reverse planks fit in a workout
For general fitness, use them after your main exercises or in a short technique-focused section. Avoid exhausting the shoulders immediately before movements that require precise upper-body support. If the reverse plank is new, practice it while you are reasonably fresh rather than at the end of an all-out circuit.
A simple home-session ending might be two short reverse-plank holds with rest, followed by an easy walk around the room. That is enough to introduce the exercise. You do not need to alternate instantly between push-ups, dips, and reverse planks, all of which can add upper-body support fatigue.
Consider the previous and following days, too. A demanding pressing workout, climbing session, or unfamiliar shoulder exercise can affect how the hold feels. Recovery belongs to the whole routine. If the shoulders are already fatigued, choose a lower-demand alternative or skip the accessory rather than forcing it because the schedule says “core.”
Track the version, not just the seconds
Record whether your knees were bent or straight, the number of holds, approximate duration, and a brief comfort note. “Tabletop, two ten-second holds, normal breathing” is a clear reference for next time. A longer hold performed with a different lever or lower hip position is not a direct comparison.
You can occasionally use a side-view recording to check whether the hips sag or the head moves out of line. Review it after the set rather than twisting to watch yourself live. A video can help with visible technique, but it cannot diagnose pain or prove that a joint position is safe for your circumstances.
Recovery, soreness, and stop signs
Some muscle fatigue after a new hold can happen, but severe soreness is not the goal. If your next session begins with lingering discomfort or ordinary movements feel affected, reduce the workload or choose an alternative. Do not repeatedly test a painful position to see whether it has become comfortable after another minute.
Stop for sharp pain, pinching, numbness, tingling, dizziness, or an unstable sensation in the shoulder or wrist. Persistent or unexplained symptoms deserve assessment. This article is not treatment for back, shoulder, or wrist pain. If a clinician has provided movement restrictions, those instructions take priority over a general fitness progression.
ACE’s guidance on progressing core training emphasizes that no single sequence suits everyone and that current abilities, injuries, and pain matter. That is a more useful approach than assuming every beginner must eventually complete the same advanced variation.
Reverse plank FAQs
Is a reverse plank good for beginners?
It can be, provided the hand and shoulder positions are comfortable and the hold is appropriately short. The bent-knee version is a useful option, but it still loads the arms. If arm support is uncomfortable, choose a glute bridge or another suitable movement instead.
Should my toes point or pull back?
Use a comfortable ankle position while keeping the heels securely supported. You do not need to force the toes downward to match a yoga photograph or pull them upward as hard as possible. Prioritize traction and a controlled body position.
Why do my hamstrings cramp?
A cramp can occur during demanding or unfamiliar effort, but this guide cannot determine its cause. Lower safely, stop the set, and reassess after it settles. Try a shorter, easier variation another time if appropriate. Recurrent, severe, or otherwise concerning symptoms warrant professional advice.
Can reverse planks replace bridges?
They overlap in hip-extension work, but they add a different upper-body support demand. If your goal is hip work and your wrists dislike reverse planks, bridges may fit better. You do not have to replace a comfortable exercise simply because another looks more advanced.
Do I need to do them daily?
No. Two spaced practice sessions can be plenty for learning. Add frequency only when you have a clear reason and recover well. The ability to repeat good technique matters more than maintaining a daily streak.
Make the hold fit your body and your routine
Start short, use secure contact points, and lower before control disappears. A comfortable bent-knee hold is a better training choice than a painful full reverse plank. Explore workout programs and fitness challenges with Workit.