
Published October 13, 2026
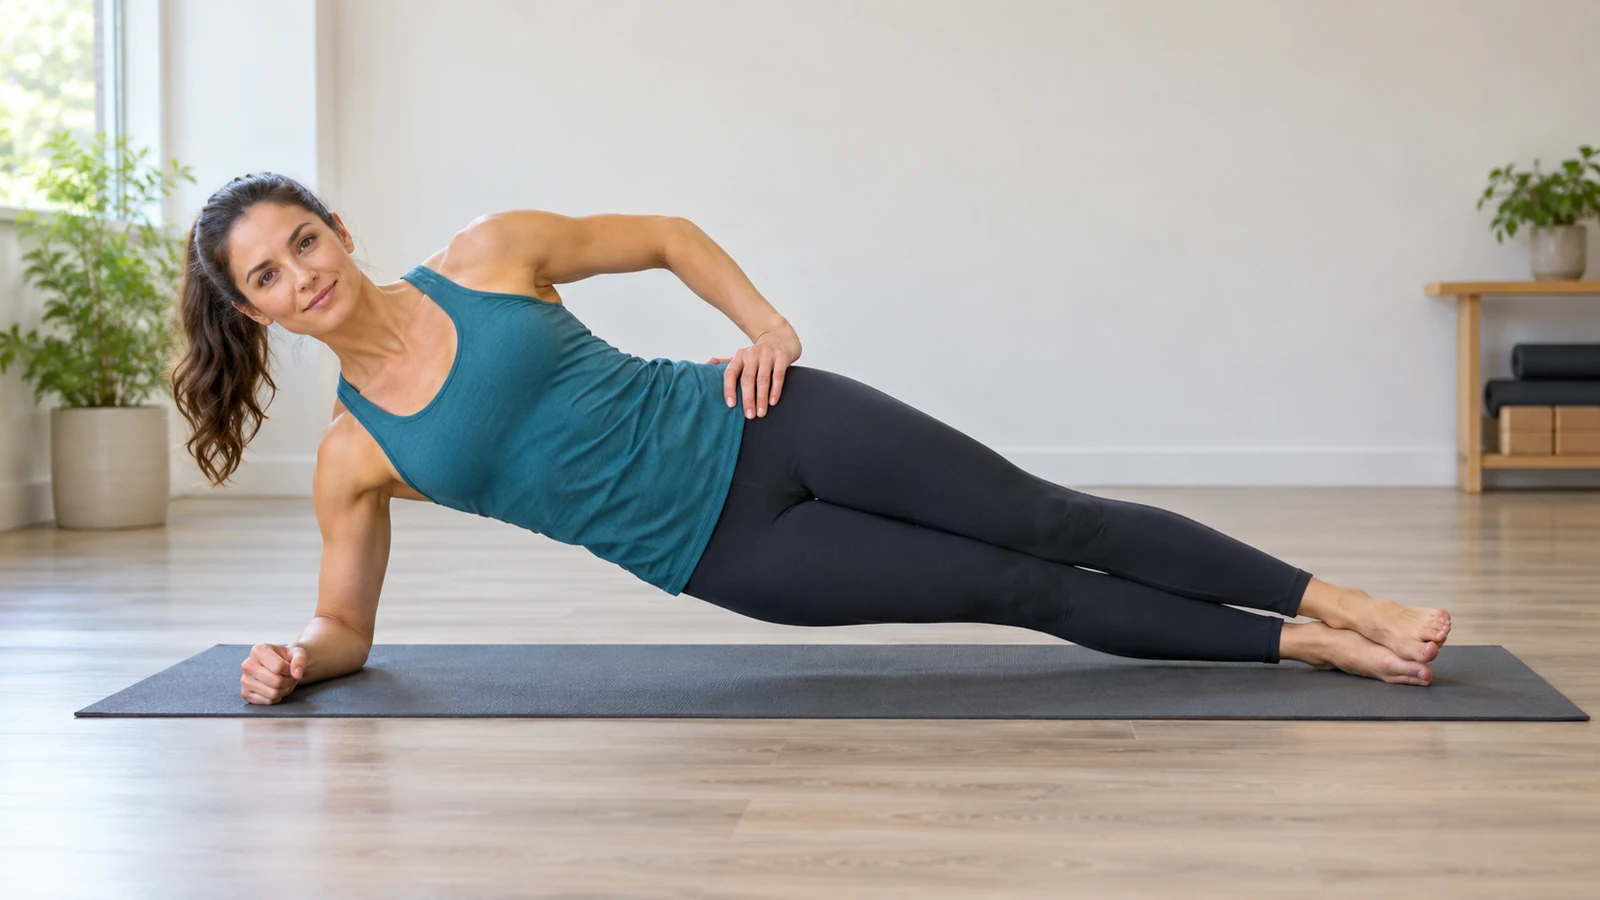
A side plank trains you to hold your trunk steady against a sideways pull. Start on your forearm with your elbow under your shoulder, lift your hips, and keep your ribs and pelvis facing the same direction. For a beginner, two controlled holds of 10–20 seconds per side, using bent knees if needed, are a practical starting point. Stop the hold when you cannot maintain the position and breathe normally.
You do not need to hold a side plank for several minutes to make it useful. The important decisions are which version you can control, how long that control lasts, and how to make the next session a little more challenging without turning it into a shoulder endurance contest.
This guide covers the forearm side plank, a knee-supported starting version, straightforward progressions, and ways to fit it into a normal strength workout. The sample sessions are general training examples for adults, not treatment plans for an injury.
What does a side plank work?
The side plank is an isometric exercise: you create muscular effort while holding a position rather than moving through repeated bends. Gravity tries to lower your hips and tip your trunk sideways. Your job is to resist that movement.
The obliques and other muscles around the side of your trunk contribute to this task. The quadratus lumborum, a deeper muscle in the lower-back region, also helps resist side bending. Your hip muscles and supporting shoulder contribute to keeping the whole position organized. NASM’s side-plank exercise guide describes these lateral trunk and hip stabilizing demands.
That does not make the exercise a test of one isolated muscle. A set may end because your shoulder gets tired, your hips rotate, your foot slips, or you lose your breathing rhythm. Identify the actual limit before assuming your abdominal muscles need a harder workout.
For example, if your supporting arm is uncomfortable after five seconds but your trunk feels barely challenged, extending the hold is the wrong next step. A knee-supported version, a more comfortable surface, or a different exercise may let you practice the intended task more effectively.
Set up your space before starting
Choose a level, nonslip floor with enough room to lie on your side and extend your legs. A firm exercise mat can cushion your elbow without making the support unstable. Avoid balancing on a thick, soft cushion that lets the elbow sink and shift.
Wear shoes with traction or work barefoot on a suitable surface. Socks on polished flooring can make your feet slide. Clear nearby dumbbells and furniture so you can lower yourself without hitting anything.
Put your timer where you can hear it. Looking down at a phone throughout the set can change your neck position and encourage your chest to roll toward the floor. A short audible timer is easier than trying to read a screen while balancing.
Before your first working hold, take a few relaxed breaths, move your shoulders gently, and try one five-second practice hold on each side. This is a setup check, not a fatigue test. If the floor position is already painful, stop and choose another exercise rather than spending the warm-up trying to push through it.
How to do a forearm side plank
- Lie on your side. Extend your legs and place one foot over the other, or stagger your feet slightly for a wider base. Stack your shoulders and hips so your chest faces forward rather than toward the ceiling.
- Place your elbow under your shoulder. Rest your forearm on the mat. Keep the upper arm approximately vertical, with your forearm pointing comfortably forward. Put your top hand on your hip.
- Prepare your trunk. Gently tighten around your waist as though preparing for someone to nudge you. You should still be able to take a breath. Keep your head in line with your torso.
- Lift your hips. Press through the supporting forearm and the side of your lower foot, or through both feet if staggered. Bring your pelvis up until your trunk and legs form a long, reasonably straight line.
- Hold without twisting. Keep your upper shoulder over the lower shoulder and your upper hip over the lower hip. Breathe steadily. Think about making space between your bottom shoulder and your ear.
- Lower under control. End the set before your hips repeatedly drop or your torso rolls. Rest, then set up carefully on the other side.
A straight line is a useful visual cue, not a demand to force every joint into a rigid pose. Your normal spinal curves remain. Avoid exaggerating a chest lift or squeezing your pelvis forward so hard that your lower back arches.
Use one simple cue during the set: “Stay long and keep breathing.” Trying to think about six body parts at once often makes a short hold more confusing than necessary. Check your setup first, then keep your attention on the biggest issue you noticed.
The beginner version: side plank from the knees
If the full version is too difficult, bend your knees and keep them on the mat. Shortening the lever reduces the challenge while preserving the sideways trunk-control task. The American Council on Exercise’s modified side plank uses this knee-supported setup.
Lie on your side with both knees bent comfortably and your lower elbow beneath your shoulder. Stack your hips and keep your thighs roughly in line with your trunk. Lift your pelvis by pressing through your forearm and the side of your lower knee. Your shoulder, hip, and supporting knee should form a long line.
Keep the hips open rather than sitting backward. The knees can remain bent while the front of your hips stays extended. If you look as though you are sitting in a chair tipped onto its side, reset the hip position before timing the hold.
Start with 10 seconds. Lower, rest, and repeat on the other side. If even that is more than you can control, use several five-second practice holds with complete rests between them. There is no requirement to “graduate” within a certain number of workouts.
Make knee support comfortable with a folded edge of the mat if needed, while keeping the elbow surface firm. If kneeling or shoulder loading remains painful, another trunk exercise may be more suitable. Workit’s dead bug guide offers a floor-based option that does not require supporting your body on one arm.
How long should you hold a side plank?
Choose a duration that ends while you still own the position. A sensible initial range is 10–20 seconds per side for two sets. Someone completely new to exercise may begin with one set or shorter holds. Someone already comfortable with the movement may use 20–30 seconds.
These are training examples, not universal pass marks. Body size, limb length, the chosen variation, shoulder comfort, and other exercises in the session all affect difficulty. A clean 12-second knee-supported hold can be a better training choice than a shaky 45-second full plank.
- New to the movement: one or two holds of 5–15 seconds per side, with generous rest.
- Comfortable beginner: two holds of 10–25 seconds per side.
- Ready for progression: two or three controlled holds of 20–30 seconds, followed by a decision about the next variation.
Rest approximately 30–60 seconds as needed between holds, and longer if your breathing or supporting shoulder has not recovered. Changing sides provides some local rest, but it does not eliminate fatigue everywhere else.
Stop when your hips start dropping despite an attempt to reset, your chest keeps turning, or you cannot breathe without losing position. Do not wait for a dramatic collapse. Keeping a few comfortable seconds in reserve makes the next set more repeatable.
Long holds are an option for a specific endurance goal, but duration is not the only form of progress. You can improve setup consistency, reduce wobbling, use a slightly harder lever, or complete the same work with less effort.
Common mistakes and practical fixes
Your hips sink toward the floor
If this happens immediately, the version is probably too demanding. Bend your knees or shorten the planned hold. If it happens only near the end, record the last controlled second as your current working duration. Repeatedly lifting and dropping the hips is a different exercise from a steady hold.
Your chest rolls toward the floor
Place your top hand on your hip and imagine both shoulders facing a wall in front of you. A quick video from the front can show rotation you do not feel. Staggering the feet may help if balance is the limiting factor, but it should not become permission to twist.
Your bottom shoulder crowds your ear
Check that the elbow is under the shoulder instead of reaching far away. Press into the floor with controlled effort and keep your neck relaxed. If this still feels uncomfortable, reduce the load with knee support. A sharper or worsening shoulder sensation is a reason to stop, not to press harder.
You hold your breath
Shorten the hold and count a few easy breaths rather than chasing a timer. Try a quiet exhale before lifting, then continue normal breathing. If breathing makes the entire position fall apart, practice an easier version until you can do both together.
You crane your head upward
Look straight ahead at a fixed point. Raising your top arm and looking toward it is optional, not part of the basic requirement. Keeping the hand on your hip removes an unnecessary coordination task while you learn.
You push through pressure that feels wrong
Ordinary muscular effort can feel demanding, but joint pain, tingling, numbness, or sharp pain should not be treated as useful feedback to ignore. Stop the exercise. Recurrent symptoms, a recent injury, or a clinician’s restrictions call for individual advice before you continue loading that area.
A progression ladder you can actually use
Pick the easiest version that gives you a clear training challenge without compromising control. Work at that level for several sessions. Change one thing at a time so you can tell whether the new demand is appropriate.
Level 1: short knee-supported holds
Use two sets of 10 seconds per side. Progress toward 20 seconds while maintaining a straight shoulder-to-knee line and easy breathing. If set two is much worse than set one, increase rest before increasing duration.
Level 2: straight legs with staggered feet
Extend your legs and place the top foot slightly in front of the lower foot so both can help create a stable base. Reduce holds to around 10 seconds when you first change levels. The longer body lever may feel substantially harder even though the feet are more stable.
Level 3: straight legs with stacked feet
Stacking the feet narrows the base. Keep the same calm setup and start with a shorter hold. This variation is useful if you want more balance demand, but it is not mandatory. Staggered feet remain a valid option for regular training.
Level 4: choose a goal-specific challenge
Once ordinary holds are comfortable, decide what you want to improve. A longer hold emphasizes endurance. A small, controlled movement of the top arm adds coordination. Lifting the top leg adds a substantial hip and balance demand. Do not combine all three changes in the same session.
For an initial moving variation, try lifting the top hand off your hip for a few seconds without rotating. Return it, lower, and reset. Treat this as skill practice. Advanced weighted versions are unnecessary for most beginners and are best introduced with appropriate coaching and a secure load setup.
A four-week example, with permission to repeat
Use the side plank twice per week, preferably with at least a day between these sessions. The schedule below assumes the knee-supported version is comfortable. If it is not, shorten the holds and repeat the first stage until it is.
- Week 1: two sets of 10 seconds per side. Learn the setup and stop with clear control.
- Week 2: two sets of 15 seconds per side, using the same version.
- Week 3: two sets of 20 seconds per side, or repeat week two if your second set is inconsistent.
- Week 4: try one 8–10-second straight-leg hold per side with staggered feet, then finish with one knee-supported set. Keep the easier version throughout if the trial is not controlled.
These weeks describe opportunities, not deadlines. You may spend two weeks at the first stage or already be ready for the third. Progress when the actual holds and your recovery support it.
Suppose Monday’s sets are clean, but Thursday’s workout includes more pressing and your shoulder tires early. Keep the shorter duration on Thursday. A change in the surrounding session can alter performance without meaning that your core strength went backward.
Where side planks belong in your workout
For general strength training, place working side-plank sets after your main lifts. That keeps the supporting shoulder and trunk fresher for exercises that require heavier loading or more coordination. A very brief, easy practice hold can also be part of a warm-up if it helps you feel prepared.
You do not need a separate, exhausting abdominal workout. Try this short finish after a full-body session:
- Side plank: 10–20 seconds per side.
- Rest until you can set up calmly again.
- Bird dog: four slow repetitions per side, with a brief controlled pause.
- Repeat once if technique remains steady.
The bird dog exercise adds a different coordination task while keeping the session simple. Do not rush the transitions to make this feel like a cardio circuit. The purpose is controlled practice.
If you train three days a week, you could use side planks on two days and another trunk exercise on the third. If you train twice a week, two short sets at the end of each session are a reasonable starting place. More exercises and more daily sets are not automatically better.
How to track progress without chasing a record
Record the variation, hold duration on each side, number of sets, and one brief technique note. “Knees, two sets of 15 seconds each side, easy breathing” tells you more than “plank completed.” Note a surface or foot-position change because it can affect how the exercise feels.
Workit’s workout log template can help you organize a simple training record. For the side plank, label which side is supporting you so your entries stay consistent. “Right” should always mean the same thing in your log.
For example: “Right forearm down: 15 and 15 seconds. Left forearm down: 15 and 12 seconds. Last left hold ended when hips rotated.” Next session, aim for repeatable 12–15-second holds on both sides rather than forcing the left side to match a personal best.
If you want a broader strength routine alongside this exercise, Workit on the App Store includes workout programs and a workout journal for recording weights, reps, and sets. Keep the side-plank target tied to control rather than treating any app number as a reason to ignore discomfort.
Side plank questions
Should both sides get the same amount of work?
Usually, start with the less comfortable side and match its controlled duration on the other side. Small differences are common and do not diagnose an injury or a specific weakness. A large, persistent difference accompanied by pain or loss of function deserves an individual assessment rather than extra sets prescribed from a timer.
Is shaking a sign I should stop?
A little muscular trembling can occur during effort. What matters is whether you can maintain the position and breathe. If shaking comes with repeated hip drops, shoulder discomfort, or uncontrolled rotation, end the hold and use a shorter duration or easier version next time.
Will side planks remove fat from my waist?
A side plank trains muscular capacity; it does not selectively remove fat from the area you feel working. Changes in body composition depend on broader factors. Use this exercise for a specific movement task instead of judging its success by whether your waist looks different after a few sessions.
Are side planks better than regular planks?
They emphasize different positions and challenges. A front plank asks you to resist sagging forward through the trunk, while a side plank emphasizes resisting a sideways pull. You can use either or both according to comfort and training needs. Neither must replace a balanced strength program.
Can I do side planks every day?
You can practice an easy skill frequently, but hard daily holds are unnecessary for a beginner. Two or three weekly sessions leave room to see how your shoulders and trunk recover. If soreness or fatigue affects your other training, reduce the sets, difficulty, or frequency.
What if I cannot get into the floor position comfortably?
Skip the exercise for now. Getting safely down to and up from the floor is part of the task. Choose a comfortable alternative with a qualified professional if you have mobility, balance, or medical limitations. You do not need to master this particular movement to begin getting stronger.
The next session: keep it simple
Choose your version, set a conservative timer, and complete two controlled holds on each side. Record what actually happened. If every hold was steady and comfortable, add a few seconds in a later session. If it was not, keep the same target or make the setup easier.
The useful side plank is the one you can repeat with a stable trunk, a comfortable supporting shoulder, and normal breathing. Build that first; harder variations can wait.
Source note: The linked NASM and ACE exercise resources support the basic movement description and knee-supported variation. The sample sets, progression schedule, troubleshooting examples, and workout combinations above are practical programming examples, not a validated rehabilitation protocol or a guarantee of injury prevention.