
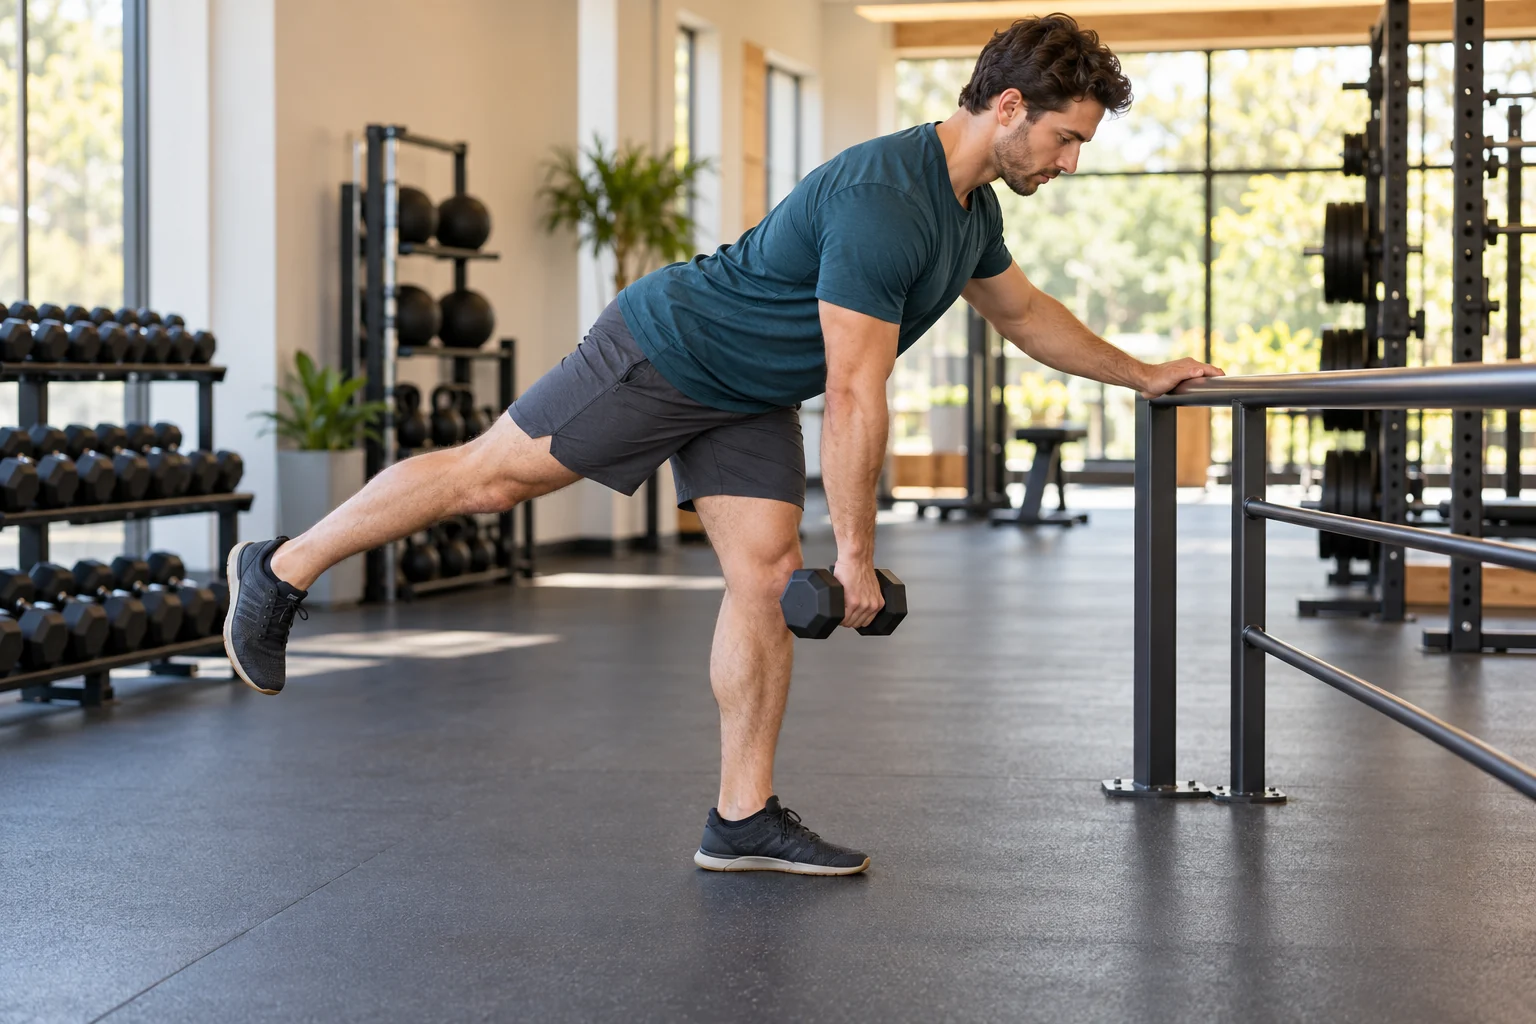
A single-leg Romanian deadlift is a hip hinge performed mainly on one leg: soften the standing knee, send your hips backward, and let the other leg travel behind you as your torso tips forward. Return to standing without twisting or leaning backward. For beginners, hold a fixed support and start without weight. Balance should not prevent you from learning the hinge.
Published October 20, 2026.
You may also see this exercise called a single-leg RDL or one-leg Romanian deadlift. The name sounds advanced, and the unsupported version can be demanding. But you do not have to begin by balancing on one foot with a heavy dumbbell.
This guide makes the supported variation the starting point. You will learn how to choose your range, which hand can hold the weight, how to distinguish a hinge from a squat, and what to do when your foot or balance gives out before your legs. The examples are general fitness guidance for healthy adults, not rehabilitation instructions.
What makes it a Romanian deadlift?
The repetition begins from standing and is driven by movement at the hips. You move backward into the hinge, then extend the hip to stand again. The weight does not need to start on the floor or touch it between repetitions.
The standing knee stays slightly bent rather than repeatedly bending deeply. That separates the basic RDL pattern from a squat, where the knee angle changes much more. It also separates the exercise from a stiff-legged reach with a locked knee.
The NSCA’s Romanian deadlift technique guide describes a controlled hip hinge, slightly flexed knees, a load kept near the body, and a depth limited by the ability to maintain the intended trunk position. Those principles remain useful when learning a one-leg variation.
If you are still deciding which deadlift pattern you mean, read Romanian deadlift versus conventional deadlift before changing the exercise simply to reach the floor.
What muscles does the single-leg RDL work?
The main effort typically involves the hamstrings and gluteal muscles of the standing leg. Muscles around the hip, trunk, foot, and ankle also contribute as you control your position. Your back is not supposed to be completely inactive; it helps maintain the trunk while the hip moves.
The ACE single-arm, single-leg RDL exercise guide uses a slightly bent standing knee and an opposite-hand dumbbell. It classifies the unsupported exercise as advanced, which is a useful reminder that the balance demand is real even when the weight looks modest.
Feeling the hamstrings working can be helpful feedback, but it is not necessary to chase the strongest possible stretch. Similarly, a burning foot does not prove your hip muscles have received the training you intended. Sensation is one piece of information, not a complete measurement of muscle loading.
What does holding a support change?
A support reduces the need to solve every balance problem at once. That can make it easier to practice the hinge and use a consistent range. You are still doing useful work on the standing leg.
Supported and unsupported versions serve different purposes. If your main goal is controlled resistance training for the hips and hamstrings, keeping a hand on a stable rail can remain a sensible choice. Removing support is optional, not a graduation requirement.
Set up the supported beginner version
Choose a genuinely stable support
Use a fixed rail, a securely installed rack upright, or a solid countertop that will not move when touched. Do not rely on a rolling chair, a loose bench, an unsecured door, or another person’s body as your anchor.
Clear the space behind you so the rear foot cannot hit a bag, wall, or passerby. Leave room beside the standing leg for a dumbbell later. Practice on a level, nonslip surface, not a balance pad.
Stand close enough to avoid reaching
Position the support beside you and within comfortable hand reach. Your arm should not have to stretch forward as you hinge. A support that pulls your shoulder away from the body can make you rotate or shift your weight unnecessarily.
Start with both feet on the floor. Place one hand lightly on the support, soften the knee of the leg you will train, and move most of your weight onto that foot. Keep a comfortable tripod of contact through the heel, the base of the big toe, and the base of the little toe.
Try a toe-assisted hinge first if needed
Before lifting the rear leg, move that foot slightly backward and leave its toes touching the floor. Practice sending the hips backward while the front leg does most of the work. This kickstand position provides another point of contact while you learn the path.
Do not worry about measuring an exact percentage of weight between the feet. The front leg should feel like the working leg, and the rear toes should act mainly as a light balance aid. If the movement remains confusing, return to a two-leg hinge before advancing.
How to perform a supported single-leg Romanian deadlift
- Stand tall beside your support. Use a relaxed shoulder position and a small bend in the standing knee.
- Establish steady foot pressure. Keep the whole standing foot in contact with the floor rather than rolling onto its outside edge.
- Send your hips backward. Let the torso incline as a consequence of the hinge, not because you are rounding downward to reach something.
- Let the free leg travel behind you. Keep it relaxed and roughly aligned with the torso. Do not kick it up independently.
- Stop at a controllable depth. Finish before you lose your hip position, bend deeply into a squat, or need to hang from the support.
- Press through the standing foot to return. Bring the hips forward under your torso until you are comfortably upright.
- Reset as needed. Touch the rear toes down between repetitions if that helps you begin each one deliberately.
Take a few unweighted repetitions on each side. A small hinge is enough for the first attempt. You do not need your chest parallel to the floor or your free leg at hip height.
Let the support hand steady you without turning it into a pulling exercise. Some hand pressure is fine. The problem is relying on the arm to haul you back up while the standing leg contributes little.
Five cues that keep the exercise understandable
1. Move the hips back, not the head down
Imagine that the standing-side hip is moving toward an imaginary wall behind you. Your torso follows that movement. Reaching your hand toward the floor too early can turn the exercise into a rounded-back reach.
2. Keep a soft knee, then hold approximately that bend
The knee does not need to be frozen, but repeated deep bending changes the movement. Set a comfortable small bend at the start, then focus on the hip traveling backward.
3. Let the rear toes face mostly toward the floor
This is a simple cue to discourage opening the free hip toward the ceiling. It is not a demand for a perfectly rigid pelvis. Stop the descent before obvious rotation replaces the hinge.
4. Keep your neck in line with your torso
Look at the floor a comfortable distance ahead as you tip forward. Avoid craning the neck to watch yourself straight ahead in a mirror. A brief side-view recording can be more informative than twisting to inspect each repetition.
5. Finish tall, not leaned back
Return to your normal standing position. There is no need to thrust the hips far forward, arch your lower back, or throw the free leg through in front of you.
How low should you go?
Your useful depth is the point you can reach while controlling the hinge and keeping the setup consistent. For some beginners, the hands move only to the upper knee area. Others can move lower without changing posture. Neither person needs to copy the other.
Use three checkpoints: the standing foot stays planted, the trunk remains controlled, and the pelvis does not visibly roll open. If one disappears, shorten the next repetition.
The floor is an arbitrary target because arm length, leg length, weight size, and mobility all affect how close the hand gets. A small dumbbell may hang far above the ground even during a useful hinge.
For example, if you can reach just below the knee cleanly but twist when reaching the middle of the shin, train the shorter range for now. Adding a stable repetition within that range is more meaningful than reaching lower by changing the movement.
Which hand holds the dumbbell?
A common arrangement is to hold the weight opposite the standing leg. If you are standing on the left foot, the dumbbell is in the right hand, while the left hand uses a support beside you. Let the loaded arm hang down near the working leg rather than reaching diagonally across the room.
Holding the weight on the same side as the standing leg is another variation. It changes the balance and rotational demands. Neither arrangement should be described as the only legitimate single-leg RDL.
A 2023 study of single-leg RDL loading positions found differences in muscle activation between same-side and opposite-side loading. These were short-term electrical-activity measurements, not proof that one hand position always produces better long-term results or that the findings transfer unchanged to supported beginners.
Choose one straightforward arrangement while learning, and keep it consistent. If switching the support side makes the setup more secure, practice without weight first. Do not increase resistance on the same day you change hand position and remove support.
Choosing your starting weight, sets, and repetitions
Begin with bodyweight. Once you can complete several steady repetitions on both sides, try a light dumbbell or kettlebell. The correct starting load is one that leaves the movement recognizable from the first repetition to the last.
This original beginner example keeps the total work modest:
- One unweighted practice set of about five repetitions per side.
- One or two work sets of six to ten repetitions per side.
- Enough rest between sides to reset without rushing, then around 60 to 120 seconds between rounds if needed.
- Finish while two or three more controlled repetitions appear possible.
- Keep the fixed support available for every repetition.
Use the lower end of the plan when the movement is new. Six good repetitions can be plenty of practice if each requires concentration. There is no advantage in continuing to ten after your form becomes a series of recoveries from lost balance.
The ACSM’s 2026 resistance-training guidance prioritizes consistent participation and individualized programs rather than unnecessary complexity. Training to failure is not required for the average healthy adult. The example here applies that conservative approach; it is not a research-established single-leg RDL formula.
Progress the exercise without changing everything
There are several ways to make progress: improve control, add a repetition, use slightly more resistance, or practice less support. These are separate variables, not a checklist to increase simultaneously.
Path A: keep the support and build strength
Stay with the same hand placement and comfortable range. Gradually build toward the top of your chosen repetition range. When both sides can repeat the work with a margin, try the smallest sensible load increase at a later session.
This path is useful if balancing distracts from the training goal. There is no deadline for letting go of the rail.
Path B: practice balance with very light loading
If unsupported control is a goal, reduce the hand contact gradually during an easy practice set. Try a repetition with a lighter touch, then return the hand to the support when needed. Keep the load low and the range manageable.
Do not turn the first unsupported attempt into a heavier working set. A new balance challenge already changes the task.
Path C: use a kickstand as the main variation
A kickstand RDL leaves the rear toes on the floor throughout. It is useful when a rail is unavailable or when you prefer another point of contact. It is not identical to a full single-leg stance, but it can make unilateral-biased hinge practice easier to organize.
Record the variation accurately. “Supported, opposite-hand load” and “unsupported, two dumbbells” are different exercises for tracking purposes, even if the total weight happens to match.
Troubleshooting: identify what ends the set
I wobble before my hamstrings feel challenged
Use more reliable support and shorten the range. Check that the floor and footwear are stable. If balance still dominates, return the rear toes to the floor for a kickstand version.
You do not need to prove that your balance is good enough before you are allowed to train the hip hinge. Change the exercise so the intended work becomes practical.
My rear hip keeps opening outward
Reduce the depth and let the rear foot travel lower. Think about keeping the front of both hips oriented generally toward the floor as the torso inclines. Do not force the pelvis with a hand or twist the standing knee to imitate a perfectly square photograph.
The exercise turns into a one-leg squat
Check whether the standing knee keeps bending as you lower. Return to an unweighted, supported version and practice a smaller backward hip movement. The torso and rear leg can move without requiring the standing knee to drop much farther forward.
I mostly feel my foot or calf working
These areas participate in maintaining stance, but they should not have to become the limiting factor for every set. Use the support, avoid gripping the floor aggressively with the toes, and choose a secure stance. If you have pain rather than ordinary effort, stop instead of attempting to work through it.
The dumbbell drifts far away from me
Let the loaded arm hang beneath the shoulder and near the standing leg. Avoid reaching forward with it to counterbalance the rear leg. Reducing the load can help you learn the path without feeling pulled out of position.
One side is noticeably harder
Begin with the side that feels less coordinated and use a manageable load. As a simple starting strategy, match the easier side to the same number of good repetitions rather than adding an automatic extra set to the harder side.
A difference in balance is not a diagnosis of a weak muscle or injury. If a large difference persists, ask a qualified professional to observe your technique, especially if symptoms accompany it.
I feel back pain or a sharp hamstring pull
Stop the exercise. Do not force more depth or add stretching under load to solve the sensation. Persistent or recurring pain calls for appropriate healthcare assessment. A technique article cannot determine the cause or prescribe a rehabilitation progression.
Fit the single-leg RDL into a complete workout
Place it where you can still concentrate. If it is your main hinge, do it before fatigue from several other demanding lower-body exercises makes the balance task unnecessarily difficult. If it is a light technique accessory, a small amount later in the session may be enough.
A simple session could include a squat or split squat, supported single-leg RDLs, and a calf exercise. You do not need a long list of deadlift variations in one workout. If you already perform substantial bilateral RDL work, consider whether replacing some of that work makes more sense than adding another large block.
For a simpler bilateral foundation, the kettlebell deadlift guide covers a different starting pattern with both feet on the floor. For optional direct inner-thigh work elsewhere in your session, the hip adduction machine guide explains a supported seated exercise with a different purpose.
Allow recovery between demanding lower-body sessions and consider your total activity. A long hike, a new running session, and several additional leg exercises still contribute to the week’s workload even if they are not labeled single-leg RDLs.
A practical three-session learning example
Think of these as checkpoints, not three mandatory calendar dates. Repeat any stage when needed.
- First exposure: use a support and no weight. Find a small repeatable range for one or two short sets. Write down what helped.
- Next comfortable exposure: repeat the same setup. If both sides feel organized, introduce a light weight while keeping the hand support.
- Later exposure: add a repetition or a small amount of load only if the earlier work remains comfortable and controlled. Keep the setup unchanged.
For example, “left six, right six, steady with rail” is a useful first entry. Later, “eight each with the same light dumbbell” is measurable progress. A session spent restoring control after a break is also worthwhile, even if the numbers are lower.
Do not set an arbitrary date by which you must perform the unsupported version. A useful progression follows your ability to repeat the movement, not the impatience of a calendar.
Single-leg Romanian deadlift FAQ
Is holding a support cheating?
No. It is a deliberate exercise variation. Support can make the hinge easier to control and reduce balance as a limiting factor. Use it consistently and record it so you compare similar sessions.
Should the back leg stay completely straight?
It can have a relaxed bend. The important point is that it moves behind you without a big independent kick or hip twist. You do not need to lock that knee or point the toes aggressively.
Can I touch my toes down between repetitions?
Yes. A light reset can help you reproduce the start position. If the purpose is a continuous unsupported balance challenge, repeated toe touches change that task, but they do not erase the useful hinge work you completed.
Is one dumbbell better than two?
One dumbbell leaves a hand available for support and makes a simple beginner setup. Two dumbbells are another option once the movement is established, but they remove that support hand and change the loading. More equipment is not automatically better.
Should I stand on a wobble board?
Not for this beginner strength-learning approach. Use a stable surface so you can understand the hinge and manage the load. Unstable equipment introduces another challenge without solving the basic technique questions.
Does this replace every other hamstring exercise?
No. It is a hip-hinge option, not a complete lower-body program. Other movements, including knee-flexion exercises, may have a place depending on your goals and available equipment.
Start with the version you can repeat
Choose a fixed support, practice an unweighted hinge, and keep the range smaller than your balance demands. Add load only when the movement stays recognizable on both sides. You can build useful training around a supported single-leg RDL without ever turning it into a balancing performance.