
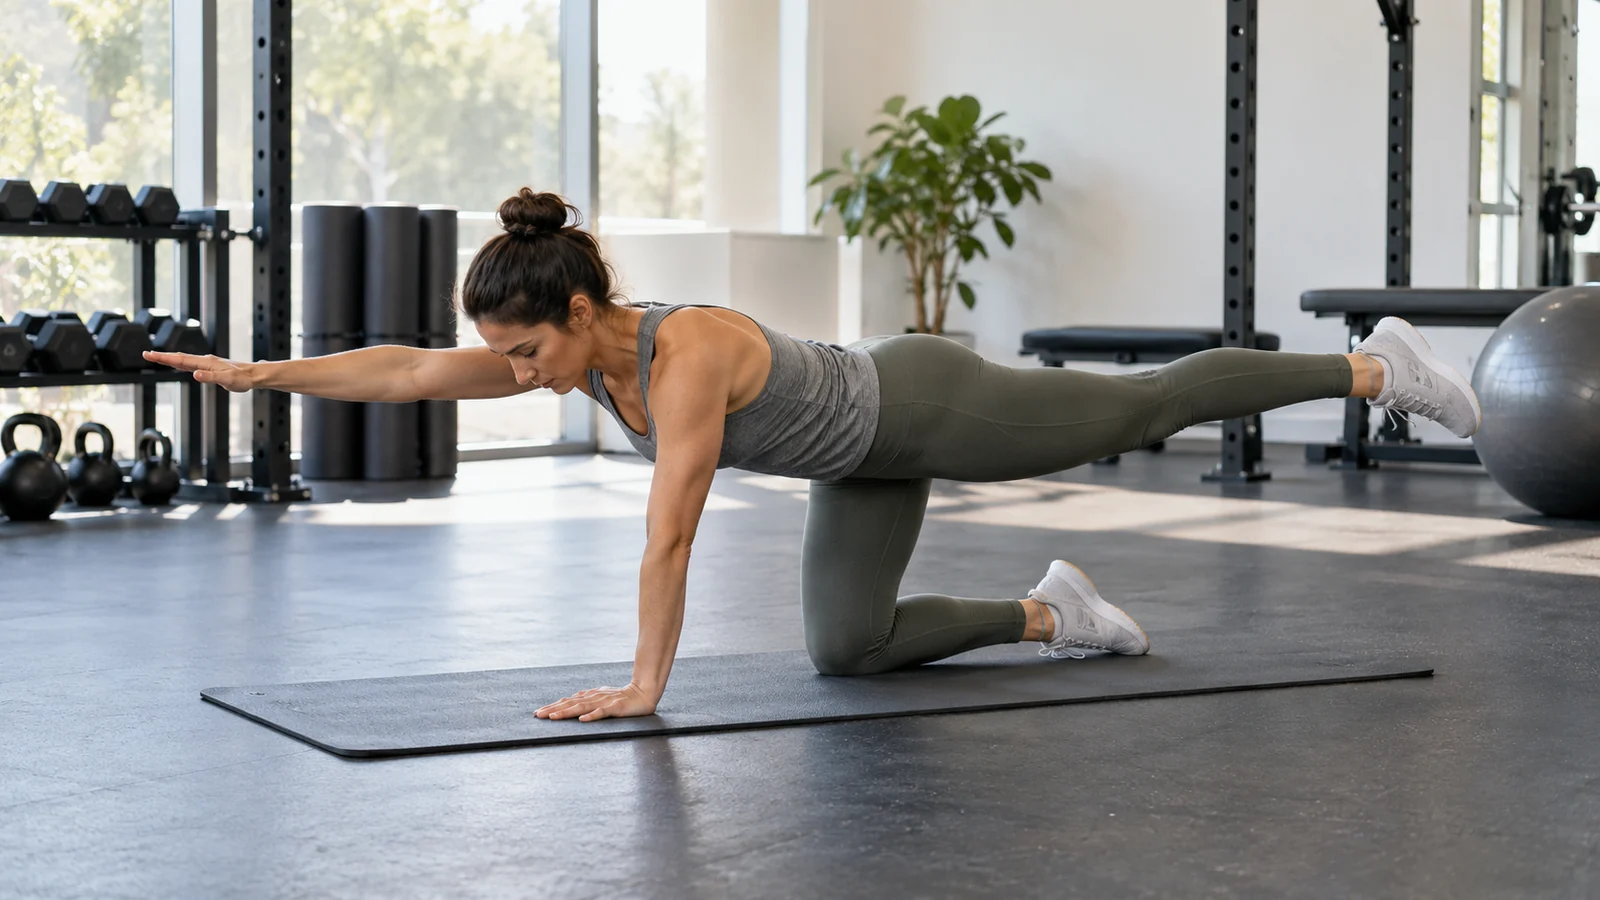
The bird-dog exercise is a hands-and-knees core movement in which you extend one arm and the opposite leg while keeping your trunk relatively still. Reach long rather than high, breathe normally, and return both limbs with control. Beginners can start with a leg slide or a single-arm reach before combining the two movements.
Published October 12, 2026
A useful starting session is one or two sets of four controlled repetitions per side, with a short pause on each reach. The goal is not to lift as high as possible or hold your breath through a long balance challenge. It is to move your limbs without turning every repetition into a twist, a back arch, or a rush to the next side.
This guide focuses on quadruped control: the particular skill of supporting yourself on your hands and knees while changing which limbs contact the floor. It covers setup, clear repetition counting, easier variations, sensible progressions, and ways to include bird dogs in a broader strength routine.
What does the bird-dog exercise train?
The bird dog challenges the muscles around your trunk to manage position as an arm and the opposite leg move away from you. Your hips and shoulders also contribute to the reach and support. It is often described as an anti-rotation exercise because you try to limit unwanted trunk turning while your support changes.
The important word is “limit.” You are not a statue, and tiny shifts are normal. The aim is a controlled, repeatable movement rather than an impossible promise of zero motion. A beginner who makes a short reach with good control is practicing the intended skill more effectively than someone who lifts high and twists to get there.
Mayo Clinic’s core-exercise guidance includes the quadruped, also called the bird dog, and presents single-arm and single-leg raises before the combined version. That progression is useful: you can learn one moving part at a time instead of assuming the full exercise must be your first attempt.
Bird dogs can contribute to a general core routine, but they are not a complete strength program. They do not replace progressively loaded squats, presses, pulls, or other movements relevant to your goals. Nor does performing them prove that your back is protected from injury. Think of them as one practical exercise with a clear purpose and adjustable difficulty.
Set up a comfortable, stable starting position
Choose a level surface with enough space to extend an arm forward and a leg behind without hitting furniture. A thin exercise mat can make kneeling more comfortable. Avoid a soft bed or an unstable cushion that makes it difficult to tell whether you are controlling the movement or simply sinking into the surface.
- Place your hands under or close to your shoulders.
- Position your knees under or close to your hips.
- Spread your fingers comfortably and press through your whole hands.
- Look toward the floor so your head follows the line of your torso.
- Find a comfortable back position without forcing a large arch or round.
- Gently firm your abdominal muscles while continuing to breathe.
There is no need to pull your belly in as hard as possible. Use enough effort to keep your trunk organized while allowing normal breathing. If you cannot take a relaxed breath in the starting position, soften the effort and reset. The exercise should begin with a position you can tolerate before you remove a support point.
Make small adjustments for your body rather than chasing a photograph. Slight differences in hand spacing or knee position can be reasonable. What matters is that your hands and knees feel secure, your neck is comfortable, and you can begin the reach without a dramatic shift to one side.
How to do a bird dog step by step
The American Council on Exercise’s bird-dog demonstration is a useful reference for the opposite-arm, opposite-leg pattern. Use these concise cues during practice, then judge the repetition by how steadily you return to the start.
- Prepare. Settle onto both hands and knees and take an easy breath.
- Start small. Move your right hand forward and your left foot backward, keeping the reach short at first.
- Extend without lifting high. Reach your arm and leg toward opposite ends of the room. Stop at a height you can control, generally no higher than the line of your trunk.
- Pause. Hold briefly while keeping your chest and pelvis oriented toward the floor.
- Return. Bring the hand and knee back underneath you without dropping them or swinging across the midline.
- Reset and alternate. Reestablish a steady base before moving your left arm and right leg.
The paired movement is right arm with left leg, then left arm with right leg. You can say the pairing out loud during the first few attempts. Confusing the sides is a coordination issue, not a sign that you are incapable of the exercise. Slow down and return all four contact points to the floor before trying again.
Think “make yourself longer,” rather than “show the ceiling the sole of your shoe.” The second cue often encourages the leg to lift beyond what you can control. Keep the reaching knee comfortable and the foot relaxed. You do not need to force the toes into a particular angle.
What a good repetition feels like
You may notice effort around your abdomen, supporting shoulder, hip, or back muscles. You do not need to feel one precise muscle burning. A successful repetition is one you can pause, breathe through, and reverse without losing your base. If you feel mostly wrist pressure or lower-back discomfort, the setup or variation needs attention.
How to count repetitions per side correctly
For this guide, one right-arm/left-leg reach and return is one repetition on that pairing. One left-arm/right-leg reach and return is one repetition on the other pairing. “Four per side” means eight total reaches, not four total reaches and not eight on each side.
A simple alternating set looks like this:
- Right arm and left leg: repetition one for that side.
- Left arm and right leg: repetition one for that side.
- Repeat the pair three more times.
- Finish with four reaches on each pairing, eight reaches total.
Two sets of four per side therefore contain sixteen total reaches. If each reach takes roughly two seconds out, two seconds paused, and two seconds back, the movement time is approximately ninety-six seconds across both sets. Add resets and a rest break, and this is a small practice block rather than a precisely timed ninety-six-second workout.
You can also complete one side at a time if you find that simpler, but avoid rushing through the second side to catch up. Keep the same number of controlled repetitions on both sides initially. If one side consistently feels very different or symptoms appear, get individual guidance rather than prescribing yourself a large correction volume.
A beginner bird-dog routine
This original template is designed for general exercise practice, not injury treatment. Use it two or three times a week if comfortable, either near the beginning of a workout or in a short standalone movement session.
- Preparation: settle into the hands-and-knees position and take three easy breaths.
- Practice: perform one single-arm reach and one leg slide on each side.
- Working sets: one or two sets of four repetitions per side.
- Pause: approximately two seconds on each reach.
- Rest: 30–60 seconds between sets, or longer if needed.
- Stopping point: finish before your trunk repeatedly twists or your movement becomes hurried.
If four per side is too much, start with two. If the combined movement is difficult from the first repetition, use one of the regressions below. There is no benefit to spending an entire set fighting a version that currently prevents you from practicing the basic skill.
Suppose you complete four comfortable repetitions per side on Monday, but on Thursday you can only manage three with good control after a tiring workout. Record three and stop. Your body does not owe the plan an identical performance every day. Consistency means returning to suitable practice, not ignoring fatigue to preserve a number.
Easier bird-dog variations that preserve the goal
Leg slide with the toes on the floor
From the starting position, slide one foot backward while keeping the toes lightly in contact with the floor. Reach only as far as you can without letting your pelvis turn. Slide the knee back underneath you. This reduces the balance demand and gives you a clear introduction to moving at the hip while the trunk stays organized.
Try four slides per side. If you are on a surface where the foot catches, reposition between repetitions rather than forcing it to drag. Do not use a slippery floor that compromises the supporting hand or knee. The point is an easier exercise, not a surprise slide.
Single-arm reach
Keep both knees down and reach one arm forward. You can first slide the fingertips along the floor, then lift the hand slightly if comfortable. Maintain a steady supporting shoulder rather than sinking your chest toward the mat. Return the hand before alternating sides.
This version lets you identify whether the arm movement triggers the biggest balance shift. If reaching all the way forward feels awkward, shorten the distance. A small controlled lift is enough for practice. You do not need your upper arm alongside your ear to count the repetition.
Single-leg reach
Keep both hands down and slide one foot backward, then lift it only a little if you can maintain position. The hands provide an extra support point compared with the full bird dog. Return slowly, and watch for the temptation to lift the leg higher by arching your back.
Short opposite-limb reach
Combine the arm and opposite leg, but keep both close to the starting position. You might move the hand forward a few inches and lightly unweight the opposite knee. Gradually increase reach length only when the shorter version looks steady. This creates an intermediate step between isolated limb movement and full extension.
Common mistakes and how to fix them
Your lower back arches as the leg rises
Lower the leg and think about reaching backward instead of upward. If the arch returns immediately, switch to a leg slide with the toes down. You may also be reaching farther than you can currently control. Make the movement smaller before adding stronger abdominal tension.
Your hips turn toward the lifting leg
Imagine both front hip bones continuing to face the floor. Shorten the reach and pause before lifting the hand. If the combined pattern remains difficult, practice single-limb versions. A little shift is expected, but a large rotation changes the task from resisting movement to finding a way around it.
Your supporting shoulder collapses
Press the supporting hand gently into the floor and keep the upper body from sinking. Avoid locking yourself into a painful elbow position. If supporting your weight on one arm is uncomfortable, choose an alternative core exercise or get help with an appropriate modification rather than repeatedly provoking the joint.
You look forward into a mirror
Looking straight ahead can encourage your neck to tip upward. Use a short video from the side instead of watching a front-facing mirror throughout the set. Position the camera before starting and keep your eyes toward the floor. Review the clip afterward without turning the exercise into a constant self-inspection task.
You hold your breath
Reduce the reach or shorten the pause until you can breathe. Count the repetitions quietly out loud if that helps. The exercise does not need a maximal brace, and a longer hold is not useful when it turns into a struggle to remain rigid.
You rush the return
The return is part of the repetition. Set your hand and knee down quietly, regain a steady position, and then change sides. If you repeatedly slap the floor or swing the leg inward, stop the set earlier. Better control on the way back is a meaningful form of progress.
How to progress without turning it into a different exercise
Progress one variable at a time. First make the current reach smoother. Then consider adding a repetition per side, lengthening the reach, or extending the pause slightly. You do not need to change all three or introduce weights to make the exercise worthwhile.
A practical sequence might be four per side with a two-second pause, then five per side with the same pause, then six. If six controlled repetitions are easy, return to four and use a three- or four-second pause. Keep breathing and preserve the same return. These are coaching options, not universal performance standards.
Resist the urge to escalate immediately to a bear-plank bird dog, unstable surface, or heavily banded version. Each introduces additional demands that can obscure the original task. A more elaborate variation is appropriate only when it serves a specific goal and you can explain what you are trying to improve.
External resistance is optional. For most beginners, there is plenty to learn by controlling the basic pattern and progressing the rest of their strength program. If you eventually use a band or weight, learn the setup with qualified guidance and avoid improvised anchors that could slip.
Bird dog versus dead bug, plank, and loaded carries
The bird dog is performed on hands and knees, with your trunk supported against gravity while opposite limbs move. The dead bug is performed on your back and creates a different support situation. Both can be useful, but comfort, control, and your training goal should determine which you choose.
A plank generally emphasizes holding a position with a longer body lever rather than repeatedly reaching opposite limbs. A farmer’s carry adds external load and walking. These movements overlap in broad trunk demands but are not interchangeable tests of a single “core strength” score.
Choose one or two options you can perform well rather than collecting a long list of similar exercises. If your wrists dislike floor support, a comfortable supine exercise may fit better. If you want practice handling and moving with external weight, a suitable carry may be more specific. No single choice needs to win for everyone.
Where to put bird dogs in your workout
A light set near the beginning can provide low-fatigue movement practice. Keep it easy enough that your supporting shoulders and trunk are not exhausted before the main session. Bird dogs are not a mandatory activation ritual, and skipping them does not invalidate the exercises that follow.
They can also fit after your main strength work, provided you still have enough attention and control. If you are consistently too tired to perform them well at the end, move them earlier or use fewer repetitions. Workit’s two-day full-body workout offers a broader framework in which a small core block can fit.
For example, practice one easy set of bird dogs, complete your main lower-body exercise, press, and chest-supported dumbbell row, then finish with any planned accessory work. This is an example of placement, not a complete individualized program. Your main exercises still need their own appropriate warm-up and progression.
If you only have a few minutes at home, one controlled set can be a useful skill session. It does not need to become a high-intensity circuit. Leave enough space between repetitions to reset, and finish while you still understand what each movement is supposed to accomplish.
Track control rather than chasing fatigue
Record the variation, repetitions per side, pause length, and one observation. “Short reach, four per side, two-second pause, pelvis steadier” is more actionable than “core burned.” The next session can repeat that exact setup, making it easier to see whether your control is improving.
A workout log also prevents ambiguous counts. Write “two sets of four per side” instead of “eight bird dogs,” which could mean several different things. Use the same definition every time, particularly if you share the plan with a trainer or training partner.
Check only a few features in a video: does your leg lift mostly by moving at the hip, does your pelvis stay reasonably level, and can you return quietly? Avoid trying to diagnose subtle asymmetries from a phone clip. Persistent discomfort or a marked difference between sides is a reason for individual assessment, not an invitation to invent a corrective program.
Comfort, symptoms, and sensible limits
Bird dogs should not produce sharp pain, spreading symptoms, numbness, or worsening joint discomfort. Stop if those occur. This guide does not diagnose back pain or prescribe rehabilitation. If you have an injury, recent surgery, pregnancy-related concerns, or a condition that affects floor exercise, seek advice about an appropriate option.
A little extra padding under the knees may improve comfort, provided it stays stable. Wrist discomfort may require a different exercise or a professionally chosen modification. Do not assume you should simply endure pressure because the movement is commonly called beginner-friendly. The suitable version is the one your body can tolerate and control.
Bird-dog exercise FAQ
How long should I hold each repetition?
Start with a brief pause, such as two seconds, while breathing. Longer holds are optional and should not come at the cost of position. If you can only hold by arching, twisting, or holding your breath, shorten the pause or reduce the reach.
Is shaking a sign that it is working?
Some shaking can accompany effort, but it is not a goal or a reliable score. Judge the set by whether you can maintain the intended movement. If shaking makes the return uncontrolled, stop earlier or choose an easier version.
Can bird dogs flatten my stomach?
They train a movement and challenge trunk muscles; they do not selectively remove abdominal fat. Changes in appearance depend on broader factors and cannot be promised from one exercise. Use bird dogs for controlled practice rather than as a spot-reduction strategy.
Do I need to bring my elbow and knee together?
No. An elbow-to-knee variation adds a different movement. The basic version here returns your hand and knee to the starting position without a deliberate crunch. Learn that pattern first so you know which part of the exercise you are actually progressing.
Keep the next session simple
Start with a stable base, reach the opposite arm and leg only as far as you can control, and count repetitions per side clearly. Repeat a manageable amount before making it harder. To explore Workit as part of your exercise routine, visit Workit on the App Store.