
Published October 27, 2026
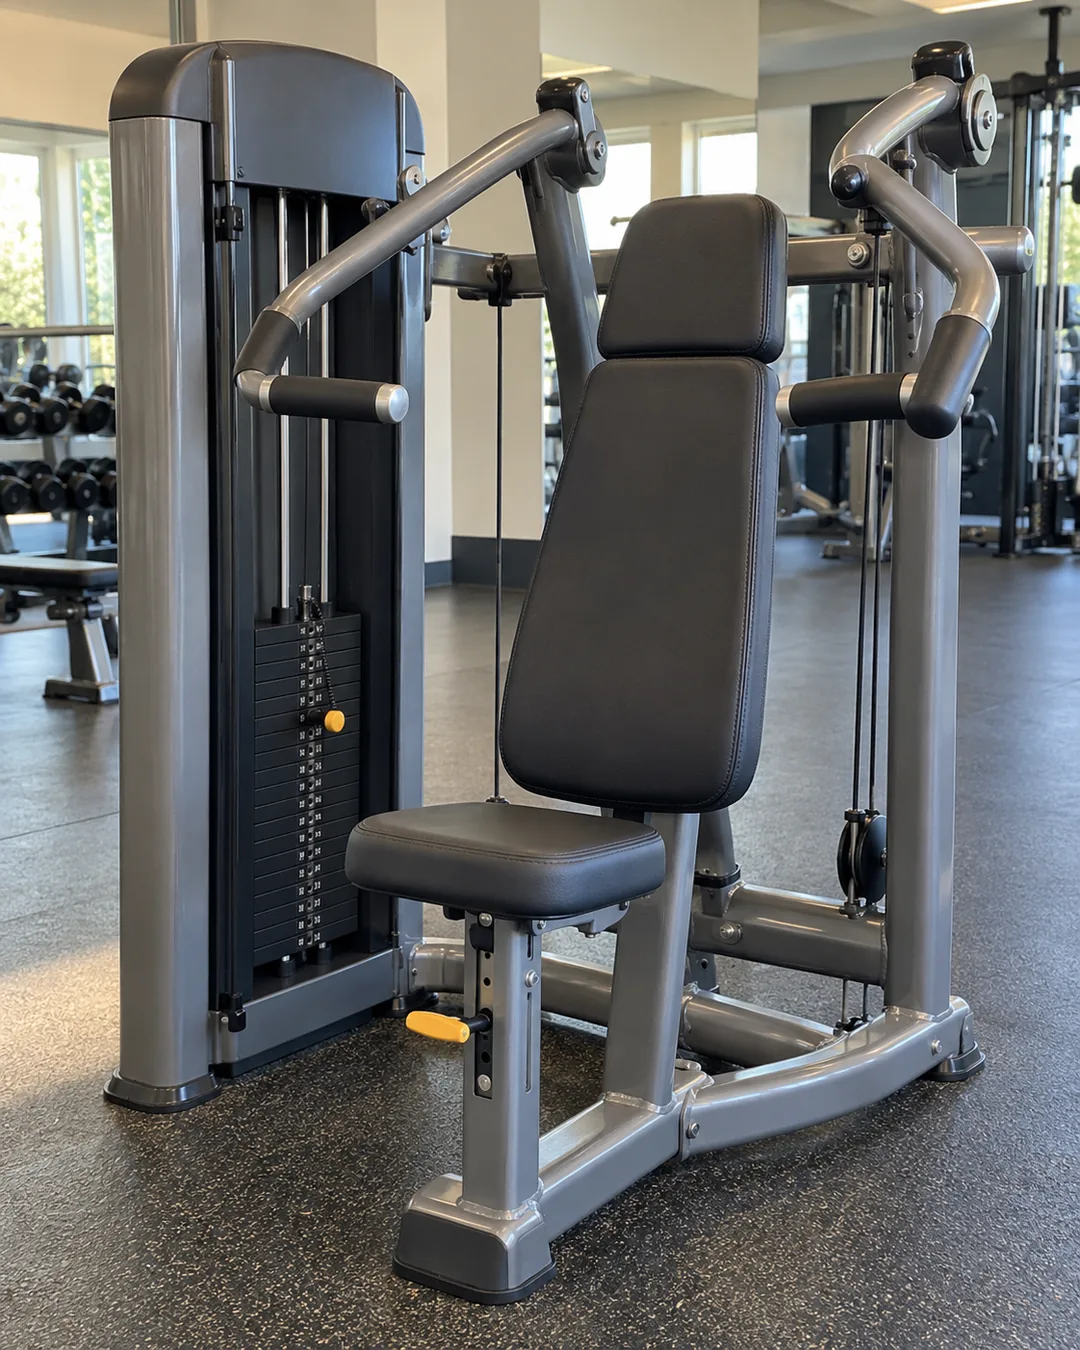
To use a shoulder press machine, adjust the seat so the handles begin around shoulder height, keep your feet supported and your back comfortably against the pad, then press upward and lower with control. Start with a light setting and check that the machine’s path fits your shoulders. The correct seat position and range depend on the model and your body, not on a universal seat number.
A guided machine can make overhead pressing simpler to organize, but it does not choose the right setup or weight for you. This guide explains the adjustments to check, how to recognize a comfortable pressing path, and how to build a repeatable progression without turning every set into a maximum-effort test.
What the shoulder press machine trains
A shoulder press combines raising the upper arms with straightening the elbows. The deltoids and triceps contribute substantially. The machine supports or guides the movement, while your body still needs to maintain a stable seated position and control the handles.
This is different from a chest press machine, whose handles travel more forward than overhead. Some machines have a reclined back pad, so the difference is not always visually obvious. Read the exercise placard and machine name rather than choosing a station only because it has a seat and handles.
A machine press is also not a complete shoulder program by itself. It is one pressing pattern. You do not need to add every shoulder exercise afterward, but a balanced routine should account for the other movements you perform, your goals, and the amount of work you can recover from.
The most useful benefit for a beginner is often practical: you can adjust a pin, sit in a repeatable position, and learn to control the press without first bringing two dumbbells into place. That convenience does not prove that machines are universally safer or that they produce better results for every person.
Read the machine before you load it
Shoulder press machines are not interchangeable. Some use one weight stack, some have independent stacks, and others use plates. Handles may move vertically, travel in an arc, or converge slightly. A seat-height change can alter where the handles begin relative to your shoulders.
The Life Fitness manuals and resources hub is one example of a manufacturer’s source for model-specific instructions. Use your actual machine’s placard or manual, and ask gym staff to demonstrate unfamiliar controls. A generic article should not overrule an equipment instruction.
Before the first set, identify the seat adjustment, resistance selector, any start-position or range adjustment, and any assist lever. Do not experiment with a lever while holding a loaded press overhead. Make adjustments only when the machine is at rest and your body is clear of moving parts.
- Check that the seat pin or locking mechanism is fully engaged.
- Keep hands, clothing, hair, and accessories away from the stack and linkages.
- Use only the intended weight selector or approved loading points.
- Do not hang a dumbbell from the selector pin to create an extra increment.
- Report damaged cables, loose parts, or unusual sticking to staff.
- Leave enough space to enter and exit without stepping over loose plates or bags.
If you cannot identify the controls or the machine does not move smoothly at an easy setting, do not try to solve it with more force. Use another exercise while staff assess the equipment.
How to set the seat height
Begin with the manufacturer’s suggested handle position. For example, the Life Fitness Insignia manual describes handles aligned with or above shoulder height for its shoulder press. That is a reference for that model, not a command to use the same setting on every machine.
Sit fully on the seat and check the handle position before selecting a challenging load. You should be able to take a secure grip without aggressively reaching behind your body, shrugging just to reach the handles, or sliding your hips forward off the seat.
If the handles begin too low relative to your shoulders, you may be forced into a deeper starting position than you can control comfortably. If they begin too high, you may lose a useful portion of the movement or struggle to reach them securely. Adjust one step at a time and test with a light load.
Keep the feet supported by the floor or the machine’s intended platform. If an otherwise appropriate seat position leaves your feet dangling, ask staff whether the model has a suitable approved adjustment or whether another machine fits better. Do not build an unstable platform from loose equipment.
Choose a comfortable grip and arm path
Many machines offer palms-forward handles and neutral handles, where the palms face more toward each other. Some offer only one option. Try the available grips at low resistance and choose the one that lets you press comfortably with the wrists reasonably aligned over the forearms.
Neutral handles can feel more comfortable for some people, but they are not a universal treatment for shoulder pain. Likewise, a palms-forward grip is not automatically wrong. The important question is whether the complete machine path suits you without forcing a painful or awkward position.
Your elbows will usually sit under or somewhat forward of the hands at the start, depending on the machine. Avoid forcing them far behind your torso. You do not have to make a perfect right angle at the elbow just because a picture shows one; body proportions and handle geometry vary.
Keep your thumbs around the handles. A relaxed but secure closed grip is more useful than balancing the handles across open palms. If you keep bending the wrists backward as the set gets harder, reduce the resistance and recheck the setup.
How to perform the press
PureGym’s machine shoulder-press demonstration emphasizes a supported seated position and controlled lifting and lowering. Once your machine fits, use this concise sequence:
- Take your position. Sit with your hips on the seat, feet supported, and back comfortably against the pad. Keep the head aligned rather than pushing it forward.
- Grip and prepare. Hold the intended handles evenly. Set a comfortable trunk brace without exaggerating a back arch.
- Press smoothly. Push the handles upward along their guided path. Keep your body seated instead of using a leg drive or sliding forward.
- Finish under control. Straighten the arms to a comfortable endpoint without violently snapping the elbows or crashing into the machine’s stop.
- Lower deliberately. Return through the range you can control without bouncing the stack or forcing a deep stretch.
- End safely. Return the handles to the resting position before releasing them or changing the resistance.
Exhale as you press and inhale as you return if that rhythm feels natural. Avoid a long breath hold while learning. If the weight makes you strain so hard that you cannot maintain a controlled breathing pattern and posture, lighten the practice set.
How deep should you lower the handles?
Use the machine’s intended range within your comfortable control. Do not force the handles to a fixed ear, chin, or collarbone landmark simply because another person uses that depth. The same external landmark can represent a different shoulder position on a different machine.
A useful bottom position lets you pause briefly without your shoulders feeling jammed, the wrists collapsing, or the torso changing shape to escape the position. You do not need to pause on every repetition; this is a control check for the setup.
If you can only move through a tiny range because the load is too heavy, reduce it. If the full available range is uncomfortable even at an easy setting, check the seat and grip. If no supported adjustment gives you a comfortable path, choose another exercise rather than making the machine fit by twisting sideways.
The top position also deserves attention. Allow a normal controlled finish rather than forcefully driving into the mechanical endpoint. Do not try to keep the shoulder blades permanently pinned down while the arms rise; overhead movement involves the shoulder girdle, not just the upper-arm bones.
Choose your first working weight
Begin below what you think you can lift. An unloaded plate-loaded machine may still have substantial starting resistance, while a selectorized machine’s lightest setting may be easy or demanding depending on its design. Ask staff if the starting resistance is unclear.
Perform a short easy set to check the path. If that is comfortable, increase cautiously for another practice set rather than jumping straight to a challenging load. The goal of this first session is to establish a repeatable baseline, not to discover a one-repetition maximum.
An illustrative beginner working target is one or two sets of 8–12 repetitions, ending with roughly two or three good repetitions still possible. Choose less work if you are learning, returning after a break, or already doing substantial pressing elsewhere in the session.
If you cannot reach the lower end without arching, bouncing, or losing the seated position, reduce the resistance. If the set feels very easy and every repetition is consistent, a small increase may be reasonable next time. You do not have to settle the perfect load in one workout.
Workit’s reps-in-reserve guide explains how to think about effort without treating every set as a failure test. Estimates are less precise when an exercise is unfamiliar, so err toward a manageable first exposure.
Why machine numbers cannot be compared directly
A 20 kg setting on one shoulder press is not necessarily the same challenge as 20 kg on another. The stack label, lever arms, pulley system, machine friction, and starting resistance all influence what reaches your hands. Some machines also label each side separately.
Compare your own performance on the same machine under similar conditions. Record the machine name or location, seat setting, grip, resistance, and repetitions. You do not need an engineering calculation to train effectively; you need a reference you can reproduce.
For a plate-loaded model, clearly state whether your note records weight per side or the total plates added. For a two-stack model, record both settings. If you use a different machine while travelling, begin with an easy test and establish a temporary baseline instead of forcing the old number.
This matters especially when a new gym feels harder. A lower displayed load does not establish that you lost strength. First rule out changes in the equipment, setup, range, rest, and position in the workout.
A simple progression example
Suppose you choose two sets of 8–12 repetitions on one machine and keep a few repetitions in reserve. Use the same seat setting, grip, and controlled range. A possible sequence could be 10 and 9 repetitions, then 11 and 10, then 12 and 12 across later sessions.
Once both sets consistently reach the top of the range at the intended effort, try the smallest permitted increase. Repetitions will often drop. That is acceptable if you can still perform the planned movement comfortably and remain within a manageable range.
If the smallest increase makes the first repetition unstable, return to the earlier setting. Stay there longer, or ask whether the machine has a manufacturer-approved incremental weight. Do not improvise a loading method or use forced repetitions to bridge the gap.
This is a practical example of double progression, not a timeline you must match. You may repeat a load for weeks. You may also reduce it after a break. A program can be working without a heavier number appearing every session.
Common problems and sensible first fixes
Your lower back arches more as you press
Reduce the load and check whether the seat and handle positions encourage you to lean. Keep a comfortable natural back position rather than trying to flatten yourself forcefully against the pad. If you must slide forward and turn the movement into a steep chest press, the setup or resistance needs attention.
The handles feel too far behind you
Check the seat height and any manufacturer-provided start-position adjustment. Do not twist or wrench one arm into place. A machine that does not fit your comfortable starting position is not compulsory; another model or a different exercise may be more suitable.
One arm finishes well before the other
Lower the resistance and check your grip and seating. Independent arms can reveal differences in coordination, but a guided machine does not diagnose the cause. Do not add a large amount of extra work to one side based on one uneven set. Sudden or unexplained weakness warrants assessment.
The stack crashes on the return
Slow down and use less weight if needed. Make sure you are following the model’s instructions for the bottom position. A loud impact is feedback that the return is not controlled, not evidence that the set was effective.
Your wrists fold backward
Reposition the grip so the handle sits securely and the wrist remains reasonably aligned with the forearm. Try an available alternative grip with light resistance. If you cannot find a comfortable position, do not keep adding weight while hoping the wrist will adapt.
You feel a sharp pinch in the shoulder
Stop. A painful repetition is not a useful test of determination. Recheck setup only with a comfortable easy movement, and seek professional advice if symptoms persist. Do not assume that a machine makes painful overhead pressing appropriate.
Where to place it in a weekly routine
If improving the machine press is a priority, place it early enough in the session that you can practice attentively, after an appropriate warm-up. If another lift is the main goal, the shoulder press can come later with a load adjusted to your available capacity.
Count overlapping pressing work. A session with chest presses, incline presses, push-ups, and machine overhead presses already contains several demands on the front shoulders and triceps. You do not automatically need extra front-shoulder isolation work after that.
For a simple full-body routine, one comfortable pressing exercise per session may be enough to start while you also train pulling and lower-body movements. Workit’s beginner machine-workout guide shows how to organize a broader session rather than treating one machine as the entire plan.
The ACSM resistance-training update published March 17, 2026 emphasizes consistency, individual goals, and the fact that machines and free weights can both be useful. It does not mean every person needs the same machine, load, or exercise order. A routine that fits your ability and schedule is more practical than collecting every possible variation.
Considering an extra shoulder exercise? Our dumbbell front raise guide explains a controlled isolation option. It overlaps the front-deltoid work in pressing, so first consider whether you need more volume rather than automatically doing both.
Warm-up and rest without overcomplicating the session
Use a comfortable general warm-up, then practice the press with easy resistance. The practice sets should help you check the path and prepare for the working load, not leave you exhausted before the main sets begin.
For example, after moving around enough to feel ready, perform a short light set, rest, and use another small step if needed. The exact number of warm-up sets depends on how heavy the working sets are and how familiar you are with the exercise. A light beginner session does not require a long ladder of near-working sets.
Rest long enough that you can repeat the movement and breathing pattern. Around 90 seconds to three minutes is a reasonable starting experiment for moderate working sets, with more time if needed. If the next set falls apart because you are still breathing hard, shortening rest further is unlikely to improve your practice.
During rest, leave the machine safe and avoid changing multiple adjustments. If you change the seat, grip, and load at once, you may not know which change improved or worsened the next set.
Machine press or dumbbell press?
A machine provides a guided path and usually a supported seat. Dumbbells let the hands move more independently but require you to manage the weights before, during, and after the set. Neither feature makes one option mandatory or automatically superior.
Choose the option that matches the skill you want to practice and fits comfortably. If the machine path feels awkward but a light dumbbell variation is comfortable, there is no need to force the machine. If bringing dumbbells into position is the main obstacle, a well-fitting machine may be simpler.
When switching between them, use new starting loads. Do not convert the machine stack number into a pair of dumbbells. Treat each variation as its own exercise, with a separate baseline and progression record.
Frequently asked questions
Should I lock out my elbows?
Finish with a comfortable controlled arm extension, following your machine’s instructions. Avoid forcefully snapping the elbows or driving into a stop. You do not need a dramatic bent-elbow hold at the top, but you also should not use the joint endpoint as a place to crash the load.
Can I press with one arm at a time?
Only if the machine is intended for that use and you can remain stable. Independent handles do not automatically mean every unilateral setup is supported. Read the placard or ask staff rather than sitting sideways or improvising an unsupported position.
How often should I use it?
That depends on your wider routine. Start with a manageable exposure and account for other pressing work and recovery. More frequent machine use is not automatically better if your shoulders remain fatigued or technique becomes inconsistent.
What if overhead pressing remains uncomfortable?
Skip it and get appropriate advice rather than forcing a painful range. The Leeds Community Healthcare activity guidance identifies sharp or increasing pain, swelling, and loss of movement or strength as reasons to stop and seek help. New numbness, significant weakness, chest pain, or dizziness also require attention rather than another set.
Leave with a repeatable setup
Before you finish, record the machine, seat position, grip, resistance, and clean repetitions. A note such as “same seat and neutral handles; two controlled sets; repeat load next time” can be more useful than immediately adding another exercise. For help building a consistent routine, explore Workit’s personalized workout programs on the App Store. The aim is a press you can repeat confidently, not the largest number you can make the machine display.
Comments
One response to “Shoulder Press Machine: Seat Setup, Form, and Progression”
[…] you prefer a pressing movement, the shoulder press machine guide explains seat position, grip, and a comfortable range. Presses already train the front of the […]