
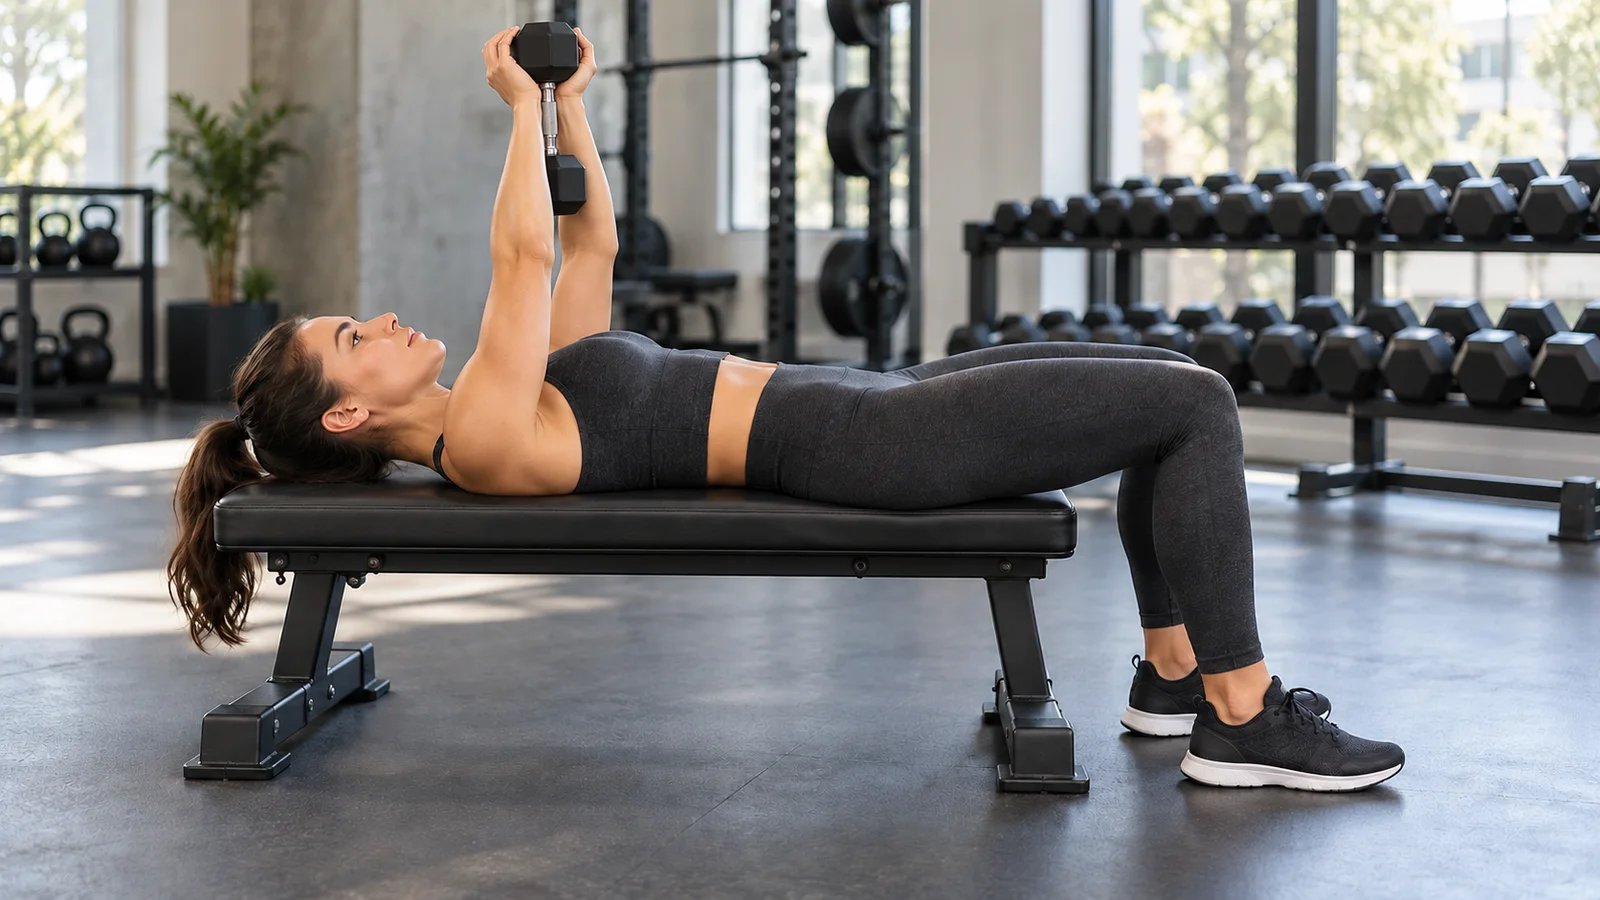
A dumbbell pullover moves one weight in an arc from above your chest toward the space behind your head, then back again. Lie lengthwise on a stable bench, keep a small, comfortable bend in your elbows, and use only the shoulder range you can control without lifting your ribs or straining your shoulders. Start with a light weight and a short arc.
The main decision is how far you can lower the weight while keeping your torso settled. Reaching deeper is useful only when the extra movement comes from your shoulders and remains comfortable. For a beginner, one or two sets of eight controlled repetitions is a reasonable first practice, provided the setup and overhead position feel secure.
Published October 19, 2026. This guide is general exercise education for healthy adults, not an injury rehabilitation plan.
What makes the dumbbell pullover different?
In a pullover, your upper arms move relative to your trunk while your elbows maintain roughly the same bend. This separates the movement from a dumbbell press, where bending and straightening the elbows is a major part of each repetition. It also creates a different loading experience from a row, which brings the elbows backward beside the body.
Gravity pulls the dumbbell downward throughout the exercise. When the weight is nearly above your shoulders, its leverage around the shoulder is relatively small. As it travels toward the space behind your head, that leverage increases. A weight that feels easy to hold over your chest can feel considerably harder farther into the arc.
This changing leverage is why your ordinary dumbbell bench-press weight is a poor starting reference. Choose a load by your ability to control the hardest part of the pullover, including the return, rather than by your ability to lift the dumbbell into position.
Pullover versus straight-arm pulldown
A cable exercise and a free-weight exercise can resemble each other while feeling quite different. A standing cable pulldown takes its resistance direction from the cable. The lying dumbbell version takes its resistance direction from gravity. Body position, equipment setup, and the point of greatest challenge therefore differ.
If you want a standing shoulder-extension exercise without holding a dumbbell above your face, see the straight-arm pulldown guide. Treat the two exercises as options to compare for comfort and control, rather than assuming that a given weight or repetition target transfers directly between them.
Which muscles does a dumbbell pullover work?
The chest and back participate in moving and controlling the upper arms, while the arms, hands, and trunk help maintain the position. The pectoralis major and latissimus dorsi are commonly discussed because both can contribute to bringing an elevated arm back toward the torso. The long head of the triceps can also assist shoulder extension and help maintain the elbow position.
How strongly you feel a particular area depends on your anatomy, range, load, and execution. Feeling a stretch near the armpit does not tell you exactly which tissue is receiving the greatest training stimulus. Neither a dramatic stretch nor a strong muscle burn is required for a useful set.
What the research can tell us
A small 2011 study by Marchetti and Uchida measured electrical activity during barbell pullovers in eight men and found greater pectoralis-major activity than latissimus-dorsi activity under its test conditions. The equipment and sample matter: this was a barbell experiment, not a long-term comparison of dumbbell training programs.
A separate 2022 study comparing pullover and pulldown positions used maximal isometric contractions in resistance-trained men. Shoulder position affected force and muscle-activity measurements. These findings support taking position seriously, but they do not establish a universally best pullover depth or prove which exercise builds more muscle over months.
Use the pullover as an optional accessory with a distinctive arm path. Keep presses and rows in a balanced routine when those movements fit your goals. There is no need to redesign an entire training week around whether the pullover belongs in a chest or back category.
Check the equipment before lying down
Use a stable, weight-rated bench with enough length to support your head, upper back, and pelvis. Place it on a level surface with clear space behind your head and beside both feet. A bench that rocks during an unloaded rehearsal needs attention before you add weight.
A manageable fixed-head dumbbell is a straightforward choice for learning. Inspect it for damage and make sure your hands can support it securely. Avoid holding an adjustable dumbbell by a removable plate or relying on an unfamiliar locking mechanism overhead. Follow the equipment manufacturer’s instructions for permitted grips and use.
- Keep your hands and the dumbbell dry enough to maintain a reliable grip.
- Use footwear and a floor surface that allow your feet to stay planted.
- Clear bags, water bottles, and other weights from the exit area.
- Choose a weight you can bring into position and put down comfortably.
- Ask a qualified trainer to demonstrate the setup if the grip or transfer feels uncertain.
Do not make the first repetition a test of improvisation. Practicing the entry and exit with an extremely light dumbbell is part of learning the exercise. If those transitions require a struggle, the working weight or equipment arrangement is unsuitable.
How to do a dumbbell pullover
1. Establish a fully supported position
Sit on the bench with the light dumbbell under control close to your torso. Lie back carefully and establish support for your head, upper back, and pelvis before moving the weight overhead. Keep both feet on the floor in a comfortable stance. If the bench height prevents stable foot contact, use a suitable stable platform or choose different equipment.
Lengthwise support makes the beginner version easier to organize than lying across a bench with the hips suspended. You do not need to drop your hips or lift your chest dramatically. Keep the natural shape of your spine without deliberately increasing the arch as the weight descends.
2. Set the grip and elbow bend
For a suitable fixed-head dumbbell, support the underside of one end with both hands according to the dumbbell’s shape, securing the handle with your fingers. Hold it above the upper chest with your arms raised. Your grip should feel reliable before you begin moving; use another exercise if the weight cannot be held securely.
Unlock your elbows slightly and preserve that comfortable bend. There is no single elbow angle that everyone must copy. The useful standard is consistency: your arm shape should look similar near the top and near the bottom rather than repeatedly folding and straightening.
3. Lower through a controlled arc
Move the dumbbell toward the space behind your head with an unhurried descent. Think of the upper arms moving around the shoulders while your chest and pelvis remain settled. Start with a deliberately small range so you can learn where the movement becomes difficult.
End the descent before pain, pinching, loss of grip, marked rib flare, or a growing back arch. Your upper arms may approach the level of the bench, or they may stop earlier. Reaching a photographed position is less important than keeping the weight and your body under control.
4. Return along the same path
Bring the dumbbell back above the upper chest without jerking it forward or changing the elbow bend to escape the difficult position. Finish with the weight balanced above you. Let the next repetition begin from that organized position rather than swinging continuously through the top.
A gentle inhale during the descent and exhale during the return is a workable breathing pattern. Keep breathing comfortable; do not take an exaggerated breath to force the chest upward. If coordinating breath and movement is distracting, shorten the set and concentrate on steady breathing.
5. Finish before the exit becomes difficult
Complete the final repetition above your chest while you still have a clear margin of control. Bring the weight close to your torso and return to sitting with the same deliberate handling used to start. If a heavier setup requires assistance, arrange that assistance before the set rather than hoping someone notices you need help.
Find your useful range before increasing weight
Begin with an unloaded rehearsal while lying on the bench. Move your arms slowly toward overhead and notice whether your ribs rise before your arms reach a comfortable endpoint. This is an observation, not a medical mobility test. It simply helps you select a conservative starting arc.
Next, repeat the movement with the lightest practical dumbbell. Loading can change what feels controlled, so do not assume the unloaded endpoint is automatically your working endpoint. Stop a little earlier on the first few repetitions and expand only if your position remains steady.
Imagine two beginners using identical dumbbells. One can lower comfortably until the upper arms are close to bench height. The other begins arching well before that point. The second person should use the shorter arc rather than borrowing the first person’s endpoint. Both can practice the exercise effectively within their current control.
Keep your range consistent within a set. If the last four repetitions become progressively shorter, record only the clean repetitions and reduce the next set’s demand. If your range becomes deeper as you tire because the weight pulls you down, end the set immediately.
Choose a starting weight and sensible effort
There is no universal beginner weight. Shoulder comfort, arm length, equipment design, and previous lifting experience all change the task. Start well below what you expect to use, then judge the whole repetition rather than just the lifting portion.
For your first practice, choose a load that allows eight even repetitions while leaving the sense that several more would remain possible. You should be able to stop at any point in the arc, breathe normally, and repeat the same endpoint. A slow final repetition is acceptable; an uncontrolled descent is not.
The American College of Sports Medicine’s 2026 resistance-training update emphasizes consistent participation and notes that training to momentary muscle failure is not consistently necessary for the average healthy adult. That is a useful backdrop for learning an exercise in which the weight passes overhead.
A practical learning tempo is roughly two or three seconds down, followed by a smooth return. This is a pacing cue rather than a special muscle-building formula. If counting seconds makes you hold your breath, simply aim for a visibly controlled descent and an unhurried change of direction.
Common pullover mistakes and their fixes
The lower back arches as the dumbbell descends
Shorten the arc and reduce the load. Check that your feet are stable and that you are not deliberately pushing the ribs toward the ceiling. A smaller movement with a quiet torso gives you a clearer training target than a large movement assembled from several compensations.
The elbows bend more and more
Some bend is intentional, but large changes turn the exercise into a different combination of shoulder and elbow movements. Pick a lighter weight and rehearse the arm shape. If you actually want an elbow-extension exercise, program that separately rather than switching exercises halfway through a set.
The weight drifts toward the face
Pause at the top and reset the path above the upper chest. Check grip security and stop if the dumbbell feels unstable. Do not compensate by moving faster. Repeated path errors are a reason to seek hands-on instruction or use another movement.
The shoulder feels pinched at the bottom
End the repetition and set the weight down safely. Do not repeatedly test the painful point under load. A lighter, shorter version may be appropriate only if it is comfortable; persistent symptoms, instability, or a history of shoulder injury deserve individualized guidance from a qualified clinician.
You chase a bigger stretch every workout
Choose a repeatable endpoint and make the existing range more controlled first. The exercise is not a contest to place the dumbbell closest to the floor. Your useful progression might be eight steadier repetitions at the same depth rather than an extra few inches of descent.
A conservative four-week practice plan
The following is an example for a healthy beginner who already tolerates light overhead movement comfortably. Use two nonconsecutive sessions each week, such as Monday and Thursday. Warm up generally, then rehearse the pullover with a very light load. These are accessory sets within a broader routine, not a complete training program.
- Week 1: One working set of eight repetitions per session. Rest and stop there while you learn the setup. Weekly total: two working sets and 16 repetitions.
- Week 2: Two sets of eight per session if the first week was comfortable. Rest about 90 seconds between sets. Weekly total: four sets and 32 repetitions.
- Week 3: Keep two sets and add one repetition to each, reaching two sets of nine per session. Weekly total: four sets and 36 repetitions.
- Week 4: If control remains consistent, use two sets of ten per session. Weekly total: four sets and 40 repetitions.
Repeat a week whenever necessary. If the second set is less controlled than the first, rest longer or return to one set. The calendar does not override how your shoulders feel. Do not increase load, depth, and repetitions together just because the next week has arrived.
After this learning block, a simple range of eight to twelve repetitions can work well. Once both sets reach twelve with consistent technique across two sessions, consider the smallest available weight increase and return toward eight repetitions. If the jump is too large, keep the lighter dumbbell and continue practicing.
Where the pullover fits in a workout
Place pullovers after the main exercises you care most about, while you still have enough attention and shoulder control for precise repetitions. A beginner might perform a squat pattern, a comfortable press, a row, and then one or two pullover sets. There is little reason to exhaust the shoulders beforehand with a long circuit.
For a supported rowing option, the chest-supported dumbbell row guide explains a movement with a different arm path and setup. Combining different patterns can be useful, but adding the pullover should not automatically double your upper-body workload.
For example, if your current session already includes three pressing sets and three rowing sets, add one light pullover set initially. Assess how the whole session feels before adding another. More exercises can make a program harder to recover from even when each exercise looks modest by itself.
Distinguish preparation from working volume. The warm-up sets versus working sets guide can help you record the light rehearsals separately, so a few easy practice repetitions do not get confused with the sets you intend to progress.
Alternatives when the setup does not suit you
Floor pullover with a deliberately limited arc
The floor supports your entire torso and can limit the available movement, depending on your arm length and dumbbell shape. Use a light load and stop before the weight or your arms collide with the floor. Keep the same grip and shoulder-comfort standards. The floor does not make an insecure overhead grip safe.
Cable or machine alternatives
A suitable cable pulldown or pullover machine may feel easier to organize because you are not balancing one dumbbell above the chest. Learn that machine’s adjustments and resistance path separately. Different equipment does not justify copying the dumbbell’s load or assuming the movement will feel identical.
Leave the pullover out
You can build a productive upper-body routine without this exercise. If comfortable presses, rows, and other pulling movements already cover your goals, the pullover is optional. A persistent struggle to find a pain-free setup is a good reason to choose another exercise rather than make the pullover a required milestone.
Questions beginners ask
Should the pullover be on chest day or back day?
Either placement can work if the overall program remains manageable. Put it where it fits your schedule and does not compromise the exercises you prioritize. Track it consistently so you do not accidentally add substantial extra work on both days.
Will it expand my rib cage?
Do not expect a dumbbell pullover to permanently enlarge your rib cage. Changes in muscle size, posture, or breathing during the movement are different from structural expansion of the ribs. Choose the exercise for a controllable resistance-training task rather than that promise.
Is soreness under the arms necessary?
No. Soreness is not the target or a reliable score for workout quality. Judge the exercise by consistent technique, tolerable recovery, and gradual improvements in what you can perform. Sharp pain, joint pain, or symptoms that persist should not be treated as evidence that the exercise worked.
Can I use two dumbbells?
Two dumbbells change the grip and coordination demands. They are a separate variation to learn with suitable loads and secure handling. Start with the version you can organize most reliably; adding a second weight is not an automatic upgrade.
Keep a useful pullover log
Record the dumbbell weight, completed repetitions, sets, and a brief description of your range. A note such as “two sets of nine, same comfortable endpoint, no rib lift” is more informative than “felt hard.” Keep the load notation clear: one 10-pound dumbbell is 10 pounds total, not 10 pounds per hand.
If you prefer an app, Workit for iPhone offers personalized workout programs and a workout journal with editable weights, reps, and sets. Use the log to support steady practice. The strongest reason to progress is that your current version has become consistently manageable.