
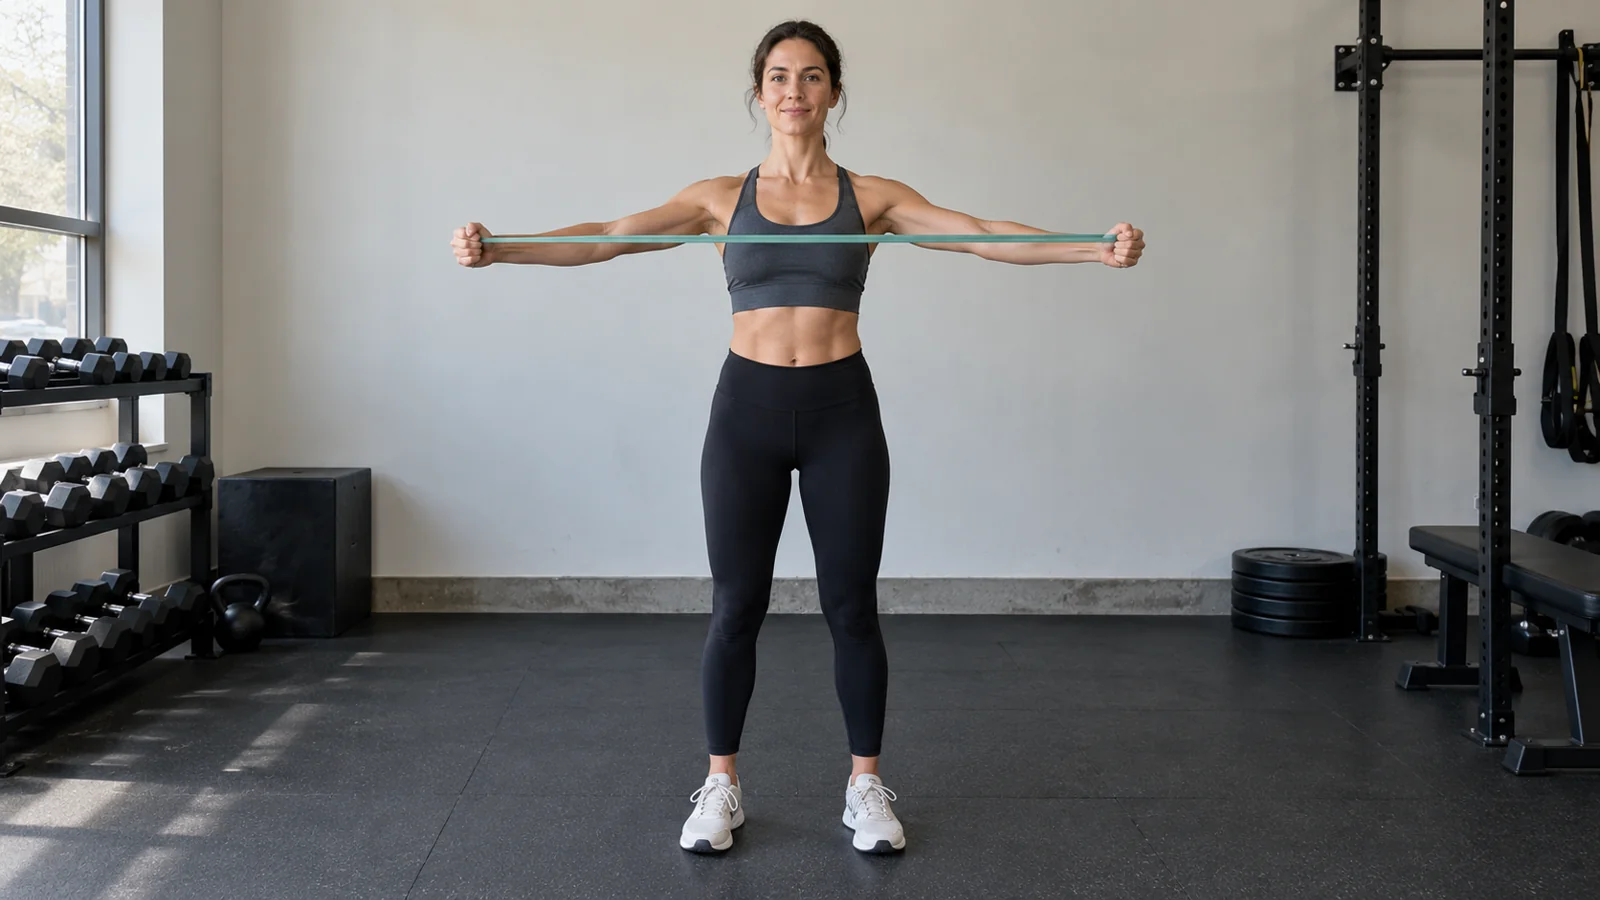
A resistance band pull-apart trains the rear shoulders and upper back by moving your arms outward against a band held in both hands. Start with a light, undamaged band at chest height, keep a small elbow bend, and separate your hands without arching your back or shrugging. Return slowly rather than letting the band snap your hands together.
Published October 18, 2026.
For a first strength-training session, try one or two sets of 10–15 comfortable repetitions, leaving about three good repetitions in reserve. For a warm-up, use even less resistance and stop well before fatigue. The exercise needs no door anchor, but band condition, grip, and stretch limits still deserve attention.
What is a band pull-apart?
In the basic pull-apart, you hold a length of resistance band in front of your chest and move your hands apart. Your upper arms travel outward while your shoulder blades move naturally with them. The elbow angle stays fairly consistent, distinguishing the exercise from a row.
The band provides resistance as it stretches. The farther you pull it, the more challenging the finish usually becomes. This helps explain why a band that feels easy at the start may still be too stiff to complete the movement smoothly.
Unlike an anchored band row or cable face pull, the ordinary pull-apart uses your hands as the two ends of the setup. That makes it portable and relatively quick to prepare. You still need enough clear space around you and a band suited to the intended stretch.
It is a small accessory exercise. It can be useful within a broader routine, but it does not replace all rows, pressing movements, lower-body exercises, or general physical activity.
Muscles worked and what the evidence says
The rear deltoids help move the upper arms outward, while muscles around the shoulder blades contribute to controlling their movement. Parts of the trapezius and the rotator cuff can also be active. The exact demands change with hand orientation, arm direction, resistance, and technique.
A 2022 study of band pull-apart muscle activity tested different hand positions and movement directions in ten men. It found that those choices changed measured shoulder-muscle activity. For example, a palms-up position increased infraspinatus activity compared with palms down in the tested conditions, while upward-diagonal movements increased activity in several trapezius regions.
That was a small, short-term electromyography study. It did not establish that one grip prevents injury, fixes posture, or produces superior long-term muscle growth. Treat its findings as evidence that variations change the exercise, not a reason everyone must use the same variation.
For a beginner, comfort and repeatability are more useful selection criteria than chasing the highest activation reading. Start with an easy horizontal version, learn to control it, and change one feature at a time if there is a clear reason.
Choose a band that lets you finish the repetition
A light, long flat band is a practical starting point
A long flat band gives you room to adjust the distance between your hands. Pick a resistance that lets you open your arms without bending the elbows substantially, lifting your chest, or pulling the head forward.
A long loop can also work if its manufacturer permits that use. Holding both layers of a loop may make it much harder than holding one strand, and a thick pull-up-assistance band can be unnecessarily stiff for this exercise.
Short mini-bands are not interchangeable with long exercise bands. A short loop may demand too much stretch or force an awkward starting position. Choose equipment designed to accommodate the movement rather than trying to stretch whatever band happens to be nearby.
Band colors are not universal
A red band from one brand is not necessarily equivalent to a red band from another. Thickness, material, length, and manufacturer design all matter. Even a printed resistance range usually depends on how far the band is stretched.
Record the brand and resistance level when you want to track progress. “Light blue long band, hands near the same marks” is a more useful note than “blue band” if your gym has several different sets.
Follow the instructions for your specific product
Check permitted exercises, maximum stretch, cleaning, storage, and replacement guidance. If the instructions call for protective eyewear, use it. Do not invent a universal safe stretch ratio for every band, and do not assume a thicker product cannot break.
The TheraBand user guide includes product-safety instructions; your own brand’s current instructions should govern your equipment. Latex-free options are available when latex is unsuitable for you.
The safety check before every set
Inspect the band in good light. Look for cuts, tears, cracks, thinning, damaged seams, or other deterioration. Do not use a band that looks compromised, and do not tie a knot over a damaged section to keep using it.
Keep sharp jewelry, rough surfaces, and other objects that could damage the band away from it. Make sure your grip is secure before stretching. Avoid tightly wrapping the band around your fingers or hands in a way that causes pressure, numbness, or makes it hard to release safely after unloading.
Keep the band below your face and away from your eyes. Clear space at your sides so your hands will not hit a wall, desk, or another person as you open your arms. Do not let children or pets move into the exercise area.
The National Center on Health, Physical Activity and Disability’s band guidance also emphasizes inspecting bands before use and selecting an appropriate comfortable range. Lightweight equipment still needs a deliberate safety check.
Finish by bringing the hands together slowly until the band is unloaded. Only then loosen your grip. Never release one end while it is stretched or test an old band by pulling it hard near your face.
How to do a resistance band pull-apart
- Stand or sit securely. Stand with feet comfortably apart and knees soft, or sit on a stable chair with your feet supported. Keep your torso upright without forcing a large chest lift.
- Hold the band in front of your chest. Begin around chest height, below your face. Use a hand spacing that leaves the band lightly tensioned rather than heavily stretched before you move.
- Keep a small elbow bend. Maintain approximately that angle. Do not lock the elbows forcefully or turn the movement into repeated bending and straightening.
- Move the hands outward. Open your arms in a smooth arc while keeping the band around chest level. Let your shoulder blades move with the arms rather than trying to pin them rigidly in place.
- Stop at a controlled endpoint. Finish before you need to arch your back, push your head forward, or drive your arms behind your body. The band does not have to touch your chest.
- Return slowly. Bring your hands toward the starting position while resisting the band’s recoil. Keep breathing and maintain the same posture.
- End before technique changes. Stop the set while you can still repeat the movement cleanly. Bring the band fully out of tension before setting it down.
Think “open smoothly, return smoothly.” A brief pause near the open position can help you notice control, but you do not need to squeeze the shoulder blades as hard as possible. Make the movement comfortable before making it challenging.
Where should your arms and hands finish?
A useful first endpoint is with the upper arms roughly in line with your torso or slightly forward, depending on comfort. You do not need to push the arms far behind your back. If you have to lift your ribs to get farther, stop earlier.
Different band lengths and hand spacings change where the band sits relative to your chest. Touching the chest is therefore a poor universal measure of a complete repetition. Use the arm movement and your ability to control it instead.
The return should also remain comfortable. Allow the shoulder blades to move forward naturally as the hands come closer together, without collapsing your whole torso or dropping the band abruptly.
If a chest-height version bothers your shoulders, try less resistance and a slightly lower arm position. That is an adjustment to explore, not a treatment for pain. If discomfort persists, leave the exercise out and get individual guidance.
Palms down, palms up, or neutral?
A palms-down grip is a common starting option with a flat band. It is easy to recognize and can be comfortable for many people, but it is not mandatory.
A palms-up version changes shoulder and forearm orientation. It may feel better for some people and worse for others. Start with very light resistance if you try it, keeping the wrists comfortable and the same controlled arm path.
A neutral or thumbs-up orientation may be possible with suitable equipment and grip. Do not twist the band into a painful grip just to imitate a label. The practical question is whether you can hold it securely and move without discomfort.
Keep your first several sessions simple. Pick one comfortable hand orientation and repeat it. If you later compare another, hold the band type, range, and effort approximately constant so you can notice the actual difference.
No grip makes the exercise a guaranteed posture correction or a universal rehabilitation drill. If a clinician has prescribed a specific version, follow that plan rather than substituting a variation based on internet popularity.
Common mistakes and useful fixes
The band is too strong at the finish
You may start easily and then stall halfway open. Choose a lighter band rather than jerking through the last part. You can also adjust your grip according to the manufacturer’s instructions, using a longer working length where appropriate.
You bend your elbows to pull farther
That shortens the lever and changes the movement toward a row. Reduce the resistance and keep a small, steady bend. If you want to train a row, use a separate row exercise instead of accidentally changing this one mid-set.
Your lower back arches
If your chest lifts and pelvis shifts as you open the arms, the band may be too difficult. Exhale, reset your ribs over your pelvis, and try less resistance. A seated version can make it easier to notice torso movement, although sitting does not remove the need for control.
Your shoulders rise toward your ears
Reduce the resistance and avoid forcing the arms higher than is comfortable. Some shoulder-blade movement is normal; the issue is an uncontrolled shrug used to complete a difficult repetition. Do not respond by forcing the shoulders downward as hard as possible.
Your neck moves forward
Look comfortably ahead rather than reaching your face toward the band. Stop a little earlier at the open position and check whether a lighter band lets the head remain still.
The return snaps shut
Slow the closing phase and shorten the set. If you cannot resist the recoil, lower the resistance before the next set. The return is part of the exercise, not a reset to skip.
Your hands become uncomfortable
Check for excessive grip pressure, folded edges, or a band wrapped too tightly around the hands. Unload it completely before adjusting. Numbness, tingling, or loss of grip is a reason to stop rather than tighten the wrap.
Warm-up sets versus strength-training sets
A warm-up pull-apart should leave you feeling ready for the session. Use an easy band, perform perhaps 8–12 smooth repetitions, and stop with many repetitions still available. You are rehearsing movement, not trying to create a deep burn.
A working set is intentionally more demanding. As a conservative example, use one or two sets of 10–15 repetitions with roughly three good repetitions in reserve. Rest around 45–90 seconds or until you can repeat the movement steadily.
These are practical starting examples rather than a universal prescription. If your shoulders are already tired from rows, presses, or other accessories, fewer pull-apart sets may be appropriate.
The ACSM’s 2026 resistance-training update supports bands as a viable training option and emphasizes consistency. It also notes that momentary failure is not consistently necessary for results in the average healthy adult. You do not need to turn every small accessory set into a maximum-effort test.
Workit’s explanation of warm-up sets versus working sets can help you decide what role the exercise is serving on a particular day.
A beginner progression without guesswork
Begin with the same band and hand spacing for several sessions. Record the brand, resistance level, grip position, repetitions, and whether the final reps stayed smooth. If your band has printed markings, use them as a setup reference without cutting or marking the material in a way the manufacturer discourages.
For example, start with one set of 10 comfortable repetitions. At the next session, repeat it or add a repetition or two if it felt easy and recovery was normal. Build toward 15 with the same range and no extra torso movement.
Once one set is predictable, you can add a second set if it fits the rest of your program. Alternatively, keep one set and try a small resistance increase. Change only one variable at a time so you know what made the exercise harder.
When you move to a stronger band, expect fewer repetitions. Return toward 10 and rebuild. If the new band prevents a controlled finish, it is too large a step for now. Keep the lighter band rather than compensating with shortened, jerky repetitions.
A narrower grip can increase the challenge with some bands, but it also increases the stretch of the working section. Stay within the product’s limits. More pre-stretch is not an unlimited progression method.
How to include pull-aparts in an ordinary week
For a beginner, two nonconsecutive strength sessions with a small amount of pull-apart work can be a manageable starting schedule. You might do one easy set before upper-body training, or one or two working sets after the main exercises.
A simple session could include a squat variation, a hip hinge, a push-up or press, a row, and then a modest pull-apart set. The pull-apart supports the broader routine rather than taking the place of those larger movement patterns.
If you train at home, Workit’s beginner resistance-band workout provides a broader no-door-anchor starting framework. Add pull-aparts only if the extra work remains comfortable and manageable.
You can also use a very easy set during a movement break if you enjoy it, but daily high-repetition targets are unnecessary. If repeated breaks leave your shoulders sore or affect your workouts, reduce the frequency, resistance, or total repetitions.
Pull-apart versus reverse fly, row, and face pull
Pull-apart: uses a band held between the hands and an outward arm movement. It is portable and requires no external anchor in the basic version.
Reverse fly: also involves moving the arms outward, but dumbbell, cable, and machine versions change support and resistance. A reverse fly exercise can be an alternative when you prefer other equipment.
Row: includes substantial elbow bending as the hands move toward the torso. It provides a different pulling pattern and can remain a main exercise even when pull-aparts are included.
Face pull: typically uses an anchored cable or band and a pull toward the face with bent elbows. Setup, anchor safety, and arm motion differ. Do not improvise a face pull by letting a stretched pull-apart band travel near your eyes.
These exercises overlap in the muscles they challenge, but they are not identical. Choose a small number you can perform well rather than adding every upper-back exercise to the same session.
What pull-aparts cannot promise about posture
Pull-aparts can train muscles involved in shoulder movement, but they are not a guaranteed fix for rounded shoulders, neck pain, or discomfort from sitting. Posture changes across activities, and a photograph of your shoulder position does not identify the cause of symptoms.
Do not spend the day forcefully holding your shoulder blades together because you practiced that direction during exercise. Comfortable movement and a varied routine are different goals from maintaining one rigid pose.
If pain is persistent, worsening, or associated with weakness or altered sensation, seek assessment rather than escalating repetitions. A professional can consider the broader situation and recommend appropriate exercise choices.
When to stop
Stop for sharp pain, increasing shoulder discomfort, numbness, tingling, sudden weakness, or an unstable sensation. Also stop immediately if the band slips, tears, or looks damaged. Unload it carefully before changing your grip or equipment.
If you are returning after injury or surgery, follow the plan from your clinician. The AAOS shoulder-conditioning guidance emphasizes appropriate professional guidance for rehabilitation. A general pull-apart routine is not a substitute for that plan.
Seek urgent help for chest pain, fainting, or severe unusual breathlessness during exercise. Ordinary muscle effort should not be confused with those symptoms.
Frequently asked questions
Should the band touch my chest?
It does not have to. Band length, grip spacing, and your proportions affect where it sits. Finish where you can control the movement without arching or pushing your arms behind your body.
Can I do pull-aparts seated?
Yes. Use a stable chair, support your feet, and ensure the chair does not block your arm path. Keep the same controlled movement and unload the band before putting it down.
Are 100 pull-aparts a day necessary?
No. A large daily repetition target is not required. Start with a modest amount that fits your training and recovery, then adjust based on how you perform and feel.
What if my band is too heavy?
Choose a lighter or more suitable band. Do not compensate by jerking, bending the elbows substantially, or exceeding the product’s stretch limits. If no suitable band is available, choose another comfortable exercise.
Make your next set repeatable
For a different small accessory exercise, our dumbbell wrist curl guide covers supported forearm work. It trains a different action, so use it only if that fits your program rather than adding exercises automatically.
Inspect the band, choose an easy resistance, and keep it at chest level away from your face. Open smoothly, return with control, and stop before your posture changes. Record the setup so progress means better performance on the same movement.
Explore workout programs and fitness challenges with Workit.
Sources
- Fukunaga and colleagues: Band Pull-Apart Exercise, movement direction and hand-position study
- TheraBand: User Guide and product-safety instructions
- NCHPAD: Strengthening Exercises with Weights and Elastic Resistance Bands
- ACSM: 2026 resistance-training guidelines update
- AAOS: Rotator Cuff and Shoulder Conditioning Program