
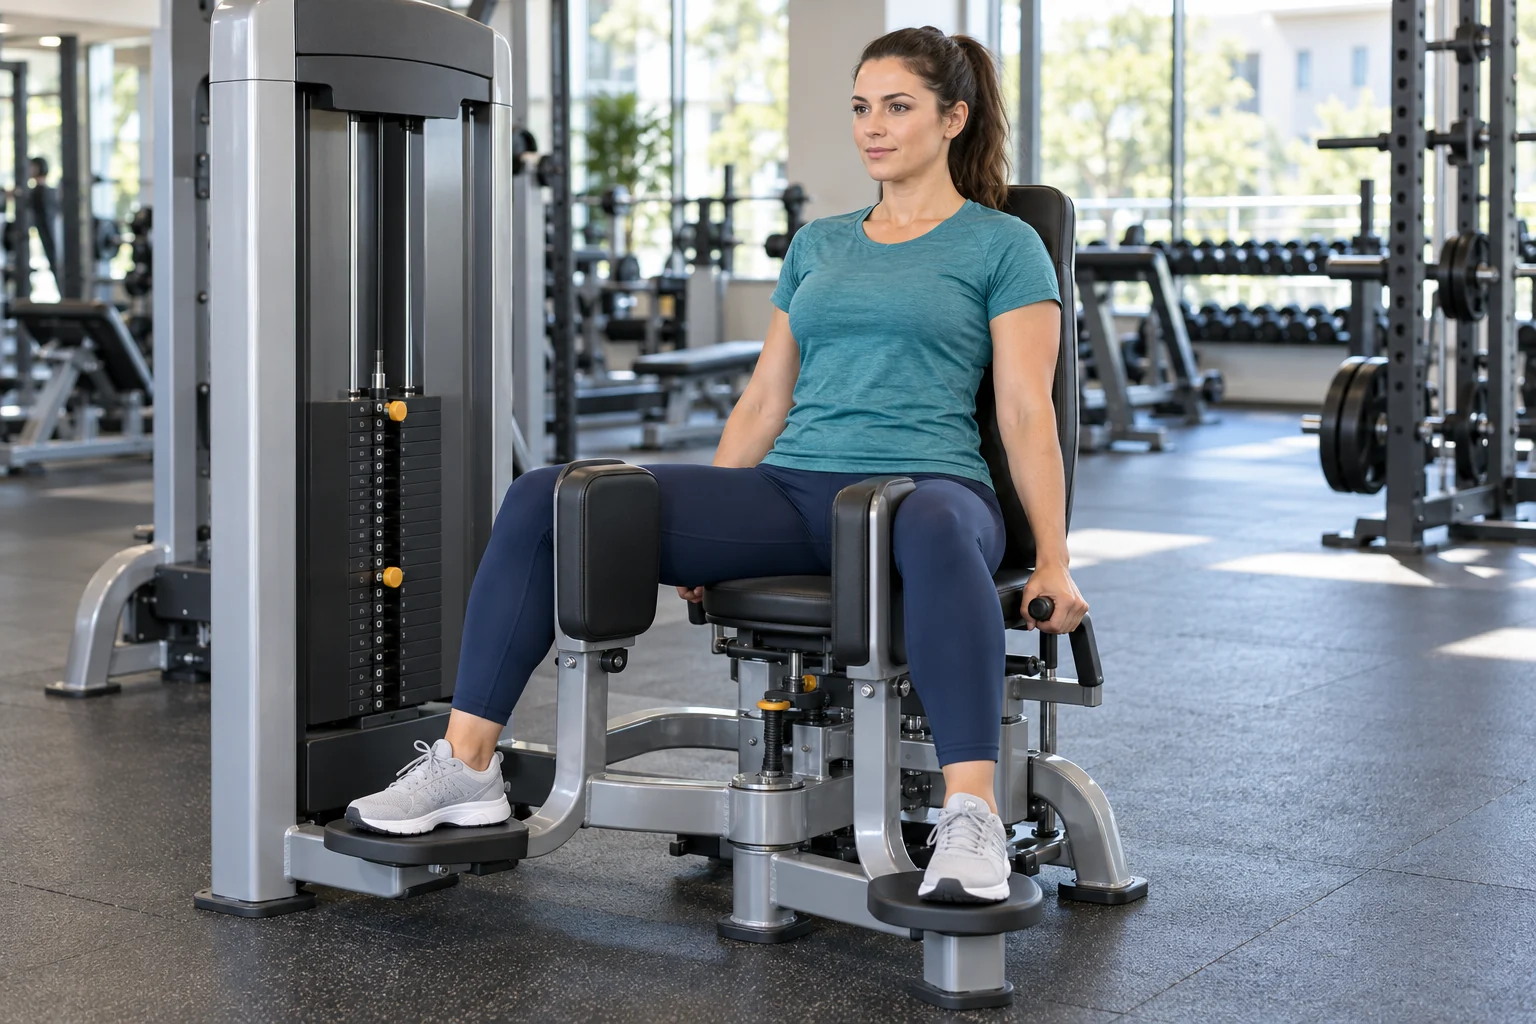
The hip adduction machine strengthens the muscles that bring your thighs toward the middle of your body. Sit with the pads against the inner thighs, choose a comfortable starting width, and squeeze the legs inward without rocking your torso. Let the pads return slowly. Start light enough that you control both directions, rather than letting the machine pull your legs apart.
Published October 20, 2026.
This is the machine often called the inner-thigh machine. It can make targeted leg training straightforward, but the unfamiliar lever, rotating pads, and wide starting position can make a first attempt confusing. The most useful questions are practical: which way should the pads face, how wide is wide enough, what weight should you use, and does this exercise add anything to the rest of your workout?
This guide answers those questions for general fitness training. The sample sessions are conservative starting points for healthy adults, not a treatment plan for groin pain or a substitute for individual medical advice.
Hip adduction versus abduction: the direction matters
Adduction brings a limb toward the body’s midline. On a seated adduction machine, that means moving the thighs together against resistance. Abduction moves a limb away from the midline, so the outward-opening machine is a different exercise.
Look at where the resistance meets your legs, not just the shape of the seat. For adduction, the pads resist inward movement from the inside of the thighs. For abduction, they resist outward movement from the outside. Some equipment combines both functions with pads that rotate and a mechanism that changes the starting position.
If you want the outward movement, use the separate hip abduction machine guide. Doing the wrong mode is not simply a slightly different version of the same set: it changes which action you are loading.
A useful first check is to perform one almost effortless repetition. Are you squeezing inward against resistance? If the answer is unclear, stop and ask gym staff to demonstrate the station. Do not force the lever or improvise a position because the last person used the machine that way.
What muscles does the hip adduction machine work?
The primary target is the hip-adductor group along the inner thigh. This group includes the adductor longus, adductor brevis, adductor magnus, gracilis, and pectineus. They do not all have identical jobs or contribute equally in every position.
In everyday movement, the adductors do more than squeeze the thighs together. Their roles vary with hip position and the task, and some contribute to hip flexion or extension. The American Council on Exercise’s hip-adductor anatomy guide explains why treating the entire group as one simple inner-thigh muscle is incomplete.
That does not make the machine useless. It gives you an accessible way to train the inward movement with the trunk supported. It just means that a seated squeeze should not be presented as a complete replacement for walking, squatting, hinging, or other whole-body movement.
Is this a glute exercise?
It is better described as an adductor-focused exercise. If your main aim is training hip extension or the muscles at the back of the hips, include an appropriate hinge, squat, or similar movement elsewhere in the program. A sensation in a neighboring area is not enough to establish that a machine is training exactly the muscle you intended.
Decide whether the machine belongs in your routine
You do not need every machine in the gym to have a useful leg workout. Hip adduction is an optional accessory: a relatively focused exercise added around the movements most relevant to your goals.
It may be a convenient choice if you want direct inner-thigh resistance work, prefer a supported seat, or want an exercise whose setup and repetitions are easy to repeat. It may be less useful right now if your session is already too long, you are still establishing a basic routine, or the equipment does not fit comfortably.
Think in terms of a gap, not a requirement. For example, someone with two consistent full-body sessions might add one or two sets near the end. Someone struggling to complete a crowded six-exercise leg day may be better served by keeping the program simpler rather than adding another obligation.
The machine also has no gender requirement. Choose it because it serves your training, not because of who usually sits on it at your gym.
Before your first set: inspect, identify, adjust
Find the instructions for this exact model
Read the exercise placard and locate the start-position release before sitting down. Identify the seat adjustment, resistance selector, handles, and intended foot supports. A combined abductor/adductor machine may have an extra mode change.
Manufacturer details matter. For example, the Life Fitness Optima hip-adductor instructions, describes inward-facing pads for adduction, supported feet, an adjustable start position, and a release used when exiting. Those controls are model-specific; another machine may operate differently.
Start with an easy resistance setting
Choose a deliberately light load while learning the route of the movement. On a weight-stack machine, make changes only when the stack is resting and insert the selector fully. Keep hands away from moving plates and linkages. If a cable looks damaged or an adjustment will not lock, leave the equipment unused and tell staff.
Establish secure contact points
Sit fully on the seat rather than balancing at its front edge. Let the backrest support you in the position intended by the manufacturer. Place your feet on the designated supports and take the handles without shrugging or pulling yourself forward.
The pads should meet the inner thigh area as the equipment intends, without digging painfully into the knee joint. If your feet cannot reach the supports or the pads do not line up comfortably, ask whether another adjustment or machine is available.
Choose a starting width you can own
Use a moderate, comfortable separation for the first practice set. You should not have to brace yourself against a strong stretch before you even start. A wider setting is not automatically a better setting, and the outermost notch is not a target.
Check the release procedure before a hard set. Knowing how to exit matters more than finding the most challenging angle. Follow the manufacturer’s sequence instead of trying to move loaded pads by hand.
How to do a controlled hip-adduction repetition
- Settle into position. Keep the pelvis supported, feet steady, and inner thighs in contact with the pads.
- Begin the inward squeeze smoothly. Move both thighs toward the center without throwing your chest forward or bouncing from the wide position.
- Finish within the machine’s intended range. Stop before you need to twist, lift the hips, or force the pads past their normal endpoint.
- Reverse without a crash. Allow the thighs to open gradually, maintaining control rather than letting the resistance drag them apart.
- Repeat the same path. Keep the useful range similar from one repetition to the next. End the set when you cannot reproduce it comfortably.
Let your breathing continue throughout the set. Breathing out during the inward effort and in during the return is a simple rhythm, not a rule you need to execute perfectly. Avoid turning a light accessory set into a prolonged breath-holding contest.
A deliberate return is especially useful when learning. You do not need to count every second, but you should be able to slow down rather than feeling carried by the machine. If the return accelerates despite your effort, lower the resistance for the next set.
How wide should you start, and should the pads touch?
Use your controllable range, not a universal angle from a video. Seat geometry, leg length, mobility, and the machine’s mechanism all affect what a comfortable repetition looks like.
The first checkpoint is the open position: can you sit steadily without a forced stretch or pinching? The second is the inward position: can you approach the machine’s normal endpoint without changing posture? The third is repeatability: can the last repetition follow approximately the same route as the first?
Some machines bring the pads close together; others leave a gap. Contact between pads is not a performance standard. Do not slam them together to prove the repetition is complete, and do not force the legs to cross.
If you later choose a slightly wider start, treat it as a new variation. Reduce the load initially and check comfort. More range and more weight at the same time make it difficult to know which change caused a problem.
Upright, reclined, or leaning forward?
Begin with the supported position shown on the equipment. Some seats are slightly reclined by design. You do not need to fight that backrest to imitate somebody else’s upright setup.
Changing torso angle changes the hip position, but the claim that one dramatic lean universally isolates the best part of the inner thigh is stronger than the available practical evidence supports. A position that feels different is not necessarily superior for long-term strength or muscle growth.
For a beginner, a repeatable baseline is more valuable than a new posture every set. Keep the pelvis supported and use the same backrest setting while you establish comfortable repetitions. If a qualified coach later suggests a variation, have them check the actual machine rather than relying on a cropped social-media demonstration.
How much weight should a beginner use?
There is no useful universal starting number. Two machines labeled with the same weight can feel different because of their leverage and resistance systems. Your experience with a squat or leg press also does not predict the right adduction setting.
Try this practical selection process:
- Perform about six easy test repetitions at a light setting.
- If the movement is comfortable and clearly easy, rest and increase by one small increment.
- Choose a working load that allows roughly 10 to 15 controlled repetitions with two or three more good repetitions still possible.
- If you need to rock, shorten the range abruptly, or rush the return, use less resistance.
The estimate of repetitions remaining will not be exact at first. That is fine. The goal is to leave a margin while learning, not to predict your limit perfectly.
For example, a set of 12 where every repetition looks similar is a better baseline than 18 repetitions that begin full and end as tiny bounces. Record the controlled 12 and build from there.
A modest beginner plan and a way to progress
The following is an original general-fitness example, not a machine-specific prescription from a research trial:
- One light familiarization set of six to eight repetitions.
- One or two working sets of 10 to 15 repetitions.
- Approximately 60 to 90 seconds of rest, with more if needed to repeat the movement comfortably.
- Stop with a few controlled repetitions still available.
- Try it in one lower-body session initially, then judge recovery before adding more exposure.
Once the exercise is familiar, it can fit into one or two weekly sessions if it suits your overall routine. This is not an instruction to train the inner thighs hard every day.
The ACSM’s 2026 resistance-training guidance emphasizes consistent training of the major muscle groups and notes that routine training to momentary failure is not necessary for the average healthy adult. It does not establish a mandatory number of adduction-machine sets for everyone.
Progress one variable at a time
Keep the seat, starting width, and movement standard consistent. When both work sets reach the top of your chosen repetition range comfortably, try the smallest available resistance increase at a later session. Expect repetitions to drop somewhat.
An example progression could be 11 and 10 repetitions, then 12 and 11, then eventually 15 and 15. These are separate successful sessions, not a promise of weekly improvement. Repeat a load when needed. If the next plate jump is too large, keep the previous setting rather than attaching unofficial weights to the machine.
Write down the settings that matter
A useful entry is: machine name, seat setting, starting-width setting, resistance, repetitions, and one short comfort note. “Two sets of 12, moderate width, smooth return” tells you more than an isolated stack number.
After a break or a switch to another gym, take an easy test set again. A different resistance label is a new baseline, not evidence that your strength suddenly doubled or disappeared.
Where to place adduction in a leg workout
For many recreational lifters, the simplest placement is after the main squat, hinge, or lunge work. That lets you practice the more demanding movements before tiring a smaller muscle group with direct accessory work.
A short lower-body session might include a squat or leg press, a hinge, and one or two adduction sets. If you prefer a unilateral knee-dominant exercise, the reverse lunge guide explains a different movement to consider. You do not have to combine every option in one day.
For a hip-hinge complement, a supported single-leg Romanian deadlift trains a different action while letting you practice one side at a time. The adduction machine should supplement that kind of broader training, not compete with it for an unlimited number of sets.
If time is tight, avoid turning the accessory into an elaborate circuit with multiple torso angles and drop sets. One comfortable, repeatable version is enough to begin evaluating whether the exercise earns its place.
Troubleshooting the most common problems
The pads feel awkward against my knees
Stop and check the seat, foot supports, and pad orientation. Pressure should match the machine’s intended contact area rather than concentrate painfully on a joint. Ask staff for a fitting demonstration. Do not solve a poor fit by twisting the knees or forcing a narrower seat position.
I can squeeze inward but cannot control the opening
End the set and lower the load. The return is part of the repetition, not a break from the exercise. Also check whether the starting width is larger than you can manage comfortably.
My torso rocks with every repetition
Try a lighter setting and settle fully into the backrest. Use the handles to remain steady, not to pull your body into each squeeze. If rocking returns as you tire, finish the set there.
One side seems to move first
Check that you are centered and both feet are supported. Use an easy set to observe the movement. Do not immediately diagnose a muscle imbalance or add extra work to one leg. Some machines mechanically link both sides, so the visible motion cannot accurately measure each leg’s strength.
I feel a sharp pull, pinch, or pain
Stop the exercise instead of forcing a smaller range through pain. A trainer can check equipment setup, but recurring or persistent symptoms need appropriate healthcare assessment. This guide cannot determine whether a sensation comes from a muscle, tendon, joint, or another structure.
I am unusually sore afterward
Do less next time if the first exposure interfered with normal activity or the next workout. That may mean fewer sets, less resistance, or more recovery before repeating it. Soreness is not a score to maximize, and it is not required to validate a productive set.
Alternatives when the machine is busy or unavailable
Choose an alternative for a reason: available equipment, comfortable positioning, or a need for a simpler setup. Alternatives do not have to imitate the seated machine perfectly.
- Side-lying hip adduction: a bodyweight option that lifts the lower leg. It needs little equipment but requires a stable, comfortable side-lying position.
- Standing cable adduction: an adjustable inward movement using an ankle attachment and fixed hand support. Learn the attachment and cable path before adding load.
- Band adduction: potentially convenient, provided the band and anchor are suitable and secure. Resistance changes through the movement.
A study comparing elastic resistance and machine hip exercises measured adductor-longus activity during both options. Such short-term activation measurements can inform exercise selection, but they do not prove identical long-term muscle growth or make every improvised band setup safe.
More demanding options, such as Copenhagen adduction, are not automatic beginner substitutions. If you want to learn one, get clear instruction and choose a progression appropriate to your current ability.
Hip adduction machine FAQ
Will it burn fat from my inner thighs?
Do not choose it on the promise of localized fat loss. In a small 12-week study of one-leg resistance exercise, fat reduction was not concentrated in the trained leg. That study used leg presses rather than this machine, but it illustrates why exercising one body region is not a reliable promise of losing fat from that exact region.
Can it make my thighs bigger?
Resistance training can support muscle development when the overall training stimulus and recovery are appropriate. However, a specific size change is not guaranteed, and one machine does not determine your final appearance. Track performance and consistency rather than expecting a precise shape after a fixed number of sessions.
Should I do adduction and abduction together?
You can include both if each serves a purpose and the total session remains manageable. There is no requirement to pair them every time or use equal stack numbers. They train different actions, and their resistance labels are not directly comparable.
Can I use the machine as my warm-up?
An easy familiarization set can help you prepare for the machine itself. It does not automatically replace warm-up sets for a different main exercise. Avoid exhausting the inner thighs immediately before a demanding movement you want to perform well.
Does everyone need direct adductor training?
No single exercise is compulsory. Your choice depends on your goals, existing training, comfort, and available time. If your routine is progressing and already manageable, add direct work only when it has a clear role.
A simple plan for your next gym visit
Identify the adduction mode, ask for help with unfamiliar adjustments, and begin with an easy practice set. Choose a comfortable width and keep your torso supported. Complete a small amount of controlled work, then record the setup so you can repeat it next time.
The useful outcome is not the biggest stack number or the strongest burn. It is an exercise you understand, can perform comfortably, and can place sensibly within a balanced routine.
Comments
One response to “Hip Adduction Machine: Form, Muscles, Weight, and Beginner Sets”
[…] with both feet on the floor. For optional direct inner-thigh work elsewhere in your session, the hip adduction machine guide explains a supported seated exercise with a different […]