
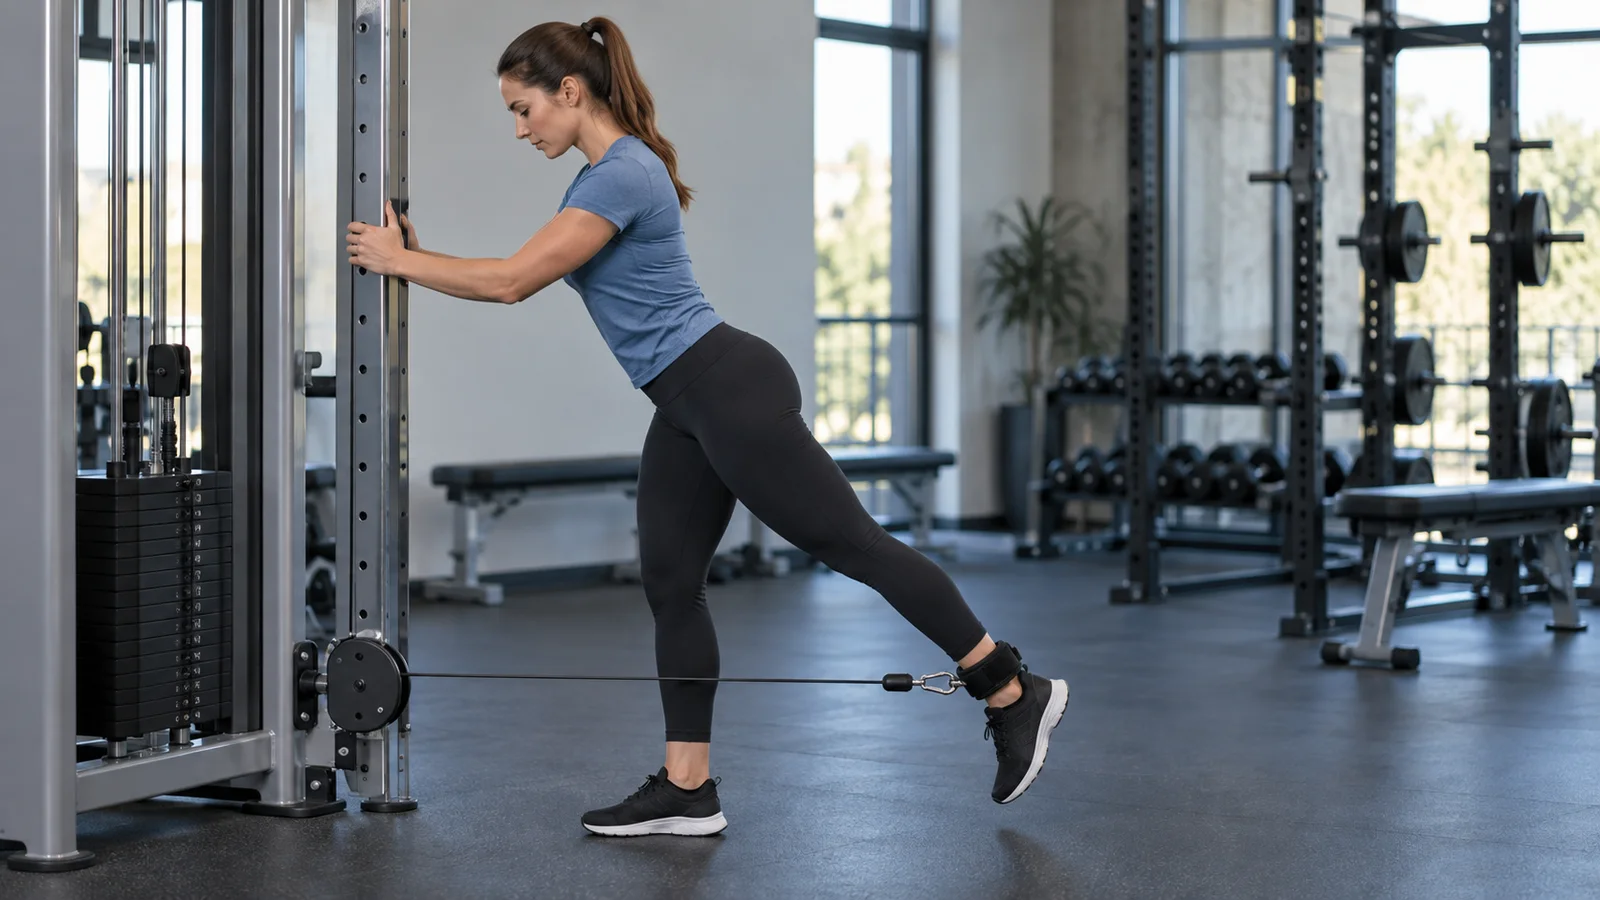
A cable glute kickback is a standing hip-extension exercise: with an ankle cuff attached to a low pulley, move one thigh backward while keeping your pelvis and torso steady. Hold a fixed support, use a light load, and stop the leg before you need to arch your lower back. A useful first session is one set of eight controlled repetitions per leg, followed by another set only if your position remains comfortable and repeatable.
Published October 19, 2026
The exercise is easy to make look bigger than it needs to be. A high-flying foot, a dramatic forward lean, or a heavy stack can conceal very little movement at the hip. This guide focuses on the details that make kickbacks worth doing: a secure cuff, a clear cable path, a consistent knee angle, and an endpoint you can control.
What muscles does a cable glute kickback work?
The main joint action is hip extension, moving the thigh behind the body. The gluteus maximus contributes to that action, with other hip extensors also involved. The standing leg and muscles around the pelvis help maintain your position, while your hands provide support so balance does not have to be the limiting factor.
Mayo Clinic’s discussion of gluteal anatomy describes the gluteus maximus as contributing to hip extension and pelvic stability. That explains why a backward leg movement can train it. It does not mean every variation isolates the glutes or automatically corrects a posture problem.
Your hamstrings may contribute, and the supporting leg may feel effort too. Neither sensation is automatically a mistake. What matters is whether you are performing the intended movement comfortably rather than shifting the work into a large back arch, repeated knee curl, or whole-body swing.
Kickbacks are an accessory exercise, not a complete lower-body program. They can add a manageable amount of one-leg hip-extension work without making every session a large compound lift. They do not replace every benefit of squatting, hinging, walking, or training the rest of the body.
Kickback, pull-through, or hip abduction: different movements
In a kickback, the torso stays relatively still while one thigh moves behind you. In a cable pull-through, both feet remain planted while the hips move backward and forward through a hinge. The attachment, body position, and loading pattern are different even though both exercises involve hip extension.
A kickback also differs from moving the leg sideways. The hip abduction machine trains a separate direction of hip movement. Angling every kickback far outward changes the task; it is not a universal trick that makes the standard version more effective.
A bridge or hip thrust offers another way to train hip extension with different support and loading. Our glute bridge versus hip thrust guide can help you choose between those options. You do not need all of them in the same workout. Choose exercises that fit your equipment, comfort, and current training plan.
For learning, keep the cable kickback simple: one leg moves backward, the rest of you supplies a stable base, and the resistance remains manageable. Once that version is repeatable, you can decide whether a different direction or body position serves a specific purpose.
Get the ankle cuff and cable setup right
Use an attachment made for the job
Choose an ankle cuff designed for cable exercise and compatible with the machine. Check the strap, stitching, ring, and closure. Place it according to its instructions, usually around the lower leg above the ankle joint, and secure it snugly without causing numbness, pinching, or impaired circulation.
Do not loop a handgrip over your shoe and hope it stays there. Do not clip the cable to a shoelace. If the gym does not have a suitable cuff, choose a different exercise or ask staff about an approved attachment. A secure connection is more important than preserving one item in your plan.
Set the pulley low and check the station
Use the low pulley position intended for this kind of movement. Check that its height adjustment is locked and the connector closes fully. Insert the weight selector pin completely, and inspect the visible cable for damage before attaching yourself to the station.
Life Fitness’s dual-adjustable-pulley guidance includes hip extension among its cable exercises and tells users to inspect cables and connections and stay clear of moving parts. Follow your machine’s own instructions for attachments and safe hand placement; the frame is not a handle everywhere you can reach.
Make room for the working leg
Face the station and position the cuffed leg approximately in line with the pulley. The cable should have a clear path toward the cuff without rubbing the supporting ankle or passing under a shoe. Move bags, bottles, and loose straps out of your stepping area.
Stand only far enough away to allow smooth movement and a manageable starting position. Stepping much farther back is not a useful way to prove the exercise is harder. You still need to reach a fixed support comfortably and return close enough to release tension safely.
How to do the cable glute kickback
- Start with a low setting. Attach the cuff while the stack is resting. Hold the machine’s designated fixed support and check that you can stand comfortably without leaning on moving parts.
- Establish your support. Keep the standing knee softly bent. Use both hands when available. The goal is controlled hip movement, so there is no prize for turning the set into a balance challenge.
- Set your torso angle. Begin upright or with a small forward lean from the hips. Keep that angle throughout the repetition rather than rocking forward as the leg travels back.
- Choose a knee position. Keep the working knee nearly straight or slightly bent, whichever is comfortable, and maintain that angle. Avoid repeatedly curling the heel toward your bottom.
- Move the thigh backward. Lead the movement from the hip. Keep the knee and foot generally facing down and forward rather than swinging the leg outward and opening the pelvis.
- Stop before your back takes over. End the rep when the thigh has moved as far as you can manage without changing your torso angle or noticeably arching the lower back. The foot may travel only a modest distance.
- Return slowly. Bring the leg toward its starting position without letting the cable drag it forward. A light toe touch between repetitions is fine if it helps you reset.
- Finish before unclipping. Bring the leg under control, move closer as needed, and let the stack settle fully. Then remove or transfer the cuff. Never unclip an attachment that is still under tension.
Try a smooth lift, a brief pause, and a slightly slower return. You do not need a long hold or an exact counting ritual. Each rep should be deliberate enough that the cuff does not swing, the stack does not crash, and you can stop without losing balance.
How high should you lift your leg?
Lift only as high as your hip can move while the rest of your setup remains stable. There is no requirement to bring the foot to hip height. A large visible arc may come from back extension, pelvic rotation, or a changing knee angle rather than additional movement at the hip.
Use your torso as a reference. If your chest drops lower, your ribs flare upward, or your belt line tips sharply as the leg rises, the endpoint has probably moved beyond the version you intended. Reduce the range and resistance, then see whether the earlier endpoint is repeatable.
The NHS’s general strength-exercise guidance describes a supported backward leg raise and specifically advises avoiding a back arch. That is an unloaded version, not a cable protocol. Its simple distinction between leg movement and back movement is still useful when learning this pattern.
For an original practice check, perform five supported backward leg raises without the cable. Notice where the leg can stop while your pelvis stays quiet. Use that modest range for your first loaded attempts. The unloaded rehearsal is a reference, not a medical test or a guarantee about the right range for everyone.
Upright or bent over: choose a position you can keep
Both a more upright stance and a modest forward lean appear in kickback variations. They change the starting hip position and the cable’s relationship to your leg. Neither is automatically the correct choice for every person, and a deep forward fold is not necessary for a useful beginner version.
Start where you can reach the support without rounding yourself into an awkward shape. If you lean slightly, hinge from the hips and keep that angle consistent. Imagine taking a photograph before the rep and at its endpoint: your torso should not have relocated dramatically between the two.
Do not rest your body on a moving weight stack, cable cover, or a surface not designed to support you. Avoid climbing onto a bench or step to create extra range. Raising the standing foot introduces another balance and fall consideration without solving the basic task of controlling the hip.
If neither upright nor modestly leaned positioning feels comfortable, skip the cable version for now. A supported bodyweight movement or a different hip-extension exercise may be a better fit. There is no requirement to make this particular machine setup work at any cost.
Choose a starting weight by what stays still
The right starting load is one you can move while the pelvis, torso angle, and working knee position remain consistent. Begin lighter than you think you need. The machine may pull your leg farther forward than expected, and the long distance between the cuff and hip gives the resistance leverage.
Try several rehearsal repetitions before committing to a set. You should be able to pause near the end without holding your breath or pushing aggressively through your hands. If you must throw the leg backward to start, the setting is too demanding for the controlled version described here.
Stack labels are not comparable across every cable system. Record the machine and displayed setting rather than interpreting the number as a universal measure of glute strength. A lower displayed weight on another station may feel harder because the pulley arrangement and geometry differ.
Suppose your first station offers 2.5 and 5 kilograms. The second setting doubles the displayed load, so it may be too large a jump. Instead of forcing it, keep the lighter option, add a few controlled repetitions, or use a station with smaller approved increments. Never modify the machine with a loose dumbbell balanced on the stack.
A conservative first workout
After several minutes of comfortable movement, perform a few supported backward leg raises without resistance. Set up the cuff and test the lightest practical cable setting. Make any adjustments before beginning the planned work.
Complete eight repetitions on the less coordinated leg, stopping sooner if your form changes. Safely switch the cuff, rest as needed, and do the same number on the other leg. One set of eight per side is sixteen total repetitions. Match the stronger side to the number the first side performed cleanly.
If that first round is comfortable, rest about a minute or longer and repeat it. Two sets of eight per leg is sixteen repetitions per leg and thirty-two total. These are suggested learning doses, not a scientifically established optimum for cable kickbacks.
Keep several repetitions in reserve during the first sessions. The purpose is to leave with a setup you can reproduce, not to exhaust the glutes so completely that you cannot judge your control. If the cuff is uncomfortable, stop and fix it rather than using fatigue to distract from the problem.
Build reps before making a large load change
For a simple progression, use a range of eight to twelve repetitions per leg. Start with one or two sets depending on your tolerance and existing program. Repeat the same setup on another nonconsecutive training day if you are recovering comfortably.
- Establish the baseline: Perform two sets of eight per leg with the same controlled endpoint.
- Add a little work: Over later sessions, move toward two sets of ten, then twelve per leg if the earlier reps remain repeatable.
- Consolidate: Repeat the top end of the range across more than one comfortable session rather than increasing weight after one unusually easy day.
- Test the smallest suitable increase: Return toward eight reps at the new setting. If the movement changes, return to the previous load.
Do not increase sets and weight simultaneously. Two sets of twelve per leg already equals twenty-four repetitions for each leg. Adding a third set while increasing the stack creates a larger change than the new number alone suggests.
The 2026 ACSM resistance-training guidance supports individualizing training and emphasizes consistent participation. It also notes that training to momentary failure is not consistently necessary for average healthy adults. It does not establish the kickback progression above; that is a practical example for building control gradually.
Common kickback problems and useful adjustments
You feel pinching or pressure in the lower back
Stop the set rather than treating pain as evidence that the exercise is working. Review the range and torso movement with a lighter or unloaded version only if that is comfortable. Persistent or recurring symptoms need individualized assessment, especially when they affect walking or other daily activity.
The cuff slides or digs into your ankle
Set the weight down and refit the attachment according to its instructions. Check whether its size and shape are suitable. Do not tighten it indefinitely to overcome a poor fit. Numbness, tingling, or a sharp pressure point is a reason to remove it and choose another option.
Your knee keeps bending more on every rep
The movement may be drifting toward a hamstring curl. Reduce the load and choose a small knee bend you can maintain. Think about moving the entire thigh backward while keeping the distance between your heel and the back of your knee more consistent.
Your pelvis opens to the side
Check that the working leg starts approximately in line with the cable rather than far across the body. Reduce the range and keep your hip points facing the station. A sideways sweep is a separate variation; it should not appear simply because the weight became difficult.
The standing leg tires first
Use more hand support, shorten the set, or take longer between sides. Do not immediately add load to force a stronger sensation in the moving leg. Your support strategy may need attention before the target muscles need more resistance.
Where kickbacks belong in your training week
For most beginners using this as an accessory, placing it after the main lower-body exercise is a straightforward option. You can focus on a small amount of controlled work without making a larger lift depend on already-fatigued hips. If used as a warm-up, keep it light and brief.
Count the rest of your hip-extension work. If you already perform demanding squats, hinges, bridges, and lunges, adding several hard kickback sets every day may be unnecessary. Replace an accessory or begin with a small amount before deciding whether more work improves your training.
A sample arrangement is one or two sets per leg on Monday and again on Thursday, alongside a broader full-body plan. This is an example schedule, not a required frequency. If soreness or fatigue changes your walking or interferes with the next workout, reduce the added work and reassess.
Do not make next-day soreness the target. The more useful questions are whether you trained comfortably, maintained the intended movement, and recovered well enough to repeat it. A session can be productive without producing a dramatic sensation afterward.
When to choose another exercise
Choose a supported bodyweight leg raise when the lowest cable setting is already too demanding. Choose a bridge variation when the cuff or standing position is the main obstacle and floor work is comfortable. Choose another planned lower-body movement when the station is crowded or the setup cannot be secured.
A resistance band can provide a backward pull, but only with an attachment and anchor designed and rated for that use. Do not improvise by tying it to a movable chair or wrapping it around a sharp rack edge. Follow the band’s inspection and stretch limits, and use another option if you cannot verify the setup.
If you have recent hip surgery, specific movement restrictions, significant balance problems, or unexplained leg symptoms, obtain guidance tailored to that situation before adding cable resistance. A general gym guide should not override rehabilitation instructions or be used to diagnose why one side feels different.
Frequently asked questions
Should I squeeze as hard as possible at the top?
A brief controlled pause can help you recognize the endpoint. A maximal squeeze is not required, particularly if it makes you arch your back or hold your breath. Keep the effort within a position you can sustain and then return smoothly.
Should I alternate legs after every repetition?
With one cable cuff, finish the planned set on one side before switching. Repeatedly attaching and detaching for individual repetitions adds unnecessary setup work. Always let the stack settle before moving the cuff, and never hop between positions with the cable pulling on your ankle.
Can I do kickbacks every day?
There is no need to begin that way. Start with a modest amount on nonconsecutive days and consider the rest of your lower-body work. Daily practice would require careful control of effort and volume; it is not automatically better for muscle growth or skill.
Track the details that make progress real
Record the machine, displayed load, cuff, pulley position, sets, and repetitions per leg. Add a quick note about the torso angle or endpoint when learning. “Two sets of ten each leg, small forward lean, pelvis steady” describes a repeatable exercise more clearly than “heavy kickbacks.”
Workit provides personalized workout programs and a journal with editable weights, reps, and sets. Use a consistent record to see whether your controlled repetitions are improving before deciding that the stack needs to move.
Finish with the same principle you started with: the thigh moves, the body stays organized, and the load remains under your control. That is a better foundation than trying to make each kickback look larger than the last.