
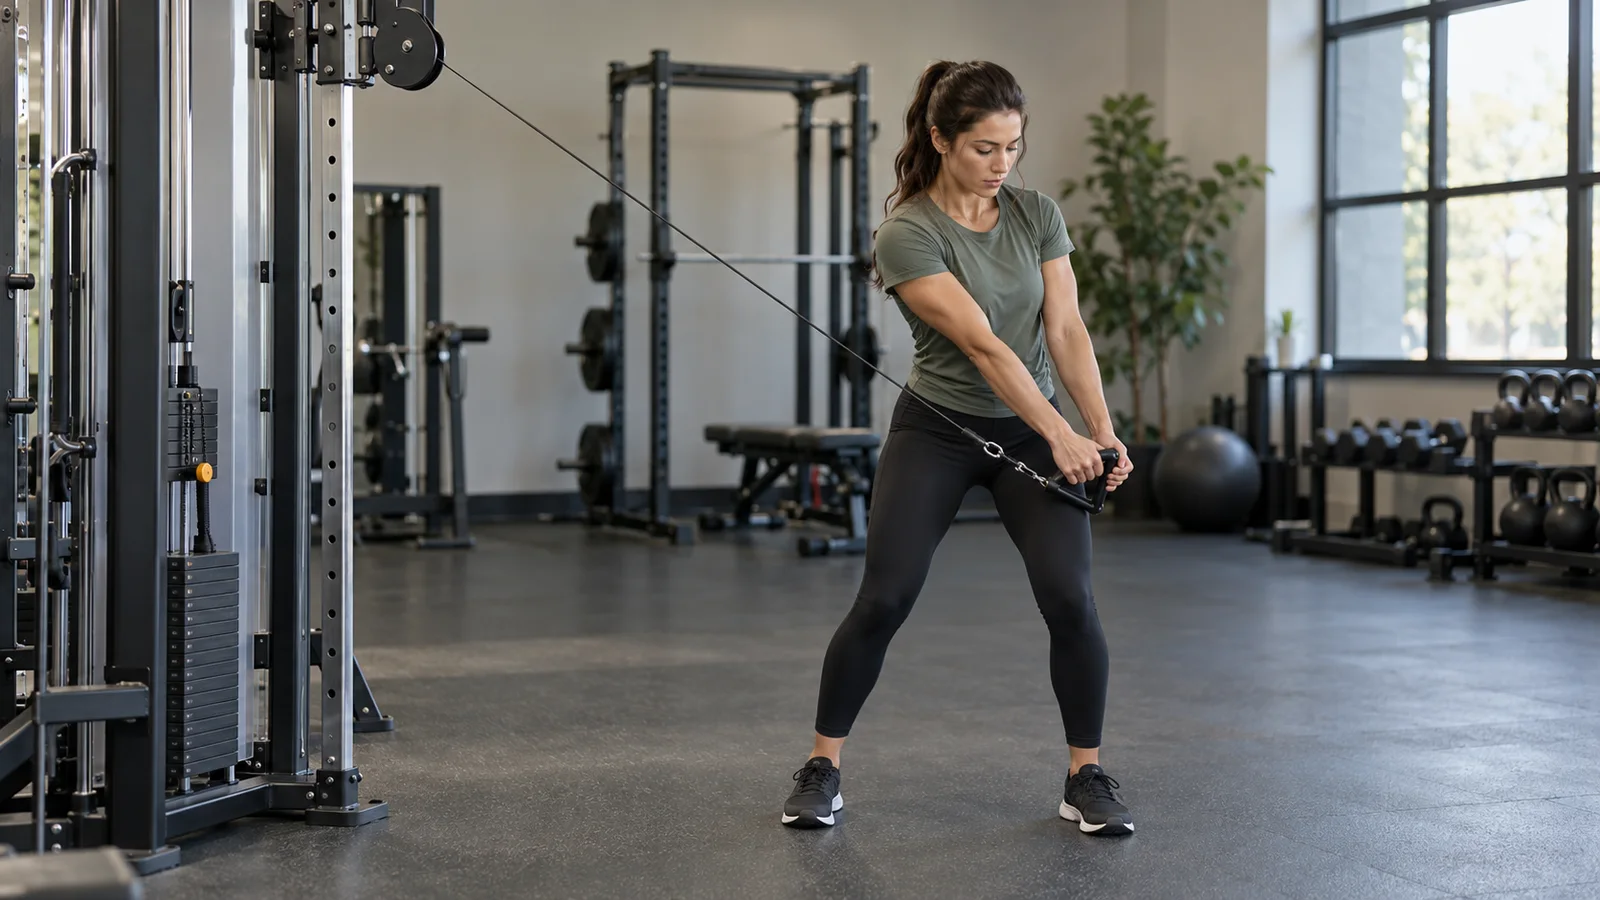
A cable woodchop moves a handle diagonally from a high position beside one shoulder toward the opposite hip. Start with a light load, a stable stance, and a small, controlled turn through your hips and upper body. Keep the return as deliberate as the pull. For a first practice session, try one set of six repetitions in each direction, stopping before you need to yank the handle or twist farther to finish.
Published October 19, 2026
The important first decision is which woodchop you are doing. Some versions keep the trunk still while the arms cross the body. Others coordinate the arms, hips, and trunk in a controlled turn. Both can be useful, but combining their instructions creates confusion. This guide starts with a modest standing, high-to-low rotational chop, then explains the stationary-trunk and kneeling alternatives.
What the cable woodchop trains
The exercise asks you to produce and control movement against a diagonal pull. The abdominal muscles, including the obliques, contribute to controlling the trunk. Your shoulders and arms guide the attachment, while your hips and legs provide a stable base and participate in the turn. It is a coordinated exercise rather than a way to isolate one small patch of your waist.
Think of the handle as a load you are guiding across your body, not an object you are throwing. The outward trip and the return both count. If the cable pulls you abruptly back toward the stack, you have lost part of the exercise even if the downward pull looked strong.
A woodchop also does not have to look dramatic to be useful. A comfortable diagonal path with modest rotation is enough to learn the pattern. Reaching far behind your head, bending deeply, or finishing near the floor introduces additional demands that a beginner does not need.
The American Council on Exercise teaches its standing medicine-ball woodchop in stages, beginning with arm movement and later adding hip and trunk motion. That is a different implement from a cable, but the staged approach is a useful reminder: learn one component before making the whole movement larger or faster.
Woodchop versus Pallof press: decide whether you will turn
In a standing rotational chop, you intentionally turn through a comfortable range. Your feet may pivot slightly so the hips and knees can follow the movement. In a stationary-trunk chop, the arms travel diagonally while the chest and pelvis stay facing ahead. Do not start with the first goal and judge yourself by the second.
The Pallof press is a clearer choice when your main goal is resisting a sideways pull without turning. Its hands move forward and back near chest height rather than tracing the same high-to-low diagonal. Neither exercise is automatically more advanced; the difficulty depends on resistance, reach, stance, and control.
Before each set, use a simple sentence to establish the task: “My hips and chest will turn together a little,” or “My trunk will stay facing forward while my hands move.” This prevents a common problem in which heavier weight quietly changes a stationary drill into a large rotational one.
Rotational training is not inherently a requirement or a prohibition. If you have a condition with movement restrictions, recent surgery, or recurring pain when turning, get individualized guidance rather than treating either version as universally appropriate.
Set up the cable station before choosing the weight
Choose a comfortable high starting point
Use an adjustable cable station with a suitable single handle or an attachment intended for two-handed use. Set the pulley above shoulder height, then check that its adjustment has locked. You should be able to hold the attachment near the shoulder without shrugging, straining, or reaching far behind yourself.
The topmost notch is not mandatory for the standing variation. A very high pulley can make the initial position awkward for a shorter person. Choose a height that creates a clear diagonal while allowing comfortable shoulders, and record that setting so the next session is comparable.
Check the equipment and working space
Inspect the attachment, connection, and visible cable. Make sure the weight pin is fully seated. Do not use a frayed cable, a connector that will not close, or an adjustment that slips. Ask gym staff to inspect the station instead of testing questionable equipment under load.
Life Fitness’s cable-machine safety guidance specifically emphasizes checking cables and connections, keeping clear of moving parts, and fully inserting the selector pin. Follow the instructions on your own machine as well; attachments and adjustments are not identical across manufacturers.
Leave room around the cable path and around both feet. A bag at your heel or another person walking between you and the pulley can interrupt the movement. Plan how you will return the handle before the set begins, not when you are already tired.
How to do a controlled standing cable woodchop
- Begin very light. Face sideways to the station with the pulley on your right. Hold the attachment in both hands close to your right shoulder. Choose a grip that feels secure without forcing your wrists into an awkward angle.
- Find your stance. Place your feet roughly shoulder-width apart, with knees comfortably soft. A small stagger is fine if it improves balance. Stand far enough away for smooth cable travel, without stretching the cable across other equipment.
- Set your torso. Keep your ribs comfortably over your pelvis. Firm your abdomen enough to control the pull while continuing to breathe. Avoid starting with a large back arch or an exaggerated rounded position.
- Make the diagonal. Guide your hands down and across toward the outside of your left hip. Keep a gentle elbow bend rather than turning the exercise into a forceful arm curl or straight-arm yank.
- Allow a small coordinated turn. Let your chest and hips follow the handle within a comfortable range. If your stance needs it, let the trailing foot pivot so you are not forcing the knee to twist against a planted foot.
- Stop at a repeatable endpoint. Finish near the opposite hip, before the movement becomes a sideways bend, deep squat, or backward lean. Briefly settle there without jerking the cable.
- Return under control. Follow the same diagonal back toward the right shoulder. Do not let the stack accelerate your hands into an overhead reach.
- Reset before changing sides. Bring the attachment under control, move toward the station to reduce tension, and let the stack settle. Reposition for the opposite direction rather than spinning around while the cable is pulling.
Take roughly two seconds in each direction while learning, with a brief pause if it helps you find the endpoint. This tempo is a teaching suggestion, not a uniquely effective formula. If counting distracts you, simply make each repetition smooth enough that you could stop it at any point.
How much should your hips, feet, and spine move?
For the introductory rotational version, aim for an easy, coordinated turn rather than maximizing separation between your shoulders and pelvis. Your chest can turn without your lower back being forced to reach its limit. You do not need to freeze every joint, and you do not need to rotate as far as possible.
Foot movement should serve the turn. If a planted foot makes the knee feel twisted, reduce the range and allow an appropriate pivot. If your feet keep shuffling because you are being pulled off balance, reduce the load instead. A planned pivot and an unplanned rescue step are different things.
Keep the movement mostly at one height through your body while the hands trace the diagonal. A little comfortable knee movement is fine. Repeatedly dropping into a deep squat to drag the handle down changes the exercise and makes the load harder to compare between sessions.
Try a no-load rehearsal first: clasp your hands near one shoulder, move them toward the opposite hip, and notice whether your knees and hips follow comfortably. This will not prove your loaded form is perfect, but it gives you a reference for the path you are trying to reproduce.
Pick a weight with a control test, not a universal number
There is no useful starting weight that fits every cable station and every beginner. Pulley arrangements change the relationship between the stack label and the force at the handle. Your arm reach and starting position also change the task. A number from someone else’s workout is therefore a poor first target.
Start at a low setting and perform three or four rehearsal reps each way. Can you pause near the finishing hip? Can you reverse direction without being pulled off balance? Can you keep breathing? If any answer is no, make the exercise easier before doing a full set.
During the first sessions, finish with several clean repetitions still available. You should not need to find your limit to identify a workable load. A technically demanding movement is a poor place to turn the final rep into a test of how much compensation you can tolerate.
For example, imagine a stack with displayed options of 5 and 10 pounds. Moving to the next plate doubles the displayed setting. If that makes the handle yank you back, stay at the lighter option and improve your repeatability, add a few controlled reps, or use a machine with smaller approved increments. Do not attach improvised weights to the selector pin.
A first-session plan that leaves room to learn
Start with several minutes of comfortable general movement, then rehearse the diagonal without resistance. Try a few very light cable repetitions to check the station and both directions. These are practice reps, not a reason to arrive at the working set already tired.
Then complete one set of six repetitions from right to left. Rest as needed, safely switch orientation, and complete six from left to right. That is six per direction and twelve total repetitions. If both sides feel controlled and you remain comfortable, you may repeat the round after about a minute or more of rest.
Two rounds of six per direction gives twelve repetitions in each direction, or twenty-four total. Stating both numbers matters: “two sets of six” can otherwise be interpreted as half the intended work or twice as much. More work is not automatically better during a first exposure.
Use the warm-up sets versus working sets guide if you want a simple way to separate setup practice from the repetitions you plan to progress. The boundary is practical: a rehearsal prepares you, while the working sets provide the planned challenge.
A four-session progression without forced deadlines
The following is an original learning example, not a tested woodchop protocol. Repeat any stage until it feels routine. Leave at least a day between these introductory sessions, and adjust the exercise around the rest of your training.
- Session one: One set of six per direction. Use a modest diagonal and prioritize a smooth return.
- Session two: Repeat the same load and range. If the first session felt comfortable, perform two sets of six per direction.
- Session three: Keep the setup unchanged and try two sets of eight per direction. Rest enough between sets to maintain the same movement.
- Session four or later: Repeat two sets of eight, or test the smallest suitable increase in resistance while returning to six reps. Choose one change.
Do not increase the load, extend the arms farther, add rotation, and speed up at the same time. If control gets worse, you need to know which change caused it. A reliable progression can be as simple as completing the same reps with less wobbling.
The American College of Sports Medicine’s 2026 guidance emphasizes consistent, individualized resistance training rather than unnecessary complexity. It does not prescribe this woodchop sequence. The schedule above applies that broad principle to a cautious skill-learning example.
Troubleshooting the mistakes that change the exercise
You feel mostly arms and shoulders
Some arm and shoulder effort is expected because they hold and guide the handle. First check whether you are curling the attachment tightly into your chest and then punching it down. Keep the elbow bend more consistent and reduce resistance if you cannot maintain the intended diagonal.
Do not chase a burning sensation by making the movement larger. A trunk exercise can be useful without making your waist feel exhausted. Judge whether you control the load through the same path, not whether one body part produces the strongest sensation.
Your lower back takes over
Stop the set if the movement hurts. If the issue is visible overextension rather than pain, return to a lighter rehearsal and a shorter path. Watch for finishing with the ribs lifted and the pelvis pushed forward. End the chop before you need that extra motion.
The stack bangs on every return
Check your starting distance and cable travel. You may be moving too quickly, standing too close for your chosen path, or letting the handle travel farther than you can control. Reset the station rather than stepping farther away indefinitely or reaching behind your head to keep the plates floating.
One direction is noticeably harder
Begin with the less coordinated direction and use a load both sides can manage. Match the cleaner side to that repetition count. A modest difference does not establish an injury or a diagnosis, but a new painful limitation, marked weakness, or persistent change deserves professional assessment.
Variations: change the task on purpose
Stationary-trunk diagonal chop
Keep your chest and pelvis facing ahead while moving the hands along a smaller diagonal. Use less resistance if needed. The aim becomes resisting the cable’s attempt to turn you while the arms move, rather than producing a controlled turn. Label it clearly in your log.
Half-kneeling rope chop
ACE’s kneeling cable woodchop uses a high pulley and rope while the upper body remains still; ACE rates that demonstration advanced. Kneeling is therefore not automatically the easiest option. It changes your support and requires comfortable knees and a safe way to get down and back up.
If you try it with coaching, use suitable padding and relearn the movement with light resistance. Do not copy your standing load simply because the attachment is the same. Skip kneeling if the position is uncomfortable or makes setup unnecessarily difficult.
Low-to-high cable lift
Starting near one hip and moving toward the opposite shoulder changes the direction of the exercise. Treat it as a separate variation with a new pulley setting and a fresh load test. A high-to-low weight that feels manageable may be excessive when lifting in the opposite direction.
Where it fits in a balanced workout
For a bodyweight option that emphasizes resisting trunk rotation rather than guiding a diagonal cable, try plank shoulder taps. Choose the version that fits your available equipment and comfortable shoulder support; you do not need both in every session.
Use the chop as a small accessory block after your main strength work, or practice it early with a very easy load when learning the coordination. Avoid exhausting yourself before lifts that require the same trunk control. The correct placement depends on what the rest of the session is trying to achieve.
You do not need a whole circuit of similar cable-core exercises. Choose one or two tasks you can perform consistently. A suitcase carry provides a different challenge: walking while holding a load on one side. It can be a useful alternative on a day when the cable area is crowded, provided you have a clear route and a manageable weight.
For a simple weekly arrangement, put a short woodchop block after one full-body session and repeat it on another nonconsecutive day if recovery is comfortable. If your existing plan already includes demanding trunk work, replace a comparable accessory instead of automatically adding more.
Frequently asked questions
Will cable woodchops remove belly fat?
Do not use the exercise as a promise of fat loss from one chosen area. Its direct training task is handling a diagonal resistance while controlling your body. Changes in body composition involve the broader pattern of activity, food intake, and other individual factors, not a special direction of cable pull.
Should beginners use straight arms?
A gentle elbow bend often makes the first attempts easier to control. Reaching farther changes the leverage, so treat a longer arm position as a progression rather than an aesthetic correction. You can keep using a comfortable bent-arm version without needing to earn a straight-arm one.
Is faster better?
Not for learning this version. Fast rotational training can serve specific athletic goals, but it requires different decisions about load, technique, and supervision. First demonstrate that you can stop and reverse the cable smoothly. Speed should be a planned training choice, not the result of a weight you cannot control.
Keep the next session easy to repeat
Record the station, pulley notch, attachment, displayed weight, variation, and repetitions per direction. A note such as “high-to-low standing chop, small coordinated turn, two sets of eight each way, controlled return” is more useful than writing only “core.” Add a short observation if something changed.
Workit offers personalized workout programs and a workout journal with editable weights, reps, and sets. You can use it to keep the basic training record consistent, with your setup details alongside it.
Leave the station with a clear next step: repeat the same version, add a few clean reps, or make one small adjustment. The best first success is a diagonal you can reproduce comfortably in both directions.
Comments
One response to “Cable Woodchop: Form, Rotation, Weight, and Beginner Progression”
[…] practice a controlled diagonal resistance pattern instead of supporting your body on one hand, our cable woodchop guide explains a standing alternative. The two exercises ask different things of the trunk, so select one […]