
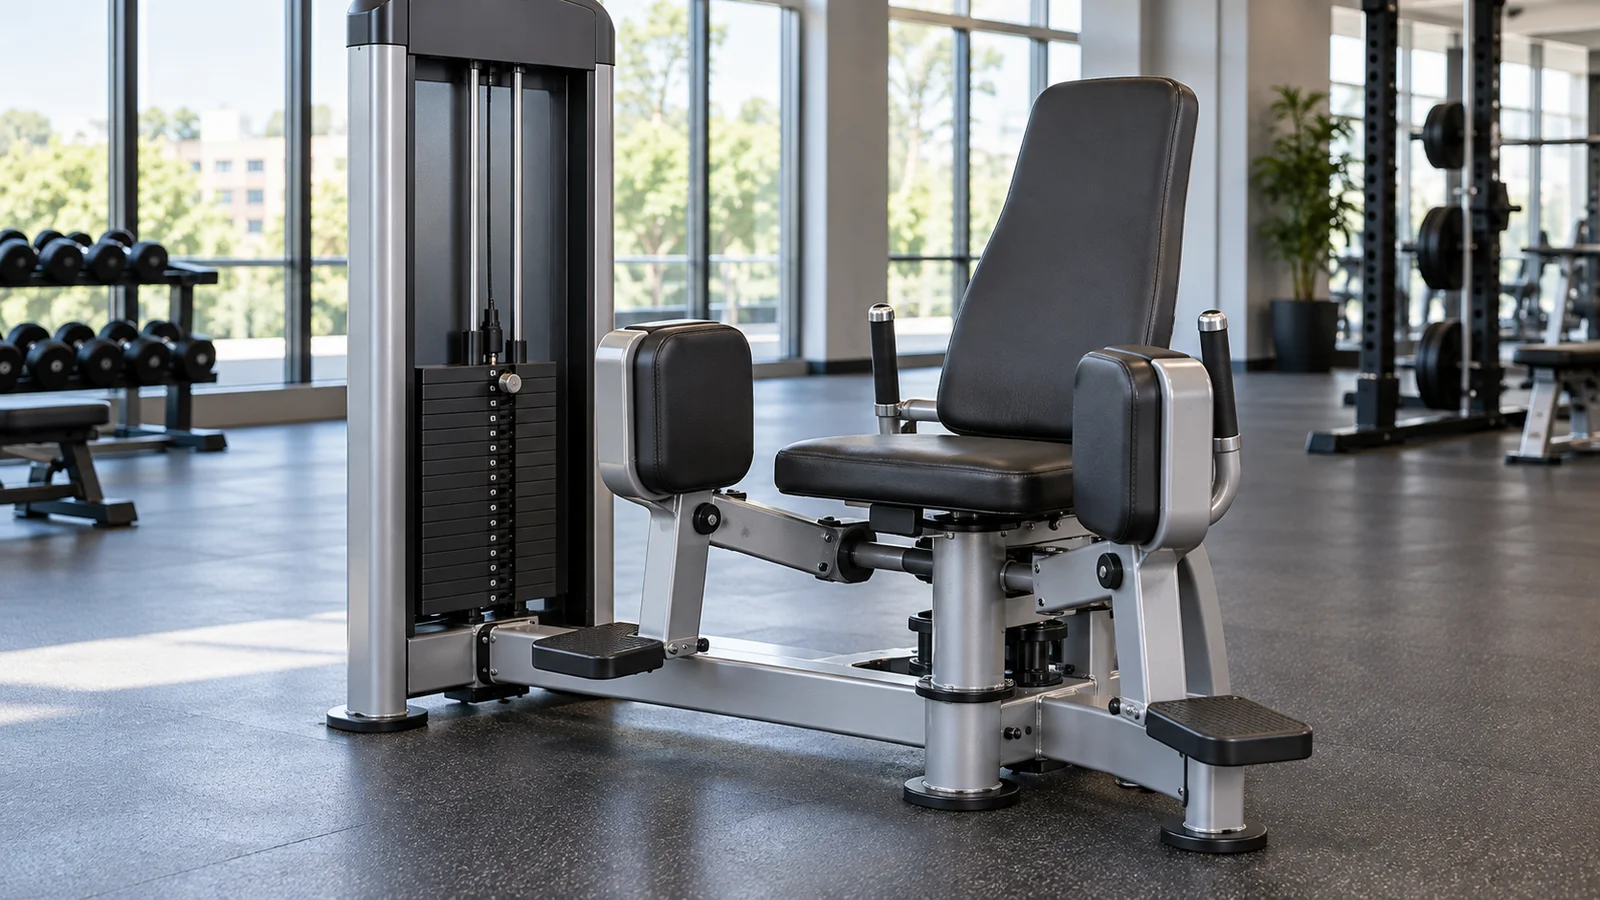
The hip abduction machine trains the muscles that move your thighs outward, including the gluteus medius at the side of the hip. On a typical seated machine, place the pads against the outside of your thighs, sit securely, and press your legs apart. Return slowly. Use a comfortable range and a light starting load while you learn the machine’s adjustments.
Published October 17, 2026.
This machine can be a straightforward addition to a lower-body workout. The confusing part is usually the setup: whether the pads go inside or outside, how far apart to start, whether to lean forward, and how much weight counts as useful work.
You do not need to copy an extreme position or chase a painful burn. This guide explains the standard seated version, gives you a repeatable way to select the load, and shows where it fits alongside other leg and glute exercises. The examples are general fitness starting points for healthy adults, not a rehabilitation program.
Hip abduction versus hip adduction: which machine is which?
Abduction moves a body part away from the body’s midline. On the seated hip abduction machine, your thighs press outward against pads placed on their outer sides. Adduction brings the thighs inward, usually against pads on their inner sides.
A simple reminder is that abduction takes the legs apart. Adduction brings them together. Some gyms have separate machines; others use one station that switches between both movements. The seat can look almost identical while the pad orientation and starting position change.
Do not assume the previous user’s setup is ready for your exercise. Read the placard and check the adjustment lever. If the resistance pushes you in an unexpected direction during an easy test repetition, stop and ask gym staff to show you the correct mode.
Is this the same as a leg extension or leg curl?
No. A leg extension primarily involves straightening the knee, and a leg curl involves bending it. On the hip abduction machine, the visible motion is the thighs moving apart at the hips while the knees stay bent in a relatively fixed position.
That distinction matters when planning a workout. The abduction machine adds a different movement rather than replacing all of your knee-dominant and hip-extension exercises. Think about the actions your program includes, not simply whether every machine is labeled for the legs.
What muscles does the hip abduction machine work?
The side-hip muscles are central to the movement. The gluteus medius and gluteus minimus contribute to hip abduction, and other muscles, including the tensor fasciae latae, can also participate. How much each contributes depends on position, resistance, and the task.
The American Academy of Orthopaedic Surgeons’ hip-conditioning guide identifies the gluteus medius and hip abductors as the main muscles in hip-abduction exercise. Its page is a clinician-oriented conditioning resource; its rehabilitation instructions should not be mistaken for a universal gym-machine plan.
People often call this a “side glute” exercise. That is a useful location cue, but you cannot precisely confirm which individual muscle is working just from where you feel a burn. You also do not need to eliminate every contribution from surrounding muscles to have a productive set.
What about the tensor fasciae latae?
The tensor fasciae latae, often shortened to TFL, is a normal muscle near the front and outside of the hip. Online discussions sometimes treat feeling it as evidence that your glutes have stopped working. That conclusion is too strong to draw from sensation alone.
If the exercise is comfortable and controlled, some effort outside your imagined target area is not automatically a problem. If you experience sharp pain, pinching, or persistent symptoms, stop rather than trying to solve the issue by forcing a different posture.
Set up your machine in the right order
Hip abduction machines differ in their seat, backrest, foot supports, range adjustments, and resistance systems. Some use a weight stack; others use air resistance or a different mechanism. Follow the instructions on the actual model you are using.
For example, Keiser’s A300 Hip Abductor manual describes backrest and pad adjustments and emphasizes controlled outward and inward movement. Those details illustrate why checking the manufacturer instructions matters. They are not a promise that every machine has the same controls.
1. Choose a very light resistance
Make your first adjustment before a demanding set. On a selectorized machine, ensure the pin is fully seated in the intended plate while the stack is at rest. Do not move the pin while someone is exercising or while the plates are lifted.
2. Arrange the pads for abduction
The contact pads should be positioned to resist the thighs moving outward. They usually contact the outer thighs near the knees, according to the machine’s design. Do not arrange them to press painfully against the knee joint or assume that every rotating pad has the same orientation.
3. Set the seat and back support
Sit fully on the seat with your pelvis supported. Use the backrest as the manufacturer intends and adjust it if the model allows. You should not feel as if you are sliding off the front edge or reaching awkwardly for the handles.
4. Use the intended foot supports
Place your feet where the machine directs. Keep them stable rather than using the footrests as a way to push your whole body upward. If the supports do not fit comfortably, ask staff whether the seat or pad configuration can be changed.
5. Choose a comfortable starting width
Begin with a position that lets you move outward without feeling forced into a stretch before the repetition starts. The widest available setting is not a goal. Adjust the range mechanism only while the machine is in its safe resting position.
6. Test the exit before the work set
Know how to bring the pads back and release the start-position mechanism. If you are unsure how to get out of the machine, ask before adding resistance. A short demonstration from gym staff is more useful than trying to work out an unfamiliar lever while your legs are fatigued.
How to use the hip abduction machine
- Settle into the seat. Keep your pelvis supported, feet on the intended supports, and hands on the handles.
- Establish a steady trunk. Sit comfortably without exaggerating an arch or folding yourself forward to begin the repetition.
- Press your thighs outward. Move the pads apart smoothly. Keep the action controlled rather than throwing the legs open.
- Stop at a comfortable endpoint. Finish before your pelvis shifts, your torso rocks, or the hips feel pinched.
- Return deliberately. Bring the pads back toward the starting position without letting the machine pull them together abruptly.
- Repeat the same movement. End the set when your controlled range changes noticeably or you would need momentum to continue.
Breathe normally. A simple pattern is to breathe out as the thighs move outward and breathe in as they return. The movement does not need to be extremely slow, but it should be slow enough that you remain in charge of both directions.
After the set, return the mechanism to its safe resting position before changing a setting or stepping out. Keep fingers away from moving arms, cables, and weight plates. If an adjustment is stiff or seems broken, ask staff rather than forcing it.
Should you lean forward, sit upright, or lean back?
For your first sessions, use the supported position shown on the machine. This gives you a clear baseline. Changing trunk position can change the hip angle and how the exercise feels, but a different sensation is not proof of better long-term results.
You may see people leaning far forward or lifting their hips off the seat. Do not assume those variations are appropriate for your machine. A supported seated machine is designed around particular contact points, and an improvised hovering position can make balance and grip part of the challenge.
If a qualified trainer recommends another position, have them check the actual equipment and your ability to control it. Record the change and reduce the load while learning. Do not compare repetitions from two very different postures as if they were the same exercise.
Does leaning forward guarantee more glute growth?
No such guarantee is justified. A position can change muscle activity during a set without establishing that it will build more muscle over months. Beginner decisions should start with the equipment instructions, comfortable movement, and a setup that is easy to repeat.
It is also unnecessary to chase the deepest possible hip angle. You are training a movement against resistance, not trying to win a flexibility contest while seated on a weight machine.
How far apart should your legs move?
Use the range you can achieve without the rest of your body changing position. The endpoint may be narrower than the machine’s maximum travel. That is normal: the equipment has to accommodate many users, and its mechanical limit is not your personal target.
Watch for a subtle shift of the pelvis or a sudden backward rock at the end of the outward motion. Those changes often appear when you try to add another inch after your comfortable range is finished. Stop just before that compensation and repeat the same endpoint.
At the inward end, return to the selected start position under control. Do not let the pads snap together or use the bounce of a weight stack to start the next repetition. If the machine repeatedly lands before you finish your range, check the starting adjustment with staff.
How much weight should a beginner use?
There is no universal starting number. Stack labels, lever lengths, pad placement, and machine designs differ. Choose the setting by how you move rather than by what another person lifts.
Begin with a load that feels easy for a handful of test repetitions. Then select a working resistance that allows approximately 10 to 15 smooth repetitions while leaving a few good repetitions possible. If you cannot control the return, the setting is too heavy for your current version.
Your hands should help you stay settled, not pull your body into a new position with every repetition. If you must grip hard and heave your torso to open the pads, lighten the load and recheck the setup.
A strong burning sensation is not a requirement. Judge the set by repeatable movement, a manageable effort level, and how well you recover. The stack number is useful only when paired with those details.
A modest beginner hip-abduction-machine plan
This is an original example for adding the exercise to a general lower-body routine:
- One easy practice set of about 8 repetitions.
- One or two work sets of 10 to 15 repetitions.
- About 60 to 90 seconds of rest between sets, or more if needed.
- Finish with roughly two or three controlled repetitions still available.
- Start with one or two weekly sessions, allowing recovery between harder sessions.
If you are new to gym training, begin at the lower end. You can learn plenty from one good work set. Adding several new exercises and many sets simultaneously makes it difficult to identify what caused excessive soreness or why the next workout feels worse.
ACSM’s 2026 resistance-training recommendations prioritize consistency and individualization. The guidance concerns overall resistance training in healthy adults; it does not prescribe a special mandatory number of hip-abduction sets. Use the example as a starting point and adjust it to your full program.
Where does it fit on leg day?
After your main lower-body movements is an uncomplicated default. For example, complete your planned squat or leg press, hip-hinge or hip-extension movement, and any other priority work. Then add the small amount of abduction work you selected.
You do not have to perform every category in one session. The point is that a side-hip accessory should fit around your larger plan rather than displace it accidentally. If time is short, keep your priority exercises and use fewer accessory sets.
If your session includes a larger leg movement, the seated leg press guide explains a separate setup. The cable pull-through guide covers a hip-hinge pattern, which differs from moving the thighs outward.
A practical progression method
Choose a range such as two sets of 10 to 15 and keep the machine settings unchanged. When both sets reach 15 with the same comfortable range and a steady torso, try the smallest available increase at a later session.
After increasing resistance, it is normal to complete fewer repetitions. If you can no longer move smoothly or return the pads deliberately, the increase was too large for now. Use the previous setting and continue practicing. Do not add loose plates or improvised resistance to a machine.
Here is an example of progress without a strict calendar: first you complete 11 and 10 repetitions; later you manage 12 and 12; eventually you reach 15 and 15. The sequence may take several sessions, and a repeated performance is not a failed workout.
Record the setup, not just the weight
A useful log entry includes the machine, backrest or seat setting, starting-width setting, load, and repetitions. Add a brief note if something changed, such as “narrower start felt more comfortable.”
If you change machines, establish a new baseline. A heavier or lighter label does not tell you whether the new machine is better or whether you became stronger overnight. Compare like with like.
What the evidence can and cannot tell you
A 2022 laboratory study compared the hip abductor machine, side-lying hip abduction, and clamshells in eleven men. Gluteus medius activation did not differ between the exercises, while the machine produced a higher gluteus-medius-to-TFL activation ratio.
That finding is more specific than saying the machine is universally the best glute exercise. It measured electrical muscle activity during exercise, not long-term muscle growth, pain relief, or injury prevention. The small, male-only sample also limits how broadly the result should be applied.
Use research as context for sensible exercise selection. It can help explain why the machine is a reasonable option, but it cannot tell you the perfect seat setting, load, or weekly volume for your body.
Common mistakes and simple adjustments
Using momentum to open the pads
If each repetition begins with a torso rock, lower the load. Try one practice repetition with an intentionally quiet body. That gives you a clearer reference than attempting to fix the movement halfway through a hard set.
Forcing the widest possible position
Stop where your comfortable hip movement ends. More machine travel is not automatically more useful work. A range you can repeat without shifting is easier to track and usually easier to learn.
Changing posture during the set
Starting upright and finishing folded forward makes the set difficult to interpret. Select one supported position and maintain it. If you want to experiment with another allowed setup, do so in a separate easy set.
Rushing the return
The inward phase still requires control. Letting the pads close abruptly removes that control and can make the next repetition start with a bounce. Reduce the resistance if you cannot manage both directions.
Assuming soreness proves effectiveness
A new exercise can feel unfamiliar afterward, but soreness is not a score. You do not need to keep adding sets until sitting down becomes uncomfortable. If the previous session disrupts ordinary activity or your next workout, reduce the dose and consider whether symptoms need assessment.
Alternatives when the machine is occupied
Standing cable hip abduction
A low cable with a suitable ankle cuff can provide outward resistance one leg at a time. It introduces a balance requirement and a different cable direction. Use a stable hand support and learn the setup rather than trying to copy your seated-machine load.
Side-lying hip abduction
This is an option when you have no machine. Begin without added load and move the upper leg outward in a controlled manner. It is a different setup with different demands, so do not expect a machine repetition count to translate perfectly.
Band side steps
A suitable resistance band can provide another way to include lateral hip work. Check the band for damage, choose manageable resistance, and use controlled steps rather than dragging the feet. Band colors and tensions are not standardized across brands.
You do not need to perform all three alternatives alongside the machine. Pick one that fits the equipment, your comfort, and the purpose of your workout. Variety is useful when it solves a problem; it does not have to make a simple session complicated.
Hip abduction machine FAQ
Will this machine remove fat from my outer thighs?
Do not use it as a promise of localized fat loss. Its practical purpose is resistance training for the muscles involved in moving the thighs outward. Changes in appearance depend on more than one exercise, and no specific shape change is guaranteed.
Can it eliminate hip dips?
Do not expect one exercise to erase a natural body contour. You can train the muscles around the hips without treating your current shape as a defect. Use strength, comfort, and consistency as outcomes you can actually track.
Should I use it before every squat workout?
It is optional. A light practice set may feel useful to some people, but a hard set can create fatigue before the main workout. Keep warm-up work easy and judge it by whether it helps you begin your planned training comfortably.
What if the front of my hip pinches?
Stop the set. Do not force a wider range or more forward lean. Ask a qualified trainer to check the equipment setup; persistent or recurring symptoms deserve assessment from a healthcare professional.
Is it only for women?
No. Exercise selection should follow your goals, comfort, and program. The muscles involved in hip abduction are relevant to people of any gender, and the machine does not belong to one category of gym user.
Your next lower-body session
Check that the machine is set for outward movement, choose a comfortable supported position, and perform an easy test set. Add only the amount of work you can repeat cleanly. Record the settings so your next session starts with less guesswork.
Explore Workit’s workout programs and fitness challenges. View Workit on the App Store.