
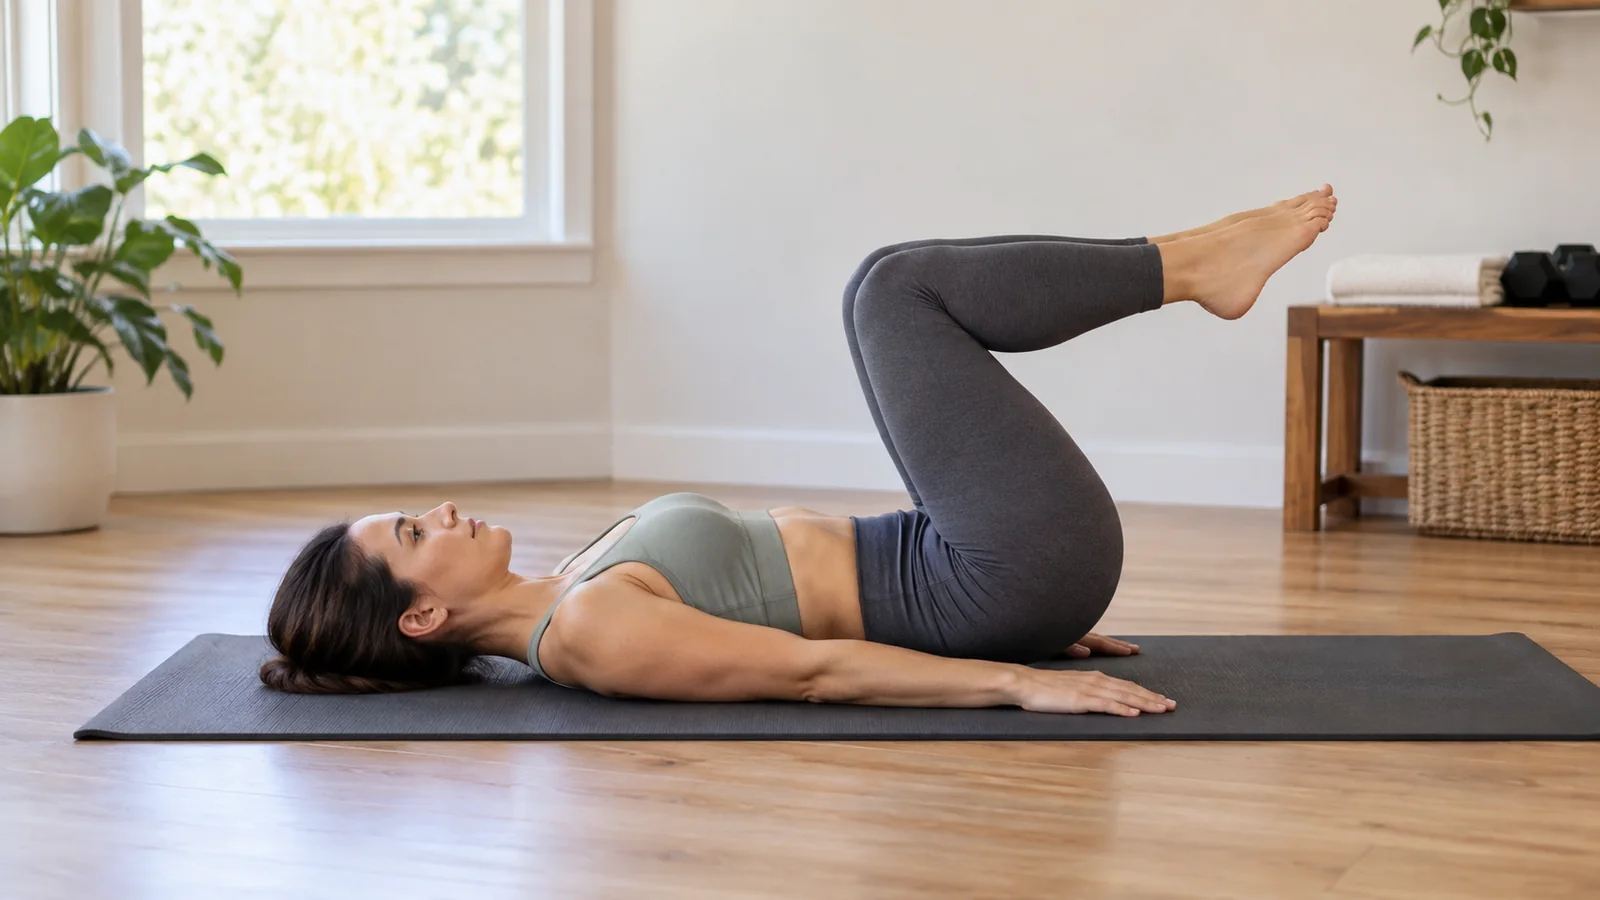
A reverse crunch is an abdominal exercise in which you curl your pelvis toward your ribs while lying on your back. Your knees move because your pelvis moves. That distinction matters: swinging your legs toward your chest can look impressive without giving you a repeatable abdominal curl.
Published October 16, 2026
You do not need a bench, ankle weights, or a long set to begin. A mat, a small controlled movement, and a clear stopping point are enough. This guide explains reverse-crunch form, the muscles involved, common mistakes, easier options, and a practical way to add the exercise to your workouts.
Quick starting point: Try one set of 5–8 comfortable repetitions with bent knees and your head supported on the floor. Finish while you could still perform another two or three equally controlled repetitions. This is a conservative practice example, not a universal prescription.
What does a reverse crunch work?
The reverse crunch trains the abdominals, particularly the rectus abdominis, the muscle running along the front of your abdomen. The obliques also contribute, and the hip flexors help position your thighs. The exercise combines a small pelvic curl with control of your legs and trunk.
People often call it a “lower-ab exercise.” That can describe where they feel effort, but it does not mean the upper and lower portions are completely separate muscles you can switch on independently. ACE’s discussion of upper and lower abdominal training explains why regional sensations and activity differences need careful interpretation.
A useful goal is to become better at moving your pelvis deliberately, rather than chasing a particular burning sensation. You might notice effort across your abdomen, and some thigh involvement is normal. Feeling your hip flexors does not automatically mean the repetition failed.
The reverse crunch is one option within a broader core program. It does not cover every task your trunk performs. Exercises that resist sideways bending or rotation provide different challenges, and your regular squats, rows, presses, and carries can involve trunk control too. Mayo Clinic describes core exercise as part of a well-rounded fitness routine, rather than a replacement for the rest of your training.
How to do a reverse crunch
The floor version below keeps the range deliberately modest. ACE’s reverse-crunch exercise guide emphasizes moving the pelvis toward the rib cage and returning the knees over the hips.
- Lie on a comfortable surface. Keep your head and shoulders down. Place your arms beside you or slightly wider, palms resting on the floor.
- Bring your knees over your hips. Bend your knees roughly to a right angle. Your feet are off the floor; your thighs point mostly upward.
- Exhale and begin the curl. Think about tipping your waistband toward your ribs. Let your tailbone and pelvis lift slightly.
- Keep the movement small. Maintain a similar knee bend. Stop before you roll heavily onto your upper back or neck.
- Lower smoothly. Return your pelvis to the mat and your knees to their starting position over your hips.
- Reset and repeat. Take an easy breath if needed. Start the next repetition without a backward swing.
One repetition is the complete curl and controlled return. Your feet do not have to touch the floor between repetitions, and they do not need to reach toward the ceiling.
Set up your practice space
Choose a firm, padded surface with room around your arms and legs. A very soft mattress can make it harder to judge your starting position because your hips sink into it. If the floor is uncomfortable, use a suitable exercise mat rather than trying to tolerate pressure on your tailbone.
Move nearby dumbbells and other objects out of your path before lying down. You should be able to finish the set, place your feet down, and turn onto your side without bumping equipment. Keep any phone used for recording out of the movement area.
Use a pace you can reproduce
For practice, think about roughly two seconds to curl and two or three seconds to return. These are coaching counts, not a special muscle-building formula. Their purpose is to expose a swing or an uncontrolled drop. If counting makes you hold your breath, forget the numbers and concentrate on a smooth repetition.
Check your form without chasing a bigger movement
Use three checkpoints: the start, the turn at the top, and the return. At the start, are you settled rather than already rocking? At the top, can you reverse direction without a sudden kick? At the bottom, can you stop before beginning again?
A short side-view video can help if recording is permitted where you train. Watch your waistband and hips, not only your knees. A repetition where your knees move a long distance but your pelvis barely curls may be mostly a leg movement.
You do not need to match someone else’s hip height. Body proportions, starting position, and current control affect what the movement looks like. A small lift with a clear pause is a more useful baseline than a large repetition you cannot repeat consistently.
Try reviewing the first and last repetitions of the same set. If the last one requires a kick, a head lift, or a sudden drop, reduce the next set by one or two repetitions. That gives you a specific adjustment rather than the vague instruction to “engage your core more.”
Common reverse-crunch mistakes and practical fixes
1. Swinging the legs to get started
A backward swing can supply momentum before your pelvis leaves the floor. To interrupt the pattern, pause in the starting position between repetitions. If you cannot begin without rocking, reduce the lift or try the preparation drill below.
Catalyst Athletics also identifies avoiding leg momentum as an important part of the reverse crunch. Its demonstration uses a supported variation; you do not need to copy its equipment setup or larger training volume to learn the basic floor movement.
2. Turning the exercise into a leg extension
Straightening and lowering your legs far from your body adds another challenge. It can also make the next repetition harder to start cleanly. For the version in this guide, keep the knee bend approximately unchanged and return to knees over hips.
If you want to train a separate leg-lowering movement later, treat it as a different exercise with its own technique and progression. Do not add it accidentally to every repetition.
3. Trying to reach the knees to the forehead
More travel is not automatically better. Reaching your knees as far as possible can turn a small curl into a rocking movement. Choose a repeatable endpoint before your upper body starts joining in. Keep your neck relaxed and your weight away from the back of your neck.
4. Dropping the pelvis back down
If the return ends with a thump, the set is probably too long or the movement is too ambitious for your current control. Reduce the range first. If the landing remains abrupt, stop and use an easier option rather than adding extra padding to disguise the drop.
5. Holding your breath through the whole set
Use the upward phase as a reminder to breathe out. Breathe in during the return or between repetitions. There is no need for a long breath hold in this beginner practice. If you cannot find a comfortable breathing rhythm, put your feet down, rest, and restart with fewer repetitions.
6. Treating fatigue as permission to change the movement
A set of eight controlled repetitions followed by four swings is not twelve repetitions of the same exercise. Count the eight and write down what happened. Clear records make it easier to recognize improvement than a larger number assembled from different movements.
An easier way to learn the pelvic curl
If lifting your hips feels confusing, start with your feet on the floor and your knees bent. Gently tip your pelvis so your waistband moves toward your ribs and the gap beneath your lower back becomes smaller. Release the movement without pushing into a large arch.
This is a preparation drill, not a full reverse crunch. Try a few small, comfortable repetitions to learn the direction. You are practicing a movement you can later use with your feet raised; you are not trying to press your spine into the floor as hard as possible.
Next, bring your knees above your hips and attempt a very small curl. Your pelvis may move only slightly. Keep that version if it is smooth. If holding both legs up prevents you from breathing comfortably or maintaining control, return your feet to the floor and choose another exercise.
A basic dead bug variation can be an alternative when you want to practice trunk control with limb movement. It is not identical to a reverse crunch: its purpose is generally to keep the trunk steadier while the limbs move. Choose the exercise you can perform comfortably instead of treating either one as a required test.
How many sets and reps should beginners do?
Start below your maximum so you can learn the movement and see how you feel afterward. The following is an example for a generally healthy adult who finds the exercise comfortable:
- First session: One set of 5–8 controlled repetitions after your main workout.
- Next suitable session: Repeat the same amount rather than automatically adding more.
- Once that feels manageable: Try two sets of 6–10 repetitions, resting about 60–90 seconds between sets.
- Frequency: Begin with two nonconsecutive training days per week.
Rest longer if you need it to reproduce the first set’s technique. End each set with roughly two or three good repetitions still available. If you are unsure how to judge effort, our guide to reps in reserve explains the idea. For this exercise, “available” means possible with the same form, not possible by swinging.
These numbers are a starting example, not an exercise-specific dose proven best for everyone. ACSM’s 2026 resistance-training guidance supports regular training, gradual development, and programs matched to the individual. It also emphasizes training all major muscle groups, which two sets of abdominal work cannot accomplish by themselves.
Progress the reverse crunch one change at a time
Progress is easier to interpret when you keep most of the exercise unchanged. Use the same setup, similar range, and similar rest while you develop a baseline.
First, make the repetitions more consistent
Repeat the same number until the last repetition looks much like the first. A smoother return or less need to reset can be meaningful progress even when your written total stays unchanged. Do not rush past this stage because the exercise uses only body weight.
Then add a small number of repetitions
If both sets are comfortable and controlled, add one repetition to one set at your next session. For example, move from 8 and 8 to 9 and 8. Keep that amount if the extra repetition changes your technique or leaves you less recovered for the next workout.
Use a brief pause as an alternative
Once you can stop and reverse the movement deliberately, a short pause near the top can make the same rep count more demanding. Reduce your repetitions when introducing it. Record the pause so you do not compare the new version directly with faster sets.
Do not rush to hold weight between your feet
A loose dumbbell adds a dropping hazard as well as extra resistance. It is unnecessary for learning this exercise. If you eventually need more challenge than controlled floor repetitions provide, get help selecting a suitable progression rather than improvising an unstable load.
Change only one factor at a time. Adding repetitions, another set, a longer pause, and a more difficult variation together makes it hard to know which change exceeded your capacity.
Reverse crunch vs. crunch, leg raise, and plank
A regular crunch moves the upper trunk toward the pelvis. A reverse crunch emphasizes bringing the pelvis toward the upper trunk. Both can train the abdominals; you do not have to perform both in every session.
A lying leg raise emphasizes moving the legs at the hips while the trunk manages their load. Some versions include a pelvic curl at the top, so exercise names can overlap. Describe what you actually do in your log. A bent-knee reverse crunch and a long-lever leg raise are not interchangeable rep for rep.
A plank mainly asks you to hold a position while resisting movement. The reverse crunch intentionally includes movement. Neither is automatically the better choice for every goal or body.
If your current program already includes several crunching movements, consider a different challenge such as the side plank or Pallof press, provided it feels appropriate. Variety should serve a purpose, not create a longer list of exercises to finish.
Where to put reverse crunches in your workout
For a beginner whose main goal is general strength, placing a small amount of abdominal work near the end is practical. You can complete your larger exercises before spending extra effort on the reverse crunch.
For example, follow a familiar two-day full-body routine and add one or two reverse-crunch sets on one of those days. On the other day, you might use a comfortable side-plank variation instead. This is an example of distributing practice, not a requirement to perform a particular combination.
A short standalone practice can also work: walk around for a few minutes, rehearse a few easy pelvic movements, and perform one comfortable set. There is no need to turn every practice into a tiring abdominal circuit.
If your main workout already leaves you unable to control the movement, shorten the set or skip it that day. A scheduled exercise is an option in the plan, not a reason to force poor-quality repetitions.
Comfort, back symptoms, and when to stop
Muscular effort is expected; sharp pain, pinching, or symptoms traveling into a leg are reasons to stop the exercise. Do not keep repeating a painful version in the hope that a stronger contraction will fix it.
If the surface is uncomfortable but the movement is otherwise pain-free, adjust your mat. If the movement itself hurts, stop rather than trying every variation during the same session. Seek guidance from a qualified healthcare professional if symptoms persist, recur, or affect normal activities. The NHS back-pain guidance also advises stopping exercises that worsen pain and getting advice.
If you are pregnant, recently postpartum, recovering from surgery, or have a condition for which you have been told to limit abdominal strain or spinal bending, follow your clinician’s individualized guidance. This general exercise example is not a rehabilitation plan or a promise to prevent or treat back pain.
Frequently asked questions
Will reverse crunches reduce lower-belly fat?
Do not choose them as a way to remove fat from one specific area. In a randomized study of abdominal exercise, six weeks of training improved abdominal endurance without significantly reducing the measured abdominal-fat outcomes. The practical reason to use reverse crunches is to train a movement and the muscles involved, not to promise a particular waist change.
Why do I feel them in the front of my hips?
Your hip flexors help hold and move your thighs. Review whether you are swinging or extending your legs farther away each time. A smaller range and a reset may make the exercise easier to control. A painful pinch is different from ordinary muscle effort and is a reason to stop.
Should my hands go under my lower back?
For the version described here, place your hands beside you for balance. Putting them underneath can make the movement harder to observe and changes your support. You do not need a particular hand trick to make a repetition count. If you need hands underneath to tolerate pain, choose a different exercise and seek advice.
Is a reverse crunch suitable for a complete beginner?
Sometimes, but using no equipment does not automatically make an exercise easy. ACE classifies its version as intermediate. Start with the preparation drill and a small trial set. If the movement remains confusing, an easier alternative or direct coaching is a reasonable next step.
Can I do reverse crunches every day?
You do not need daily sets to practice this exercise. Starting with two nonconsecutive sessions makes it easier to assess recovery and keep room for the rest of your training. Adding frequency is optional; more days are not automatically more useful.
What if I am not sore afterward?
Keep judging your work by controlled repetitions, manageable effort, and how consistently you can train. Soreness is not a target to manufacture. Do not double your sets simply because yesterday’s practice did not leave you uncomfortable.
Track the movement you actually performed
Write down the variation, sets, repetitions, and any meaningful technique change. A useful entry might read: “Floor reverse crunch, bent knees, 2 sets of 7, controlled return, no added weight.” That is more informative than writing “abs” or a total without context.
Our workout log template can help you organize your sessions. You can also use Workit to log your sets, reps, and weights alongside the rest of your strength training. A subscription is required.
The most useful starting goal is simple: make a small pelvic curl you can repeat comfortably, return under control, and stop before momentum takes over. Build from that baseline instead of chasing height, speed, or an arbitrary number of repetitions.