
Published October 23, 2026
An assisted dip machine uses a counterweight to support part of your body weight while you bend and straighten your elbows on parallel handles. On the usual counterweighted design, selecting more weight provides more assistance and makes the dip easier. Start with enough assistance for controlled repetitions, use a comfortable depth, and learn the machine’s mounting and exit procedure before your first set.
A useful beginner starting point is two sets of 6–10 repetitions, stopping with a few controlled repetitions available. The goal is not to reach the smallest assistance number immediately. It is to establish a stable, comfortable movement you can repeat without dropping into the bottom or struggling to leave the machine safely.
First, identify the machine you are using
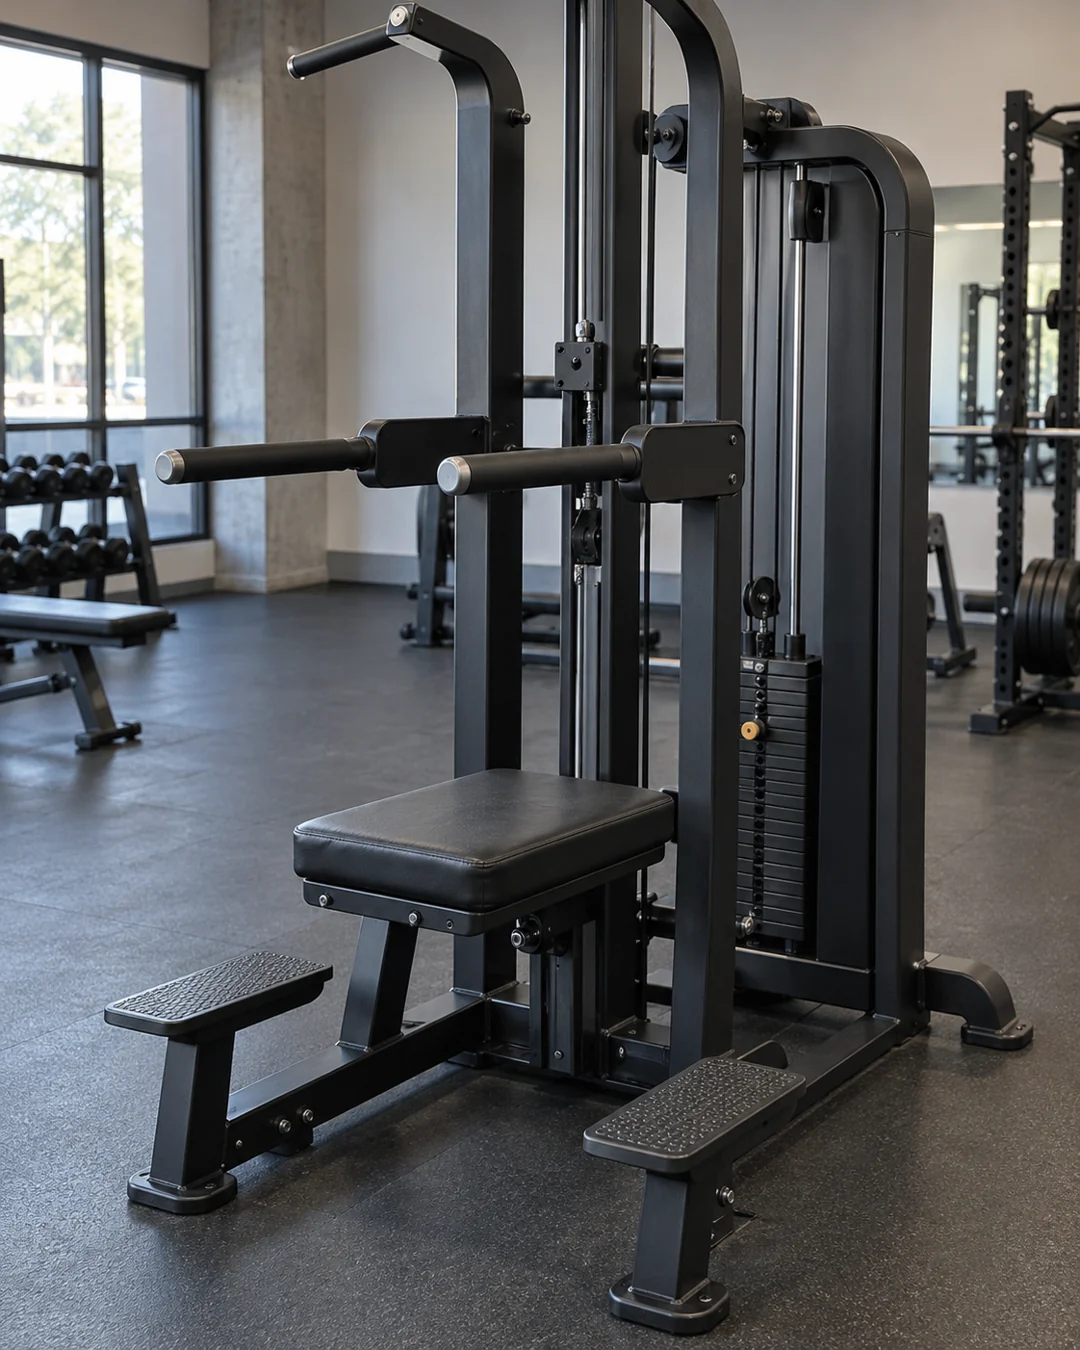
An assisted dip station usually has parallel handles, steps, and a moving knee pad or foot platform. Many stations also include overhead handles for assisted pull-ups. The support platform is connected to a weight stack that counterbalances part of your weight. Its movement and safe entry sequence depend on the model.
A seated dip or triceps-press machine is different. On that machine, you generally sit and push handles downward against resistance; adding weight usually makes the exercise harder. Do not transfer instructions from one design to another simply because both are called “dip machines.” Read the placard and ask staff when the mechanism is unfamiliar.
Manufacturer instructions are the authority for equipment operation. For example, the Life Fitness Insignia owner’s manual explains that a larger selected counterweight makes its assisted dip easier and specifies its own pad and step sequence. Another model can require a different exit procedure. Have a staff member demonstrate yours before loading it.
How the assistance weight works
Think of the stack number as help rather than weight you are lifting. If you select a larger counterweight, the platform supports more of you. If you select a smaller one, you must contribute more effort. This is the opposite of the usual progression on a chest press or leg curl.
As a simplified illustration, an 80 kg person using 30 kg of nominal assistance might think of the task as roughly 50 kg of body-weight load. The subtraction helps explain the direction of the change, but it is not a precise measurement of force at the hands. Pulley arrangements, friction, moving parts, and machine design complicate the real mechanics.
Use the displayed assistance setting to compare sessions on the same machine. Do not assume that 30 kg of assistance on another brand will feel identical. If you change gyms or machines, recalibrate with an easy set and record the change. A different number is not automatically progress or regression.
The number should move down as the exercise gets harder
If you performed controlled sets at 40 kg assistance and later use 35 kg with the same repetitions and range, you are receiving less help. That is a meaningful progression on that machine. Moving from 40 to 45 kg gives more help and may be appropriate when learning, returning after a break, or managing fatigue.
Do not treat more assistance as a failure. The machine exists to make the movement adjustable. If a lighter assistance setting causes you to plunge into the bottom or strain through the first repetition, restore more help. A manageable exercise is more useful than an impressive-looking setting with an unsafe execution.
What muscles does the assisted dip train?
The triceps help straighten the elbows, while the chest and front of the shoulders contribute to the pressing action. Muscles around the shoulder blades and trunk help you control your body between the handles. Assistance reduces the demand, but it does not turn the exercise into a completely passive movement.
Body position and machine geometry influence how the exercise feels. A modest forward inclination can change the task, but exaggerated leaning or elbow flaring is not necessary for a beginner. Start with a comfortable, controlled position rather than trying to isolate the chest or triceps with dramatic angle changes.
You cannot accurately assign a fixed percentage of the work to each muscle from a photograph or a burning sensation. Nor does feeling the exercise strongly in one area prove it is the best choice for you. Look at whether the movement is comfortable, repeatable, and compatible with your training goals.
Set up before you step onto the machine
- Read the exercise placard and confirm the machine is intended for assisted dips.
- Ask staff to demonstrate the entry and exit sequence, especially the moving support platform.
- Check that the selector pin is fully seated and any handle adjustments are locked.
- Choose generous assistance for your first trial rather than beginning near your limit.
- Check that your body weight is within the manufacturer’s user limit.
- Keep the steps dry, your footwear secure, and the surrounding area clear.
- Know where your feet will go when you finish, before your arms become tired.
Never change the pin while you or another person is loading the moving platform. Keep hands, clothing, and loose items away from the weight stack and moving mechanisms. If a cable looks damaged, a step is loose, or the pad moves unpredictably, do not use the station. Tell gym staff rather than attempting a repair.
Some machines use a knee pad and others use a standing platform. Use the body position the manufacturer intended. Do not stand on a pad designed only for kneeling, put a foot on an exposed linkage, or invent a shortcut because another person seems to do it that way.
Perform the dip with a controlled range
Once you have entered according to the machine’s instructions, hold the dip handles securely and establish a stable starting position. Your arms should be comfortably extended without aggressively snapping the elbows into lockout. Let the support pad carry the intended part of your weight rather than trying to balance on it as a separate exercise.
Bend the elbows to lower your body slowly. Keep your movement smooth and avoid collapsing forward between the handles. Stop at a depth you can control without shoulder pain or a feeling of instability. Then press through the handles to return to the starting position, continuing to control the support platform.
You do not need to chase a deep stretch or force the upper arms below a particular line. Shoulder tolerance, body proportions, handle spacing, and training experience differ. A shallower, repeatable range is a sensible starting point. Increase range only if it remains comfortable and controlled, not because someone nearby uses a deeper dip.
Keep the bottom deliberate
The bottom is where beginners often lose control. Lowering too quickly can turn the reversal into a bounce. Use enough assistance that you can pause briefly if needed and change direction smoothly. If you feel unable to stop the descent where you intended, the set is too demanding for the current setup.
A practical self-check is whether the first and last repetitions reach approximately the same depth without a sudden drop. You do not have to measure the angle. Choose a visible landmark or a familiar comfortable endpoint, and stop the set when fatigue prevents you from reproducing it.
Do not force the elbows against your ribs
Let the elbows follow a natural path compatible with the handle spacing. Excessive flaring can be a sign that the position is not working for you, but squeezing the elbows tightly inward can also feel forced. If the handles adjust, ask staff how to set them and test the comfortable option with ample assistance.
If neither handle position allows a comfortable movement, choose another pressing exercise. Equipment is not equally suitable for every body. There is no benefit in forcing yourself to fit a machine simply because it is part of a written routine.
Breathe without turning the set into a strain
Use steady breathing, usually exhaling as you press upward and inhaling as you lower. Avoid a prolonged breath-hold during a difficult beginner set. If you become dizzy, stop and get off safely with help if needed. The exercise should not require an all-out effort to complete the first few repetitions.
Learn the exit while you are fresh
Finishing the last repetition does not finish the task. You still need to transfer from the moving support to the fixed steps safely. Follow your machine’s placard or staff demonstration exactly. Keep a secure grip, move deliberately, and do not jump off or let the pad fly upward uncontrolled.
Different manufacturers describe different sequences, so a generic internet instruction should not override the model you are standing on. Some specify bringing the pad to a particular position before stepping away; others describe a staged transfer between knees and steps. Learn that sequence before training hard, and leave enough energy to perform it.
If you are unsure how to exit, ask for assistance rather than experimenting under fatigue. This is especially important on your first visit or when moving to a different brand. A minute of equipment orientation can prevent a confusing end to an otherwise successful set.
Find your starting assistance
Begin with more help than you expect to need. Perform a few easy repetitions to learn the platform’s movement, then rest and adjust only after you are safely off the machine and the stack is at rest. Your first working setting should allow about six controlled repetitions with several more available.
If you cannot lower smoothly or press back up without straining, increase assistance. If ten repetitions feel extremely easy, you can reduce it slightly at a later set or session. Avoid making multiple large changes in rapid succession. The purpose of the first workout is to learn a repeatable setting, not find your limit.
Body weight alone cannot tell you the correct pin position. Two people of the same size may have very different pressing experience and comfort with dips. Previous chest presses or push-ups provide background, but they do not translate into an exact assistance formula.
A manageable beginner training plan
Try two working sets of 6–10 repetitions, with about two minutes of rest between them. Use more rest if needed to regain comfortable control. Leave approximately two or three good repetitions available at the end of each set. Begin once or twice per week according to the pressing work already in your routine.
This is an illustrative starting plan for a healthy adult who can use the machine comfortably, not an individualized prescription. The ACSM’s 2026 resistance-training guidance supports a consistent, individualized approach rather than assuming complex methods or repeated failure are required. A new exercise should fit the whole program.
Do not add assisted dips on top of a large amount of pressing simply because the platform makes them feel beginner-friendly. They still count as demanding upper-body work. You may replace a pressing accessory while you learn them instead of adding another block to an already long session.
Example session placement
If learning dips is your main priority, place them after your general warm-up and easy practice sets, while you are fresh. Then continue with a row and the rest of your planned workout. If they are only an accessory, perform your priority press first and use a more assisted dip setting afterward.
Keep that order stable when comparing performance. Ten dips before a press and eight dips after several demanding press sets are not directly comparable. The order changes the fatigue you bring to the machine. Record it before deciding that you need a different program.
If your plan includes a separate elbow-flexion accessory, reverse curls are one option to learn with light weight. They do not replace compound pulling work, and adding them is unnecessary if your current arm workload is already sufficient.
Progress by reducing assistance gradually
Stay with a setting until both sets reach the upper end of your planned range with a consistent depth and controlled exit. Then reduce the assistance by the smallest available step and let repetitions fall toward the lower end. If the new setting disrupts technique immediately, restore the previous one.
For example, a hypothetical person might perform 8 and 7 repetitions at 40 kg assistance, later reach 10 and 10, and then try 35 kg. The numbers illustrate a progression method, not recommended settings for you. The size of a machine’s increments may make the next step easy or surprisingly difficult.
Change one major variable at a time. Reducing assistance, adding depth, and adding sets in the same session makes it hard to identify what caused a problem. You can first establish a comfortable range, then build repetitions, and only then reduce the help. There is no deadline for reaching an unassisted dip.
For a broader explanation of this approach, see double progression. With an assistance machine, remember that progression usually means less counterweight rather than a larger stack number. Label the log clearly so you do not accidentally reverse the plan.
Common mistakes and what to change
Choosing too little assistance
The first repetition should not feel like an emergency. Increase the assistance if you cannot control the bottom or if every repetition requires a full-body strain. A heavier counterweight allows you to practice the movement instead of merely surviving it. Learning with more help is still training.
Dropping into a deep stretch
Reduce the range and slow the descent. Do not use the weight of your body to force extra shoulder extension. If a comfortable shallow range is unavailable, stop the exercise and choose another press. Persistent pain is not something to solve by repeatedly testing a deeper dip.
Using the pad as a bouncing platform
Keep the body and support moving smoothly rather than pumping the knees or feet to create momentum. If the platform oscillates, pause safely and reset with more assistance. Check the manufacturer’s intended position rather than trying to control the machine by improvising foot placement.
Confusing assistance with resistance
Write “assistance” next to the number in your log. A larger number on this station usually makes the task easier. If an app or spreadsheet treats all weight increases as progress, add a clear note rather than following its suggestion blindly. The machine’s mechanism determines the meaning.
Training until you cannot exit confidently
End the set earlier. You need enough control to complete the manufacturer’s dismount sequence after the last repetition. Taking a set to a point where you cannot manage the platform adds a risk that is unnecessary for a beginner. Leave room for both another good rep and a calm exit.
Alternatives when the machine does not suit you
A chest press machine can provide adjustable pressing work without supporting your body between parallel handles. A triceps pushdown can train elbow extension with a different setup. Neither is an identical substitute, but you do not need identical movements to build a useful routine.
Bench dips are not automatically an easier or more comfortable replacement. Their shoulder position and support arrangement differ. Likewise, bands on parallel bars require their own secure setup and change assistance through the movement. If you are uncertain, choose a familiar stable exercise rather than inventing an improvised progression.
If your goal is general fitness rather than a specific unassisted dip, there is no requirement to master this machine. Select exercises that you can perform consistently and comfortably. A well-chosen alternative is a training decision, not a failure to progress.
Frequently asked questions
How much assistance should a beginner use?
Enough to complete the planned repetitions with controlled depth and a safe exit. Start generously, then adjust after an easy trial. A fixed percentage of body weight cannot account for your experience, the machine’s mechanics, or your shoulder comfort.
When should I try an unassisted dip?
Only when you can safely support yourself on suitable parallel bars and control the intended range. Low assistance on a machine does not guarantee a smooth transition because balance and support differ. A qualified trainer can help assess the transition without turning it into an all-or-nothing test.
Is soreness required?
No. Soreness is not a necessary sign of a productive session. Watch whether you can recover for your next workout and improve your repeatable performance over time. Unusual joint pain, sudden weakness, numbness, or persistent symptoms should not be treated as normal training feedback.
Your first-session checklist
Learn the machine, select ample assistance, practice a comfortable range, and leave enough energy to dismount calmly. Record the machine, assistance setting, repetitions, and any setup notes. Repeat that baseline before making the exercise harder.
If you are building a broader fitness routine, explore Workit on the App Store. Keep the plan practical: a clear exercise, an honest effort level, and one manageable next step are enough to begin.
Comments
One response to “Assisted Dip Machine: Setup, Assistance Weight, and Beginner Sets”
[…] a different compound pushing option, see the assisted dip machine guide. Dips are optional, require a comfortable shoulder range, and are not a direct substitute for a […]