
Published October 11, 2026
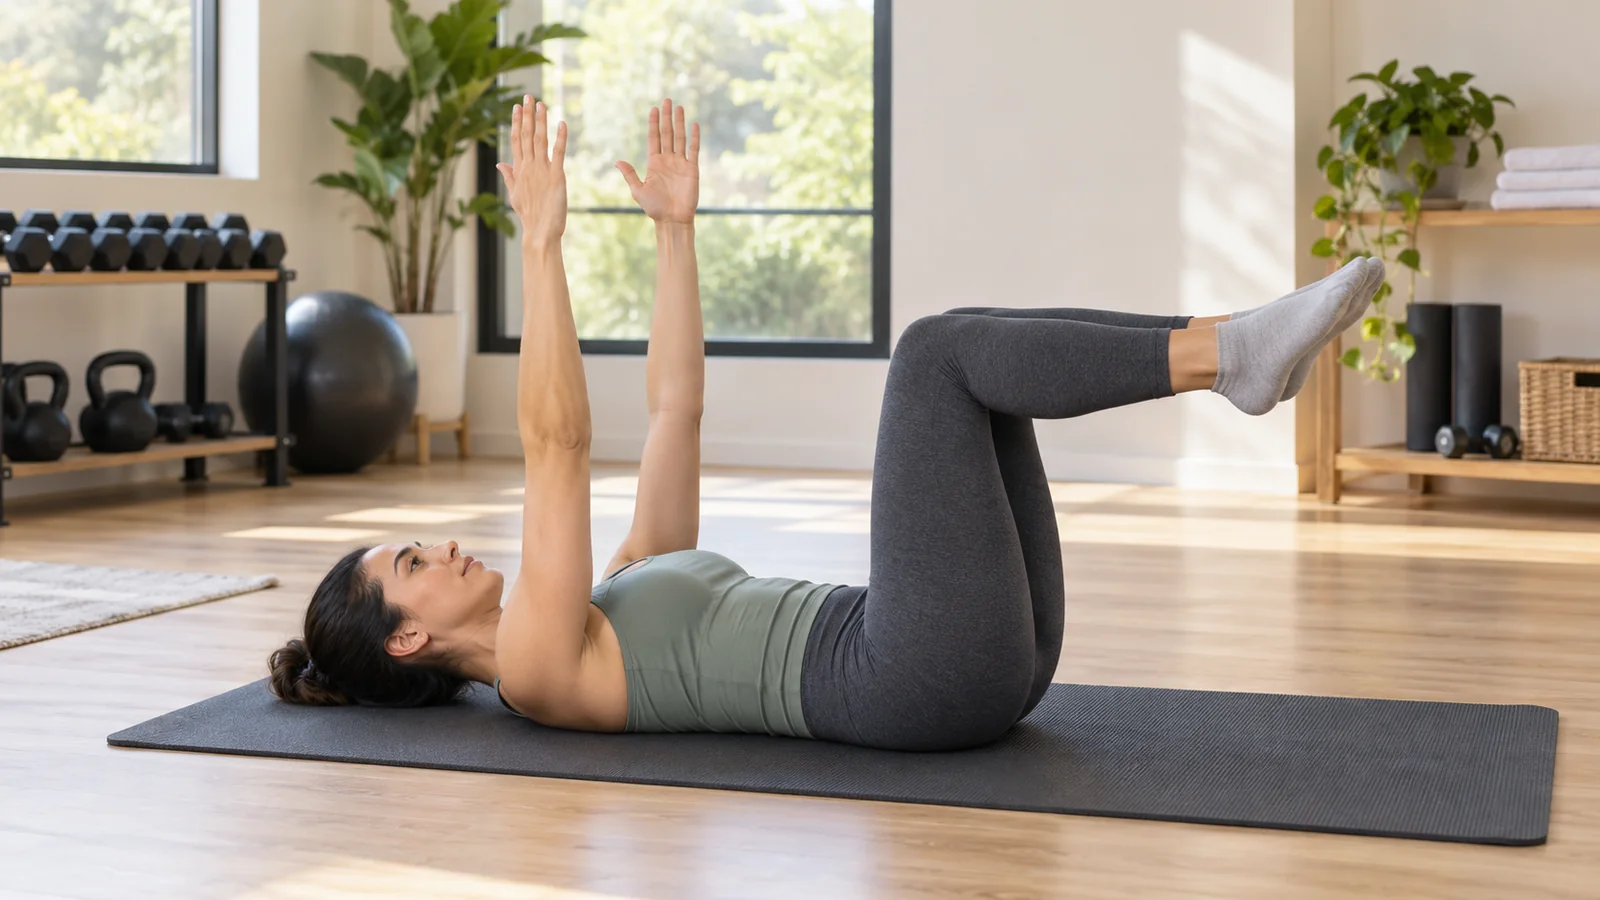
The dead bug exercise trains you to keep your trunk steady while your arms and legs move. Lie on your back, lift your arms and bent knees, then slowly reach one arm and the opposite leg away without letting your lower back arch. Beginners can start with heel slides or heel taps and build toward the full movement.
A useful starting dose is one or two sets of four to six controlled repetitions per side, two or three days a week. Choose a version that lets you breathe normally and finish each repetition in the same comfortable position. Reaching farther is optional; keeping control is the job.
This guide explains how to find that position, choose an appropriate variation, troubleshoot common problems, and add dead bugs to a realistic strength routine. The sample progression is a general training example, not a treatment plan for back pain or an injury.
What is a dead bug, and what does it work?
The name comes from the starting position: you lie face up with your arms and legs lifted. During a standard repetition, opposite limbs reach away from your body and return. Your trunk stays comparatively still.
The abdominal muscles work to resist the tendency for your lower back to arch as your limbs move. This is often called anti-extension training. NASM’s dead bug exercise guide identifies the rectus abdominis, transverse abdominis, and obliques among the muscles involved in this stabilizing task.
The practical skill is managing a moving lever without losing your chosen trunk position. A bent leg makes a shorter lever; a straight leg reaching farther away creates a harder task. You can therefore change the challenge without buying equipment or counting faster repetitions.
Dead bugs also require coordination. Moving the left arm with the right leg may feel surprisingly awkward at first. That does not mean the exercise is unsuitable. You can practice one moving limb, slow down, and add the second limb when the pattern feels familiar.
What the exercise can and cannot do
Dead bugs are one option for training abdominal control and endurance. They are not a complete strength workout, a guaranteed cure for lower-back pain, or a way to remove fat specifically from your stomach. More complicated variations do not automatically produce better results.
It helps to give the exercise a modest, useful purpose: practice moving your limbs while maintaining a comfortable trunk position. You can then combine it with squatting, hinging, pushing, pulling, and the other movements in your broader program.
How to do the dead bug exercise
Use a firm, comfortable surface with enough room to extend an arm and a leg. A thin exercise mat can reduce pressure against the floor. Clear nearby furniture and anything you could kick. You do not need a weight, resistance band, or unstable surface to learn the movement.
1. Find your starting position
Lie on your back with your knees bent and feet on the floor. Let your head rest comfortably. Take two easy breaths. Gently tighten your abdomen while keeping your neck and jaw relaxed.
Your ribs and pelvis should feel settled rather than pushed away from each other. Aim for a comfortable, steady lower-back position, with gentle contact toward the mat where appropriate for your body. Do not force your spine flat by painfully curling your pelvis or squeezing as hard as possible.
2. Bring your limbs into position
Raise your arms toward the ceiling. Lift one foot, then the other, until your knees are roughly above your hips and bent about ninety degrees. Your hands should be approximately above your shoulders.
If lifting both feet makes your back arch or makes breathing difficult, put them down. Start with the heel-slide variation below. Getting into the full starting position is already a meaningful part of the challenge.
3. Reach opposite limbs away
Slowly move your right arm toward the space behind your head while reaching your left leg away. Exhale gently during the reach if that helps you keep your ribs settled. Stop before your trunk position changes.
Your hand and heel do not have to touch the floor. A small, controlled reach is a complete repetition. Keep the nonmoving arm and leg approximately in their starting positions rather than letting them drift toward your chest.
4. Return, reset, and switch
Bring the moving limbs back without swinging. Take an easy breath, then repeat with your left arm and right leg. Count each side separately: six repetitions per side means twelve total reaches.
Try about two seconds reaching out and two seconds returning. That is a practice rhythm, not a mandatory tempo. Slow enough to notice a change in your back position is more useful than trying to match a stopwatch perfectly.
5. End the set while it still looks controlled
Stop when you cannot keep the same range, breathing, and trunk position. Place your feet down one at a time. Rest for roughly thirty to sixty seconds, or longer if you need it, before another set.
These basic mechanics align with the opposite-limb movement described by NASM. The shorter starting sets and variations here are programming options designed to make practice manageable, rather than a claim that one repetition prescription suits every beginner.
Choose your starting variation
You do not need to pass through every variation in order. Choose the easiest version that provides a clear abdominal challenge without pain or breath-holding. Stay there as long as it remains productive.
Level 1: Arms only, feet supported
Keep both feet on the floor and raise your arms toward the ceiling. Move one arm partway overhead, return it, and change sides. Let the arm travel only as far as your shoulder and trunk position allow.
This is useful when coordinating four lifted limbs feels overwhelming. It also gives you a way to learn the breathing rhythm with less demand from your legs. Harvard Health describes an arms-only modification as an easier option.
Level 2: Heel slides
Begin with both feet down. Gently slide one heel away along the floor while the other foot stays planted. Stop at a comfortable distance, then bring it back. Alternate legs.
Keep your arms resting beside you or pointing upward. The heel remains supported, which makes this an approachable place to practice the leg movement. Use a surface where your heel moves smoothly; do not yank it against a sticky mat.
Level 3: Bent-knee heel taps
Lift your knees above your hips. Keep one knee still while lowering the other bent leg until its heel lightly touches the floor, or approaches it. Return and switch.
The knee stays bent throughout. Lowering from the hip is different from simply straightening the knee. If the tap pulls your back into an arch, make the motion shallower or return to heel slides.
Level 4: Opposite arm with a bent-knee tap
Add the opposite arm to the heel-tap pattern. For example, lower your left heel while reaching your right arm behind your head. Return both before changing sides.
This bridges the coordination gap without immediately adding the longer lever of a straight leg. You can also keep the arm reach shorter than the leg reach. Symmetrical-looking distances are not the goal.
Level 5: Standard opposite-arm, opposite-leg dead bug
Gradually straighten the moving leg as it reaches away. Keep the foot higher at first. Only lower it farther if you can do so without your back position changing.
A straight leg does not need to hover an inch above the floor to count. Your useful endpoint may be much higher, especially during the first few sessions. Record the version you actually perform rather than borrowing a more advanced label.
What should you feel?
Expect muscular effort around your abdomen and some work around the front of your hips as your legs move. You may notice that one side is harder to coordinate. The exercise should not produce sharp pain, a pinching sensation, or increasing back discomfort.
You do not need a dramatic abdominal burn. A set can be useful when the main challenge is maintaining a steady position for several deliberate reaches. Conversely, a strong burning sensation does not prove that the movement is being performed well.
Use three questions during a set: Can I keep breathing? Can I keep the next reach as controlled as the last? Can I return without swinging? If any answer becomes no, shorten the reach or finish the set.
Some shaking can accompany effort, but you should still be able to control the movement. If shaking makes it impossible to maintain your position, treat it as a reason to rest rather than a target to chase.
Common dead bug mistakes and practical fixes
Your lower back arches as the leg extends
Make the leg reach shorter, keep the knee more bent, or keep the moving foot higher. Change one of these variables and try two slow repetitions. If the problem remains, use heel slides with the other foot supported.
For example, someone who loses position halfway through a straight-leg reach does not need to force the final half. Their current training range ends earlier. Several smooth repetitions within that range are easier to reproduce and progress.
You hold your breath through the whole set
Reset with both feet down and breathe normally. Start the next repetition with a gentle exhale, then inhale during the return or pause. Avoid turning every reach into a maximal brace.
Counting quietly can provide a simple check that you are letting air move. If you cannot breathe comfortably despite reducing the range, stop and choose an easier exercise. Do not use dizziness or lightheadedness as evidence of a productive workout.
You feel mostly neck tension
Keep your head supported rather than curling it toward your knees. Relax your shoulders away from your ears. You can also remove the arm movement and practice a leg-only version.
A small folded towel may make the resting head position more comfortable, but avoid propping yourself so high that your neck is sharply bent. Persistent symptoms deserve individual assessment rather than repeated attempts to force the setup.
Your hips click or your groin feels pinched
Do not push through painful clicking or pinching. Reduce the leg range or stop that variation. A shorter heel slide may feel different, but trying an easier movement is not a diagnosis or permission to ignore recurring symptoms.
If the discomfort repeats, affects daily movement, or persists after stopping, speak with a qualified clinician. The article cannot determine whether the sensation comes from technique, a joint, a tendon, or another cause.
You keep moving the same-side arm and leg
Put your feet down and rehearse the arm-leg pairing before lifting both knees. Say “right hand, left foot,” perform that reach, and reset. Then switch.
You can also complete a few repetitions on one side before changing, provided both sides receive the planned work. The point is deliberate coordination. There is no benefit to speeding up a confusing pattern.
You rush the return
The return is part of the exercise. Think of bringing the limbs home with the same attention used to send them away. A slower return also makes it easier to notice whether the nonmoving leg drifts.
If every repetition becomes faster, the set may be too long. Reduce the target from eight per side to four, rest, and see whether the second set is more consistent.
A beginner dead bug plan for four weeks
The following example uses two nonconsecutive practice days each week. Progress only when the current version remains comfortable during the session and afterward. Repeating a week is a valid choice.
- Week 1: Choose heel slides or arms only. Perform one or two sets of four repetitions per side. Learn the setup and a repeatable breathing rhythm.
- Week 2: Use the same variation for two sets of five or six per side. Keep the reach and tempo consistent.
- Week 3: If both previous sessions felt controlled, try bent-knee heel taps or add the opposite arm. Return to four repetitions per side for two sets.
- Week 4: Build the chosen variation toward six repetitions per side. Try a slightly longer reach only if it does not change your trunk position.
This plan deliberately avoids increasing difficulty, repetitions, sets, and frequency together. If a new version feels substantially harder, doing fewer repetitions preserves room to learn it.
Suppose you complete two sets of six heel taps on Monday with comfortable breathing. On Thursday, you add the opposite arm and manage four clean reaches per side. That is a useful progression even though the repetition count decreases.
Compare like with like. Six long-lever repetitions are not directly equivalent to six heel slides, and counting a full left-right pair as one repetition changes the apparent total. Write “per side” in your notes so next week’s comparison means something.
Where dead bugs fit in a workout
Before strength training
One easy set can serve as a short movement rehearsal before your main exercises. Keep it easy enough that you are not arriving at squats or presses with a tired trunk. A warm-up set should help you settle into the session.
After your main exercises
One or two controlled sets near the end of a workout are another simple option. Fatigue from earlier exercises may mean you need an easier dead bug variation than you would use when fresh.
For a broader session, pair this guide with the 20-minute strength workout. You do not need to add a long abdominal circuit after completing the planned sets.
Alongside a home band routine
Dead bugs need no anchor or band and can provide a straightforward floor-based trunk exercise within a home session. The resistance-band workout for beginners covers a complementary way to train other movement patterns.
Keep the overall week balanced. The CDC’s adult activity guidance includes muscle-strengthening work for all major muscle groups on at least two days weekly, alongside aerobic activity. A few sets of dead bugs alone do not cover those muscle groups.
How to progress without adding unnecessary complexity
First make your current repetitions more repeatable. Then choose one progression: add a repetition per side, extend the reach slightly, or move to the next suitable variation. More difficulty is useful only when you can still perform the intended task.
A longer pause can also make a familiar variation more demanding. For example, pause briefly at the end of a comfortable reach before returning. Do not use a pause so long that you need to hold your breath.
Weights and bands are optional later tools. They change the demands and may require different setup skills. You can make considerable progress in coordination and control without holding a weight above your face or installing an anchor.
Use a workout log to record variation, repetitions per side, sets, and one brief form note. “Two sets of five per side; shorter right-leg reach” is more actionable than “abs done.”
When to modify or get individual guidance
Stop if the exercise causes pain, dizziness, or other concerning symptoms. Seek individual advice if you have an existing back problem, recent surgery, an injury affecting the movement, or a health condition that changes what exercise is appropriate.
If you are pregnant or returning to exercise after childbirth, ask your care professional about suitable positions and progression. This general floor routine is not a prenatal, postpartum, pelvic-floor, or rehabilitation program.
If getting onto or up from the floor is difficult, do not force that transition. A qualified professional can help you choose an accessible alternative and a safe setup. The ability to perform one particular floor exercise is not a requirement for starting strength training.
Dead bug exercise frequently asked questions
How many dead bugs should a beginner do?
Start with one or two sets of four to six repetitions per side. Use an easier version if your position changes before you reach that number. Add repetitions gradually rather than starting with a large daily target.
Should my lower back be completely flat?
Avoid an increasing arch as your limbs move, but do not force a painful flattening position. Body shape, comfort, and the chosen variation affect floor contact. If the setup is confusing or uncomfortable, an in-person assessment is more useful than pressing harder.
Are dead bugs better than planks?
They provide different practice opportunities. A dead bug lets you adjust moving-limb range while lying down; a plank uses a different support position. Choose according to comfort, ability, and the rest of your program. Neither is mandatory.
Can I do dead bugs every day?
Daily practice is not necessary to begin. Two or three short sessions can make it easier to assess recovery and maintain quality. If you are sore or your control is worse, allow more recovery instead of repeating hard sets.
How do I know when to move on?
Look for comfortable breathing, steady trunk position, and repeatable range across every planned repetition. When those qualities hold over more than one session, try a small progression. Being bored with an exercise is different from being ready for a harder version.
A quick check before you finish
After your final set, compare the first and last repetitions. Did you shorten the reach because you were tired? Did you stop breathing near the end? Those details help set your next target. If the last two repetitions were rushed, keep the same variation and reduce the next set slightly.
You can also practice in front of a phone camera positioned safely to the side, if you want visual feedback. Review whether your trunk changes position, rather than judging how impressive the reach looks. Keep the camera out of your movement area and avoid turning your head toward it during the set.
Your next session
Choose one variation, complete a short controlled set, and write down what you did. Build from a version you can repeat confidently. If you want to learn about the app, explore Workit.