
Published October 28, 2026
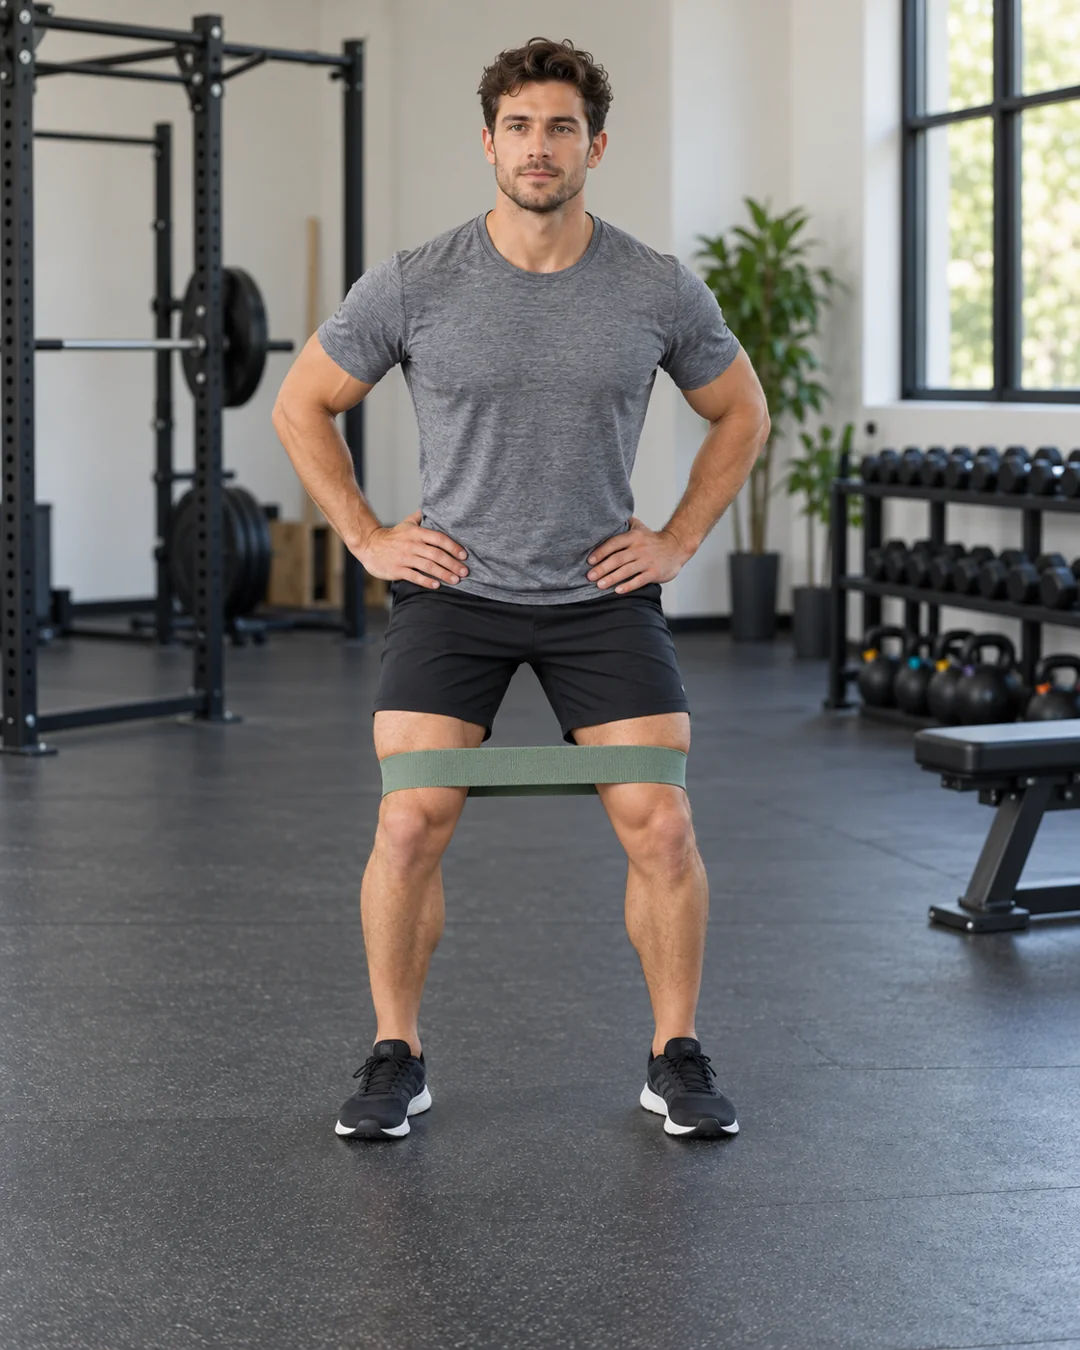
To do a lateral band walk, place a suitable mini-band above your knees, soften your hips and knees, and take small sideways steps while keeping your torso steady. Move the trailing foot with control rather than letting the band snap it inward. Maintain a comfortable space between your feet, and use a lighter band if you have to sway, drag your shoes, or turn your toes sharply outward.
This is a small movement with several useful decisions: where the band sits, how wide to step, how much to bend, and when more resistance becomes less control. You do not need to walk across an entire gym or create an intense burning sensation to practice it well.
What the lateral band walk trains
A lateral band walk asks you to move sideways against the band’s pull while controlling your pelvis, knees, and stance. Muscles around the sides of the hips contribute to that task. Both legs work: the leading leg steps outward, while the other leg helps support and control your position before following.
It is not simply a walking version of sitting on a hip machine. Standing adds balance and foot-placement demands. The movement is also different from a deep lateral lunge, where one knee bends much more and the body travels through a larger range.
NASM’s active-recovery guide describes a mini-band placed above the knees, a bent-knee athletic stance, controlled side steps, and a steady upper body. Those are useful starting cues. They do not establish that every person needs this exercise or that a particular band walk prevents injury.
If you prefer a seated alternative, the hip abduction machine guide explains a different way to train outward thigh movement. Neither option is automatically superior, and you do not have to include both in the same session.
Choose a band that allows a normal-looking step
Use a short loop designed for lower-body exercise. Check the manufacturer’s instructions for permitted placement and stretch. A long band tied into a makeshift loop or a damaged band stretched beyond its intended use is not a good substitute.
Inspect the band before putting it on. Look for cracks, tears, worn stitching, sticky or brittle sections, and damaged seams. Replace unreliable equipment rather than hoping it lasts through one more set. Keep bands away from sharp jewelry and rough surfaces that can cut them.
Band colors do not form a universal resistance scale. A blue band from one brand may feel entirely different from another. Record the actual band or its stated level, not just the color, if you want to compare sessions meaningfully.
Start light enough that you can take a small side step without tilting your torso. If the band dictates your movement, it is too demanding for the current task. The exercise should not require you to hop, shuffle rapidly, or use your hands to push your knees apart.
Fabric loops may resist rolling for some users, while thin elastic loops may feel easier to position. That does not make either type universally better. Choose a band that fits comfortably and allows the intended movement without pinching or sliding.
Where should the band go?
Above the knees, on the thighs rather than directly across the knee joints, is a practical starting position. It keeps the band away from your feet and makes the initial stepping task easier to organize. Place it according to its instructions and check that it stays flat rather than twisting.
Moving the band lower can change the difficulty and the way you have to control your legs. An ankle or foot placement is not simply the same exercise with a different appearance. It can increase demands on balance and foot position, and it may create a tripping problem if the band catches your shoes.
Do not move the band to your ankles merely because the above-knee version feels too easy for a few repetitions. First check whether you are maintaining a steady stance, controlling the trailing leg, and using a suitable number of steps. Progression can come from better execution before a more demanding placement.
If a clinician prescribed a particular position for rehabilitation, follow that individual plan rather than substituting a general internet cue. This article is not a treatment program for knee pain, hip pain, or a specific movement diagnosis.
Set up your stance and training area
Choose a clear, level area with reliable footing. Remove loose weights, bags, cords, and floor mats that could shift beneath you. Leave enough space to move a short distance in both directions without stepping into other people’s exercise area.
Put on the band while seated or supported if needed, then stand before beginning. Do not balance on one leg while wrestling with a tight loop. If getting the band on or off is difficult, use a more manageable band or ask for assistance.
Start with your feet about hip-width apart as a comfortable reference. Bend the knees and hips slightly into a shallow athletic stance. You do not need a deep squat. Keep your trunk arranged over your pelvis without rounding forward or leaning backward.
Let the knees track generally in the direction of the feet. Start with the toes pointing mostly forward, allowing a comfortable natural angle rather than forcing an identical foot position on every person. Avoid exaggerating an outward toe turn simply to make the step easier.
Have a stable support nearby if balance is uncertain, but do not use a rolling chair or movable piece of equipment. If you need substantial hand support to take each step, a different exercise may be more useful than forcing a lateral walk.
Step-by-step lateral band walk
- Establish a comfortable stance with light band tension and a steady torso.
- Shift enough weight to free the leading foot without throwing your upper body sideways.
- Lift that foot and take a small step to the side. Place it securely before moving the other foot.
- Bring the trailing foot toward your starting stance width under control. Do not snap it inward or let the feet collide.
- Repeat a few consistent steps, then return in the opposite direction with the other leg leading.
Think of each step as a complete movement. The leading foot moves, your balance settles, and the trailing foot follows. A rapid side-to-side shuffle can hide the fact that the band is pulling the second leg rather than you controlling it.
Keep breathing throughout. You should not need a prolonged breath hold to complete a short band walk. If the stance becomes so demanding that you can only continue by straining and holding your breath, reduce the resistance or the duration.
At the end, stand comfortably, stop moving, and remove the band with support if necessary. Do not keep walking around the gym wearing a tight loop, especially near stairs or other equipment.
How wide should each step be?
A small step that you can control is more useful than the widest step you can force against the band. The exact distance depends on your leg length, the band’s size, its resistance, and where it is placed.
Use the stance you can return to consistently as your reference. If the leading foot moves so far that you must drag the trailing foot or tilt your torso to catch up, reduce the step size. A stretched band is not a score you need to maximize.
Keep enough space between the feet to avoid repeatedly losing all tension, but do not hold an unnecessarily wide stance that makes normal stepping impossible. The aim is controlled movement against resistance, not a permanent wide squat.
Watch what happens near the end of the set. People often begin with modest, tidy steps and gradually make them larger as fatigue changes their balance. If the movement becomes less recognizable, stop before adding more distance.
How low should you squat?
Use a shallow, comfortable bend that you can maintain without your torso collapsing forward. The band walk does not require a deep squat, and dropping lower is not automatically a better way to train the hips.
Keep the approximate height of your head and pelvis steady while moving sideways. A little natural movement is expected; repeatedly bobbing up and down can make each step a different task. Reduce the bend or band resistance if you cannot hold a consistent position.
Do not force a low stance because it creates a stronger burning sensation. That sensation can reflect sustained effort, but it does not prove that your technique is better or that the exercise will produce a superior result.
If the knees become uncomfortable, stop and reassess rather than automatically bending farther or pushing them harder outward. A different stance, lighter band, or alternative exercise may be appropriate, but persistent pain needs individual advice.
A simple way to count steps
Define your counting method before the set. In this guide, one step means moving the leading foot outward and then bringing the trailing foot back to the starting stance width. That complete pair is one controlled step, not two separate repetitions.
For a short practice set, try five complete steps to the right and five to the left. That is ten complete steps, with each direction receiving five. Rest, then consider a second set if the movement remained comfortable and consistent.
This is an illustrative starting structure, not a universally optimal dose. If five steps are too many to keep your torso steady, use fewer or remove the band. If they are easy, first confirm that the trailing leg is controlled before adding more.
In a small room, use two or three steps in each direction rather than turning around while the band is stretched. Keep track of the total in each direction, and avoid crossing your feet to reverse course.
Warm-up, accessory work, or recovery movement?
The same band walk can serve different purposes depending on how hard and how long you perform it. A few easy steps may be part of preparation. Several demanding sets are training work. Calling something a warm-up does not make its fatigue disappear.
If you use it before lower-body lifting, keep the amount small enough that your main exercises still feel ready rather than pre-exhausted. You do not need to create a deep burn to demonstrate that a muscle has been “activated.” Muscles already participate in movement; the useful question is whether the preparation improves your next task.
The warm-up versus working-set guide explains how to separate rehearsal from demanding exercise. Use that distinction when deciding whether to add a second or third band-walk set before your main lifts.
For accessory work, place it where it fits your wider routine and recovery. If balance is already unreliable after hard training, use a simpler option rather than completing a prescribed walk at any cost. For a whole-session starting point, see the beginner resistance-band workout; a single side-stepping exercise is not a complete program.
Progress without losing the movement
Keep the band, placement, stance, and step size consistent before judging improvement. Changing all four makes it impossible to know whether you have become stronger or simply found an easier way to complete the count.
One progression option is to add one complete step in each direction. Two sets of five right and five left total twenty complete steps. Two sets of six each way total twenty-four. That is four additional steps overall, not a reason to increase resistance at the same time.
Another option is a modestly stronger band while returning to a shorter set. If that produces trunk sway, toe turning, or a snapping trailing leg, go back to the previous band. Resistance is only useful when you can manage the movement it creates.
The ACSM 2026 resistance-training guidance recognizes elastic bands as a useful training tool and emphasizes individualized, consistent practice. It does not establish a uniquely effective lateral-walk dosage or require training to failure. Use broad guidance without inventing a precise rule it does not contain.
Common mistakes and practical fixes
Your upper body rocks from side to side
Reduce the band resistance and step size. Check that you are lifting the foot rather than throwing your torso sideways to unload it. A small amount of weight shift is normal; an exaggerated lean that grows with every step is a reason to simplify.
Your feet drag across the floor
Lift and place each foot. Dragging can create friction that changes the task and may catch your shoe on the surface. If you cannot clear the foot without losing balance, remove the band and practice unresisted steps first.
The trailing leg snaps inward
Slow down and shorten the step. The return deserves the same attention as the outward movement. If the band repeatedly pulls you out of position, choose a lighter loop rather than trying to move faster between uncontrolled steps.
The band rolls or pinches
Stop, release tension, and reposition it. Check the size, material, clothing, and placement. Do not continue through pinching or numbness, and do not tie a tighter knot in unsuitable equipment to keep it in place.
You turn your toes farther outward as the set continues
Reduce the demand and reset your stance. A comfortable natural foot angle is different from progressively changing it to make the band easier to move. Record a shorter controlled set rather than counting steps performed with a different movement.
You feel pain rather than ordinary effort
Stop. Do not treat joint pain as evidence that a weak muscle is finally working. The Leeds Community Healthcare activity guidance identifies sharp or increasing pain, returning swelling, and loss of strength or movement as reasons to stop and seek advice. A band exercise is still exercise; its small equipment does not make it automatically suitable for every condition.
Three situations that call for a simpler version
You are learning alone: begin without a band and use a short clear path. Check whether you can move sideways and reverse direction without crossing your feet. Adding resistance before that is comfortable only makes it harder to identify the problem.
You are training in a crowded gym: use a small designated area rather than a long walkway. Two controlled steps each way can be enough space for practice. Do not expect other people to anticipate where a stretched band will take you.
You are returning after a break: use an easier band or fewer steps than your old routine. Your previous equipment choice is information, not an obligation. Re-establish a comfortable baseline before trying to match a remembered burn or repetition total.
If the band walk remains awkward despite a lighter setup, select another exercise and seek feedback. Persistence should mean learning a suitable movement, not forcing one particular variation into every program.
Track the details that actually affect difficulty
A useful log entry includes the band, its position, your counting method, and the number of steps each way. Add one control note: “light fabric loop above knees; two sets of five each direction; trailing foot controlled.” That is specific enough to reproduce.
Do not compare a session with a band around the ankles to one with the same band above the knees as though only your performance changed. Likewise, changing brands can alter resistance even if the printed level or color looks similar.
The workout log template offers a broader recording system. You do not need a complex spreadsheet for a short accessory exercise, but a consistent note prevents you from confusing different versions of the task.
For example, suppose your first set uses five steps each way and your second uses four because you begin to sway. Record five and four rather than rounding both up to five. Next time, repeat the easier workload and aim for consistent movement. The missing steps are useful feedback, not a debt you must repay with an extra set.
If one direction consistently feels less controlled, do not immediately double the work on that side. Check the floor space, starting stance, band position, and fatigue first. Persistent asymmetry or discomfort is a reason to ask for individual assessment rather than inventing a corrective program from one workout.
Frequently asked questions
Should I feel a strong burn?
You may feel muscular effort around the hips, but a burn is not a required target. Judge stance, control, and manageable workload rather than chasing sensation. Stop for pain, numbness, or a loss of balance.
Can I do lateral band walks every day?
You do not need to. Frequency depends on how demanding the work is and what else you do. Start with a manageable place in your routine and assess recovery rather than assuming daily band work is harmless.
Will this fix knee pain or “weak glutes”?
A generic tutorial cannot diagnose the cause of pain or determine a rehabilitation plan. Lateral band walks may appear in individualized programs, but that does not make them a universal fix. Get appropriate assessment for persistent symptoms.
Is the ankle position always better?
No. It changes the task and may increase balance or foot-control demands. The above-knee position is a useful starting option, and there is no requirement to move lower if the current version fits your purpose.
Keep the steps small and repeatable
Choose a band that lets you move cleanly, keep the torso steady, and control both feet. Increase the challenge only when the current version is consistent. For help organizing your wider routine and recording training, explore Workit on the App Store. Review its current subscription details and build a plan that values repeatable practice over an ever-stronger band.