
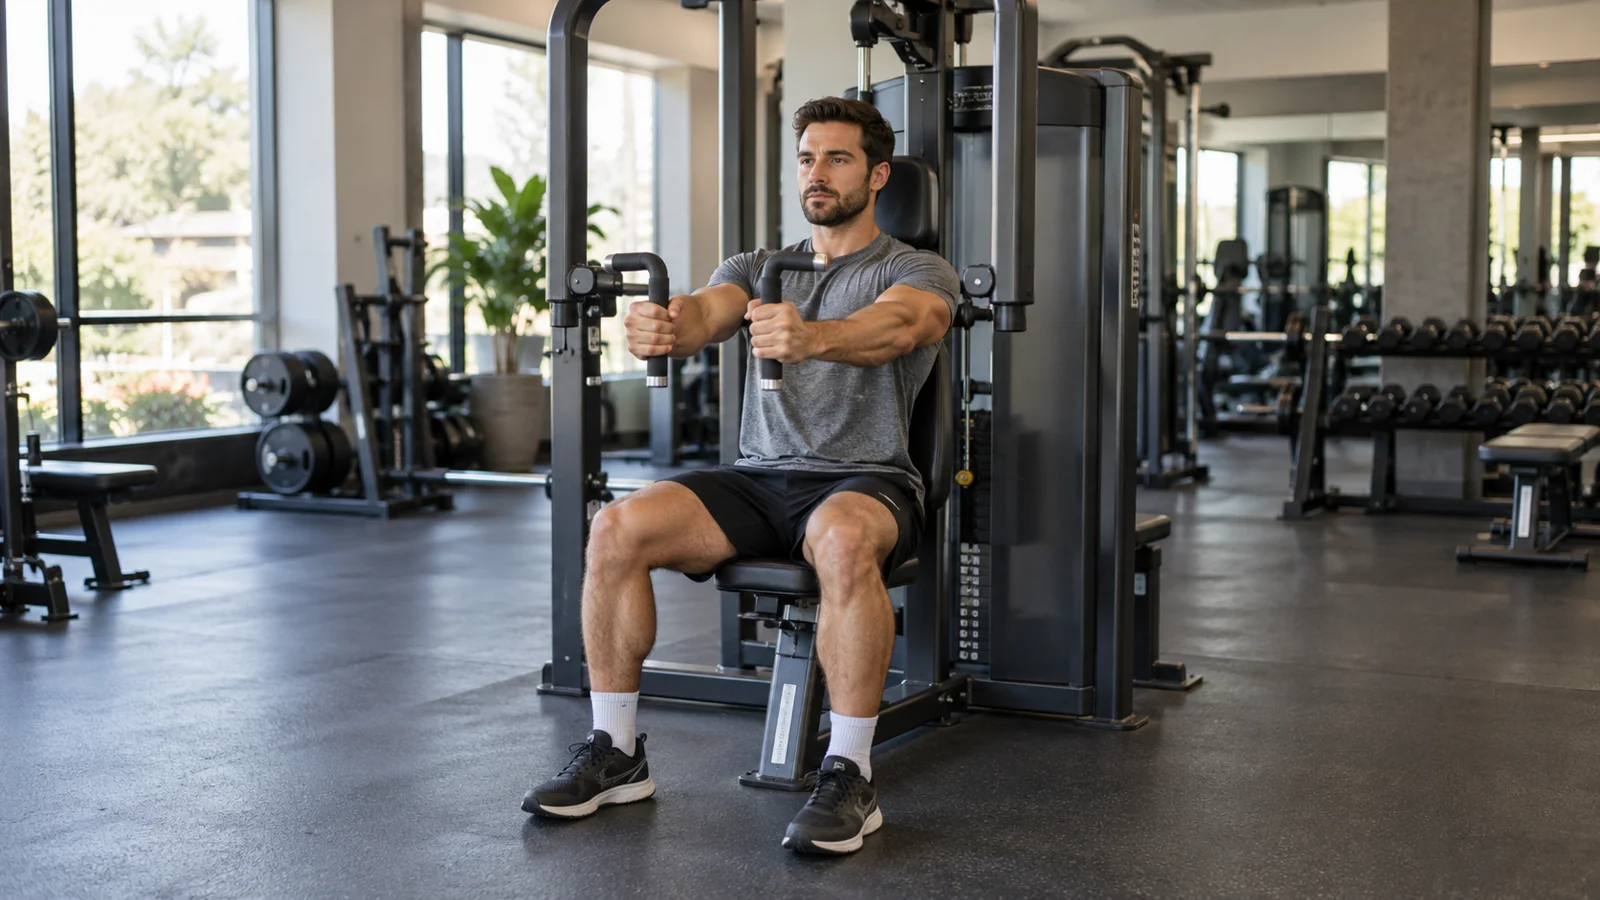
A pec deck fly trains your chest by bringing your upper arms together in front of your body while a machine guides the movement. Adjust the seat and starting position first, keep your back supported, and use a light load you can open and close smoothly. Stop the return before your shoulders are pulled into an uncomfortable stretch.
Published October 18, 2026.
For a beginner, one or two sets of 10–15 controlled repetitions after a main chest exercise is a reasonable starting example. Leave about three good repetitions in reserve. Machine fit, a comfortable range, and a controlled return matter more than reaching a particular weight or forcing the handles to touch.
What is a pec deck fly?
The pec deck fly is a seated chest exercise, also called a machine chest fly, pectoral fly, or butterfly. You sit against a back pad with your arms positioned to the sides, then bring the machine’s handles or pads toward the center.
The important movement is the upper arms coming toward one another across the front of your body. This differs from a chest press, where you also bend and straighten your elbows substantially. On a fly, the arm shape stays comparatively consistent.
Some machines use bent elbows against padded wings. Others have handles that you hold with a small elbow bend. Both are commonly called pec decks, but their setup instructions are not interchangeable. Identify which type you have before copying a demonstration.
A machine can make balance simpler, but it does not automatically make every position appropriate for every person. The seat height, starting-angle adjustment, and available handle positions determine whether the machine fits you comfortably.
Muscles worked and what the exercise can offer
The pectoralis major, the large chest muscle, contributes to bringing the upper arms across the body. The front of the shoulders also assists, while other muscles help control the shoulder joints and your position against the pad.
The pec deck is useful when you want chest-focused accessory work without the same elbow movement and balance demands as pressing. It can complement a chest press or push-up, particularly when a supported seated position helps you concentrate on a steady repetition.
It does not isolate a separate “inner chest” muscle or guarantee a particular chest shape. Bringing the hands close together can create a noticeable contraction, but that sensation is not evidence of selectively reshaping one region. Overall muscle development depends on consistent training and factors beyond a single exercise.
ACE-sponsored research comparing chest exercises found high chest-muscle activation during the pec deck in its testing. That was an acute muscle-activity comparison, not proof that this machine produces superior long-term growth. The report also cautioned about the shoulder position in the padded-wing version, particularly for people with a history of shoulder dysfunction.
Use that evidence as context, not a ranking you must follow. A comfortable exercise you can repeat and progress is more useful than forcing a machine that does not fit your shoulders.
Know which machine you are using
Handle-style chest fly
On this version, you grasp handles with the arms extended to the sides and the elbows slightly bent. The handles travel inward as you bring your upper arms together. Keep the elbow bend approximately consistent instead of turning the final part of the motion into a press.
Some handles pivot independently. Others have a fixed orientation or several grip options. Use the intended grip rather than grabbing a rotating joint, exposed work arm, or another part not designed to support your hand.
Forearm-pad or wing-style pec deck
This version uses bent elbows and forearms against pads. Position yourself according to the machine diagram and keep the contact points comfortable. You should not have to lift your shoulders aggressively or contort your wrists to reach the grips.
Do not assume that a seat position used on a handle machine will work here. The pads determine the upper-arm position, and the exercise may feel very different even with the same displayed load.
Combined chest-fly and rear-delt machine
Some machines perform two exercises. The chest fly usually involves sitting with your back against the support; the rear-delt version uses a different orientation and arm setting. Check the placard rather than copying the previous user’s settings.
For example, Life Fitness lists a combined pectoral-fly/rear-deltoid model. That confirms the dual purpose, but the specific machine’s instructions still govern its setup. A rear-delt adjustment should not be treated as a deeper chest-fly starting position.
Set up the pec deck in five checks
1. Inspect the station and read the diagram
Check that the seat, handles or pads, weight-stack pin, and adjustment mechanisms appear secure. Do not use equipment with loose components, damaged cables, or a movement path that catches unexpectedly. Ask gym staff to inspect it rather than trying to repair it yourself.
Find the model’s setup diagram. If the adjustment method is unclear, request a demonstration. Manufacturer documentation can help; the Life Fitness manuals and resources hub, for instance, organizes instructions by product. Other brands have their own manuals and support channels.
2. Adjust the seat while the machine is unloaded
Sit so the intended handles or pads line up comfortably with the chest and shoulder region described on the placard. Your shoulders should not be forced toward your ears. Keep your feet supported and your pelvis steady against the seat.
There is no universal seat-notch number. Two people of the same height may need different settings because torso and arm lengths differ. If your feet cannot be supported or the handles remain poorly aligned, another exercise may be a better fit.
3. Choose a conservative starting angle
If the arms have start-position adjustments, begin with them farther forward rather than pulled well behind your body. Make the change only when the stack is resting, and fully engage the locks as the manufacturer instructs.
You can explore a slightly wider opening later if it remains comfortable and controlled. The machine’s maximum available stretch is not a target you need to reach.
4. Select an easy practice load
Choose a setting that feels clearly manageable. Machine leverage and cable arrangements differ, so a weight used on another pec deck is only a rough reference. Even two similar-looking machines can feel different across the movement.
Place the selector pin fully into the chosen plate. Never change the load while the stack is suspended, and keep fingers clear of moving plates.
5. Rehearse getting into and out of position
Some models have a foot lever that brings the arms forward. Others require a different entry sequence. Follow the equipment instructions rather than reaching far behind yourself under load. If you cannot enter or exit the setup smoothly, ask for help before beginning a working set.
How to do a pec deck fly step by step
- Settle into the seat. Keep your feet supported, pelvis steady, and back comfortably against the pad. Maintain a natural posture without exaggerating the arch in your lower back.
- Take the intended contact points. Grip the handles securely or place your forearms on the pads. Keep wrists comfortable and shoulders away from a forced shrug.
- Bring your upper arms inward. Move both sides smoothly toward the front of your chest. Exhale naturally as you close the machine.
- Keep the arm shape consistent. On a handle machine, preserve a small elbow bend. On a pad machine, maintain the intended forearm contact rather than sliding or pushing through a different part of the arm.
- Finish under control. Bring the arms toward the center as far as the machine and your comfortable range allow. Do not slam the handles together, cross them, or round your body forward to gain extra distance.
- Open slowly. Let the arms move outward while controlling the resistance. Stop before the shoulders are pulled backward into discomfort or your back leaves the pad.
- End the set safely. Return the stack gently and use the machine’s exit method. Keep control until the load is fully supported.
A brief pause near the closed position can help you learn control, but a long, forceful squeeze is unnecessary. The return matters just as much as closing the handles. If you cannot slow the opening phase, lower the weight.
How far back should your arms go?
Use a comfortable range that you can repeat without being pulled out of position. For a first session, an opening that keeps the upper arms around the plane of your torso, or somewhat forward of it, is a cautious place to explore. Your machine and individual shoulder comfort determine the actual endpoint.
Do not chase a deep stretch by letting the handles drag your arms far behind you. A stretch sensation is not a requirement, and more stretch does not automatically mean more useful training.
If the opening feels uncomfortable, first reduce the load and bring the starting position forward. Retest with a few easy repetitions. If it still pinches or feels unstable, stop using that variation rather than trying to force an adaptation within the session.
At the closing end, the handles do not have to touch. Some machines are designed with a gap, and different bodies reach the endpoint differently. Keep your torso supported instead of leaning forward to satisfy an arbitrary finishing position.
Common mistakes and what to change
The weight pulls your shoulders backward
This often becomes obvious during the return. Reduce the load and shorten the opening range. Check the start-position setting before the next set. You should guide the machine back, not wait for it to drag you to its limit.
You shrug to reach the handles
Recheck seat height and grip selection. The machine may be too high relative to your shoulders, or you may be reaching for the wrong part. If no adjustment produces a comfortable fit, choose another movement.
You lift your back off the pad
Leaning forward can help move a load that is too heavy, but it changes the exercise. Reduce the weight and keep the same supported position from the first repetition to the last. A natural small back curve is different from repeatedly arching or lunging.
You press instead of fly
On a handle machine, substantial elbow bending followed by straightening turns the movement into a different pattern. Lighten the load and concentrate on moving the upper arms together while the elbow angle stays fairly steady.
You bounce out of the open position
Make the turnaround deliberate. If the repetition relies on a quick rebound, the load or range may be more than you can control. Stop briefly before reversing during a light practice set, then return to a smooth rhythm.
You squeeze hard enough to lose your posture
You do not need to thrust your chin forward, hold your breath, or round your shoulders aggressively to finish. Close the arms comfortably, keep breathing, and reverse. The goal is a repeatable set rather than the strongest possible sensation on every rep.
Beginner sets, reps, rest, and effort
A conservative starting example is one or two working sets of 10–15 repetitions after a main pushing exercise. Use a load that leaves about three good repetitions in reserve. Rest around 60–90 seconds between sets, taking longer when you need it.
Repetitions in reserve, often shortened to RIR, describes how many more controlled reps you think you could perform. It is an estimate. For a new movement, technique is a useful additional stopping rule: end the set if the back lifts, the shoulders feel strained, or the opening phase becomes uncontrolled.
The ACSM’s 2026 resistance-training update supports consistent training and reports that momentary muscle failure is not consistently necessary for the average healthy adult. You do not have to test your maximum or grind through ugly repetitions to make this accessory exercise worthwhile.
If you are already doing several challenging chest exercises, start with less extra work. Adding a pec deck should serve a purpose, such as replacing an uncomfortable fly variation or providing a manageable additional set. More exercises are not automatically a better program.
Where it belongs in a chest workout
For many beginners, a pressing movement comes first and a fly follows. That lets you practice the main exercise while fresh, then add a small amount of chest-focused work without needing a long session.
A simple example is two working sets of a chest press machine, followed by one or two light-to-moderate pec deck sets. That is only the chest portion of a workout; include the other movements your broader plan requires.
You can also use the pec deck on a different day from another chest accessory. There is no requirement to pair every press with a fly. If time is limited, complete the main movements and leave the extra exercise for a future session.
A very light fly practice set can help you learn the machine, but tiring your chest before a main press may reduce what you can do on that press. Decide whether a set is rehearsal or training and keep its effort consistent with that purpose.
Progress without changing everything at once
Write down the machine, seat setting, starting-angle setting, displayed load, repetitions, and a short effort note. These details matter because changing the seat or opening angle can make the same weight feel substantially different.
For example, start with two sets of 10 controlled repetitions. Keep the setup fixed and gradually work toward two sets of 15 with a few good repetitions still available. When that feels repeatable over more than one session, try the smallest supported increase.
After an increase, the number of repetitions may fall. That is expected. If the new setting forces you to shorten the movement dramatically or lose back support, return to the previous load. You can keep improving control and consistency until the next increment is manageable.
Do not increase the load and opening range together. A wider range is a separate change, and you should explore it only if comfortable. There is also no requirement to keep extending the range indefinitely once you have a useful, repeatable movement.
If soreness interferes with your next workout or ordinary activities, reduce the number of sets or the effort next time. Mild muscular soreness can happen after an unfamiliar exercise, but soreness is not a score that needs to rise every week.
Pec deck versus cable fly and dumbbell fly
Pec deck: provides a seat and a guided path. It can simplify balance and setup once adjusted, but the available positions may not fit everyone.
Cable fly: allows different pulley heights and arm paths, with more responsibility for maintaining your stance and controlling the handles. Workit’s cable chest fly guide covers that separate setup.
Dumbbell fly: uses free weights and requires controlling each arm independently. The resistance changes with arm position, and getting into and out of the exercise needs care. It is not automatically the easiest alternative just because dumbbells are available.
Choose based on comfort, equipment access, and your ability to repeat the movement. You do not need all three. If the pec deck does not fit, a comfortable press or push-up can still provide chest training without trying to reproduce the fly pattern exactly.
Shoulder discomfort and reasons to stop
Stop for sharp pain, pinching that worsens, numbness, tingling, sudden weakness, or a feeling that the shoulder may slip or give way. Do not keep adding repetitions to see whether those symptoms disappear. If symptoms persist or recur, seek individual assessment.
People with a history of shoulder instability, injury, or surgery should follow their clinician’s guidance about exercise selection and range. The AAOS shoulder-conditioning program is intended to be individualized with professional guidance; a general gym article is not a rehabilitation prescription.
Stop exercise and get urgent help for chest pain, fainting, or severe unusual breathlessness. These are different from ordinary chest-muscle effort during a set.
Do not assume a machine must be safe for you simply because it is popular or because another person uses a much wider range. You can omit this exercise entirely and still build a sensible strength-training routine.
Frequently asked questions
Should I keep my shoulders pinned back?
Keep a comfortable, supported torso and avoid letting the load wrench the shoulders forward or backward. An exaggerated, rigid squeeze of the shoulder blades is unnecessary. Follow the machine’s intended position and use a controlled range.
Is the pec deck a chest press?
No. A fly brings the upper arms together with relatively little elbow-angle change. A press includes substantial elbow straightening. Both can train the chest, but they are different movements.
How heavy should I go?
Use a load that allows smooth repetitions and a controlled return with several good reps still available. There is no useful universal starting number because machine leverage and individual experience vary.
Can I use one arm at a time?
Only if the machine is designed for that use and you can maintain a supported position. Some machines link both sides or require a specific entry method. Follow the manual rather than assuming every pec deck supports unilateral work.
Does it work the inner chest?
It trains the chest through bringing the upper arms together. It does not isolate a separate inner-chest muscle or guarantee a change to the natural gap or shape of your chest.
What if I cannot feel my chest working?
First check fit, range, and control. Try a lighter practice set without shrugging or pressing the handles forward. You do not need a dramatic burning sensation for a set to be useful, and pain is never a cue to push harder.
A useful first-session checklist
For a separate pulling accessory, the straight-arm pulldown guide explains a cable-based shoulder-extension movement. It complements a different part of a balanced program; it does not replace rows or make extra sets compulsory.
Identify the machine type, set the seat, choose a conservative opening angle, and rehearse the entry and exit. Then complete one or two controlled sets with a few repetitions left. Record the settings so the next session is easy to repeat.
Explore workout programs and fitness challenges with Workit.