
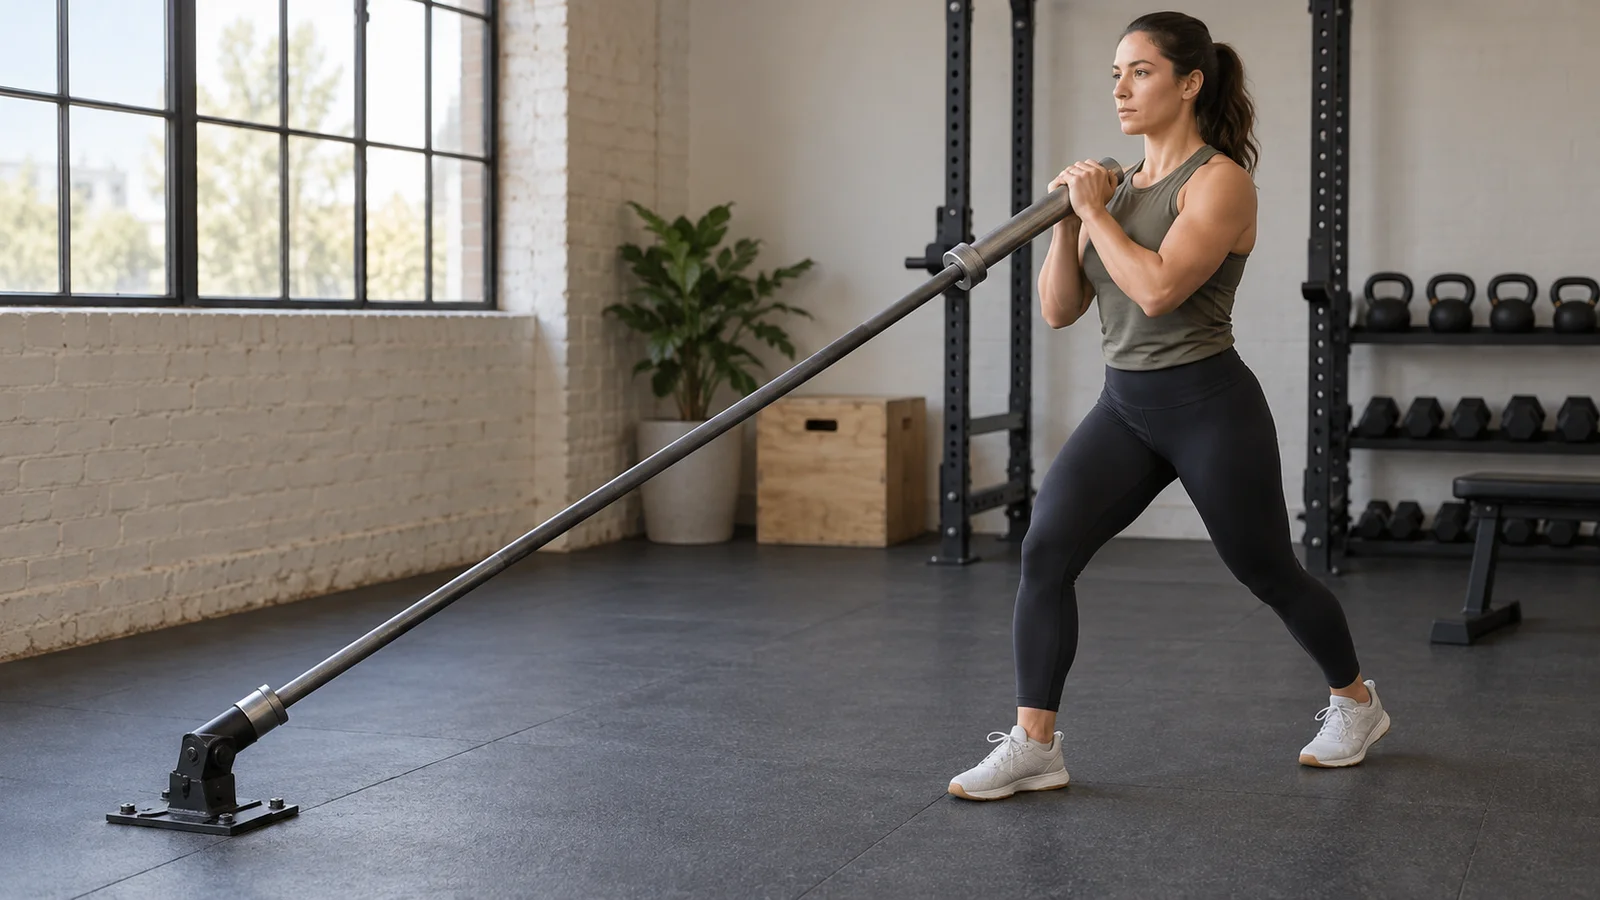
The landmine press is a strength exercise in which you press the free end of a securely anchored barbell upward and forward. It trains your shoulders and triceps, with help from the chest, while your trunk controls the movement. Start with a purpose-built landmine attachment, a light load, and a standing two-handed press before trying single-arm variations.
Published:
The angled bar path is the defining feature. Instead of balancing a free bar directly overhead, you move one end around a fixed pivot. That gives you a different pressing option, but it does not make the exercise automatically comfortable or appropriate for every shoulder. A useful first session is one in which you learn the setup, repeat controlled repetitions, and finish without needing to wrestle the bar back to the floor.
This guide covers equipment checks, standing and half-kneeling technique, load selection, common mistakes, and practical ways to include the landmine press in a workout. The sample sessions are general training examples, not an injury rehabilitation plan.
What is a landmine press?
A landmine is a pivoting attachment that holds one end of a barbell. Depending on the equipment, it may attach to a compatible rack or sit in a purpose-built floor base installed according to its instructions. You hold the other end and press through an arc. The National Strength and Conditioning Association’s introduction to the landmine press describes this stable-base arrangement as a way to perform shoulder-strength exercises.
There are several versions. A standing two-handed press uses both hands on a suitable grip at the bar’s end. A single-arm press loads one side at a time. Half-kneeling presses put one knee on a pad and the opposite foot on the floor. These options change your support and coordination demands; they are not interchangeable measures of strength.
For this guide, a press means a controlled upper-body movement without an intentional leg drive. A landmine push press adds a leg-assisted drive. A squat-to-press combines a squat with the press. Both can be legitimate exercises, but adding them accidentally makes it difficult to judge whether your chosen pressing load is appropriate.
Landmine press muscles worked
The front portion of the shoulders helps raise the upper arms, and the triceps straighten the elbows. The chest contributes to the pressing action. Muscles around the shoulder blades coordinate the upward reach, while your trunk and hips help keep the rest of your body from leaning or rotating excessively.
The exact demand changes with the angle of the bar, your body position, your grip, and whether you press with one or two hands. It is more useful to describe the landmine press as an angled upper-body press than to promise that it isolates one small section of the chest or shoulder.
- Shoulders: contribute to raising and directing the arms through the press.
- Triceps: contribute to elbow extension.
- Chest: assists the forward-and-upward press.
- Shoulder-blade muscles: support coordinated movement as you reach.
- Trunk: helps resist unwanted arching, leaning, or rotation.
A single-arm version may make you more aware of your abdominal muscles because the load is offset. That does not turn it into a complete core program, and feeling an exercise strongly does not prove it is superior to every alternative.
Set up the equipment before choosing a weight
Use a secure, compatible anchor
Use a purpose-built landmine attachment and follow the manufacturer’s mounting instructions. Confirm that the rack or floor base is suitable for that attachment, that required hardware is secure, and that the sleeve fully accepts the correct end of your bar. Ask gym staff to check unfamiliar equipment before using it.
Do not improvise by jamming a bar into a wall corner, a loose plate stack, or furniture. A setup that looks stable when unloaded may shift when the angle or force changes. Protecting a wall with a towel does not create a secure pivot.
For an example of equipment-specific requirements, see Rogue’s Monster Landmine 2.0 instructions. Instructions for your own model take priority over a generic exercise description.
Clear the whole movement area
You need room for the bar’s arc, your stance, the plates, and a controlled return to the floor. Check for overhead obstacles and people walking through the path. Keep your water bottle and loose equipment outside that space. On a shared gym floor, point the working end away from a busy walkway when the station allows it.
Use a level, non-slip surface. If a half-kneeling version is planned, place a firm pad where your knee will rest before lifting the bar. A thick, unstable cushion can make the position harder to control.
Load and unload with the bar supported
Set the working end down in the equipment’s designated supported position before changing plates. Keep fingers clear of pinch points, slide plates on deliberately, and use the appropriate collar or retention system required by the setup. Do not hold a raised bar with one hand while trying to add a plate with the other.
If you use a handle attachment, check its fit, orientation, and retention instructions. Rogue’s angled landmine handle instructions, for example, specify the order of plates, handle, and collar. Other attachments can differ.
How to do a standing two-handed landmine press
This is a useful first variation because both hands share the load and you can establish a stable standing position. Start with the unloaded bar if you can lift and control it comfortably. An unloaded full-size bar is still resistance; it may be too heavy for some beginners.
- Face the anchor. Stand near the free end with enough room to lift it safely. Use the grip or handle intended for your equipment.
- Bring the working end to chest height. Use a controlled, comfortable lifting position. If getting the bar into position is difficult, ask a qualified trainer for help or use a lighter setup.
- Find your stance. Place your feet around hip-to-shoulder width apart, or use a small staggered stance if that feels steadier. Keep your knees softly bent.
- Organize your torso. Let your ribs sit over your pelvis, and gently tighten your abdomen. Avoid starting with your chest thrust upward and your lower back deeply arched.
- Press along the arc. Move the bar upward and forward, following the path allowed by the pivot. Exhale as you press while maintaining enough trunk tension to stay steady.
- Finish with control. Extend your arms through a comfortable range. Allow your shoulder blades to move with the reach instead of pinning them forcibly down and back.
- Return smoothly. Bend your elbows and bring the bar back toward the same starting point. Pause briefly before the next repetition.
- End the set deliberately. Return the bar to its supported resting position before letting go. The final lowering is part of the exercise.
Your standing distance will depend on the bar length, anchor height, and your proportions. At the bottom, you should not feel crowded by the bar. At the top, you should not have to chase it by rising onto your toes. Adjust your position before the set rather than shuffling under a moving load.
Single-arm and half-kneeling technique
Standing single-arm landmine press
Once the two-handed version feels predictable, try one arm with a lighter load. Hold the free end or suitable handle near the shoulder on the working side. Keep your wrist comfortably aligned with your forearm and your elbow beneath the hand rather than flared far outward.
Press forward and upward while keeping your chest generally facing the anchor. A small natural shift can occur, but avoid turning the repetition into a large torso twist. Lower along the same path. Complete the planned repetitions, set the bar down safely if needed, and change sides.
Start with the side that feels less coordinated, then match its controlled repetitions on the other side. Do not give the stronger side extra repetitions simply because it can perform them. If the sides differ substantially or one side hurts, get individualized guidance rather than trying to correct the difference by adding more work.
Half-kneeling single-arm landmine press
For a right-arm press, one common setup places the right knee on a pad and the left foot forward. Keep the front foot flat, with your legs spaced wide enough for balance rather than arranged like a tightrope. Reverse this arrangement for the other side.
Begin with an unloaded or lighter bar than you use standing. Establish the kneeling position and a safe way to bring the bar into the starting grip before attempting repetitions. If lowering to a knee while holding the bar feels awkward, ask a trainer to demonstrate a suitable setup; do not improvise a loaded transition.
Keep your hips facing forward and press without leaning backward. Half-kneeling removes some opportunities to use your legs, but it can be less comfortable for knees or balance. Standing is a valid long-term choice. You do not need to earn a more complicated position to benefit from pressing.
How much weight should beginners use?
Choose a load you can control through the full planned set while leaving several clean repetitions available. For a first session, even five slow practice repetitions with an unloaded bar may be enough to learn whether the movement suits you.
Do not use your dumbbell or overhead-press number to calculate a landmine weight. The pivot, bar angle, hand position, and bar itself affect the force you experience. Twenty pounds added to a landmine is not the same task as pressing a twenty-pound dumbbell.
A practical starting prescription is two sets of six to ten controlled repetitions, with roughly ninety seconds to two minutes of rest. For single-arm work, that means six to ten per side. Rest longer if needed to repeat the same quality. These are examples, not a requirement to reach ten repetitions on day one.
Use these checks before adding weight:
- You can get into and out of the starting position without struggling.
- The anchor remains stable throughout the set.
- The last repetition follows a similar path to the first.
- You can breathe rather than holding your breath through the entire set.
- You finish without joint pain or an uncontrolled lowering phase.
Common mistakes and practical fixes
Leaning back to finish the press
If your ribs lift and your lower back arches more with every repetition, the load or range may be beyond what you can currently control. Reduce the weight, shorten the set, and practice keeping your torso steady. Do not solve the problem by forcing your abdomen into a maximal brace while continuing to grind.
Turning a strict press into a push press
A noticeable knee dip followed by a leg drive changes the exercise. When your goal is a strict landmine press, keep the legs supportive and quiet. If you need momentum halfway through a set, stop the set there. Intentional push presses belong in a separate plan with appropriate coaching.
Standing too far from the bar
Reaching toward the working end can leave you leaning forward at the bottom and chasing the bar at the top. Reset your stance with a light load. You should be able to begin near your chest or shoulder and finish without taking a step. A side-view recording can reveal a distance problem that is hard to feel.
Forcing the shoulder blades to stay still
Keeping the shoulder blades squeezed tightly together throughout the press can interfere with a natural reach. Think about moving your hand smoothly toward the end position while keeping your neck relaxed. Avoid aggressively shrugging, but do not treat all shoulder-blade movement as an error.
Letting the wrist fold backward
A bar sleeve may be wider than the handles you normally use. If the grip feels insecure or forces your wrist into an uncomfortable position, try a compatible purpose-built handle. Reducing weight helps only if you can also hold the equipment reliably. Do not continue with a grip that is slipping.
Rushing the return
The downward phase is where many beginners lose their position. Use a controlled return that takes about a couple of seconds, without turning that timing into a rigid rule. If you cannot guide the bar back to the same starting point, lower the load or end the set earlier.
Where the landmine press fits in a workout
Place it early enough that you are not already exhausted from other pressing. It can be your main upper-body press in a simple full-body workout, or a secondary press after another movement. You usually do not need several similar pressing exercises in the same beginner session.
A balanced example might include a squat or sit-to-stand pattern, a row, the landmine press, and a manageable trunk exercise. Choose versions you already know how to perform. The landmine press should complement the session rather than make every other movement an afterthought.
If you are practicing torso control separately, Workit’s bird-dog exercise guide offers a different floor-based movement. Do not pre-fatigue yourself with a long core circuit immediately before learning a new loaded press.
A simple first-session example
- Spend a few minutes moving comfortably and practicing unloaded arm movements.
- Inspect the attachment and rehearse bringing the light bar into position.
- Perform one practice set of five easy two-handed repetitions.
- Rest, then perform two working sets of six to eight repetitions if the practice set felt controlled.
- Finish with familiar pulling and lower-body exercises at manageable effort.
Keep the session short enough that the equipment setup remains careful at the end. Fatigue is not a reason to skip the collar check or rush unloading. If you are new to the gym, a staff demonstration of that station can be more useful than adding a third working set.
A progression that does not depend on heavier plates every week
First, repeat the same setup. Record the variation, added plate weight, bar type if known, repetitions, and a short form note. This makes your next workout comparable. Switching from two hands to one, changing anchor height, and increasing weight simultaneously hides what actually improved.
Next, add repetitions within a small range. For example, progress from two sets of six to two sets of eight over several comfortable sessions. Once both sets remain controlled and you still have repetitions available, add the smallest practical weight increase and return toward the lower end of the range.
If the smallest plate increase is too large, stay at the current load. A steadier return, a more repeatable starting position, or a modest additional set can provide a useful next step. Change one thing at a time, and reduce volume if the extra work affects the rest of your training.
There is no deadline for moving from two-handed to single-arm pressing. Different variations can serve different purposes. Select the one that fits your equipment, coordination, comfort, and current program.
For a supported pressing alternative, see the chest press machine guide. Establish a fresh load and setup for that machine rather than carrying over your landmine numbers.
Landmine press versus overhead press and push-ups
An overhead press moves a free weight more vertically and asks you to manage a different shoulder position. A landmine press follows a diagonal arc. Neither is universally better, and comfort with one does not diagnose a problem with the other.
Push-ups require no landmine station and move your body relative to the floor or another stable surface. Incline push-ups can be adjusted by changing the support height. They may be a simpler option when you cannot safely set up or handle a barbell.
If your goal is broad upper-body strength, choose a press you can repeat and progress. If your sport or training goal specifically requires overhead strength, an angled press may complement that work without fully replacing it. Exercise selection should reflect the task you want to improve.
Frequently asked questions
Is the landmine press good for beginners?
It can be, provided the equipment is secure and the starting load is manageable. Beginners still need to learn how to lift, hold, press, and set down the bar. If the unloaded bar is too heavy, choose a lighter compatible setup or a different pressing exercise.
Is it a shoulder exercise or a chest exercise?
Both contribute, along with the triceps and supporting muscles. The relative challenge changes with your position and the bar path. Treat it as an angled compound press rather than a guaranteed way to isolate an upper-chest region.
Should I press every day?
Daily pressing is unnecessary for most beginners. Start with one or two sessions within a balanced strength routine, allowing recovery between challenging sessions. Repeating a few easy technique repetitions is different from performing hard working sets every day.
Can I do it if overhead pressing hurts?
Do not assume that an angled bar makes a painful shoulder safe to load. Stop movements that cause pain and seek guidance from a qualified healthcare professional when symptoms persist or you are managing an injury. This guide does not assess the cause of pain or prescribe rehabilitation.
How do I know when to end a set?
Stop when you cannot repeat the intended bar path, when your grip becomes unreliable, or when you need a large lean or leg drive. Sharp pain, dizziness, or other concerning symptoms are reasons to stop immediately rather than finish a repetition target.
Your next landmine session
Start with three priorities: a secure anchor, a load you can handle from setup to finish, and a repeatable press. Two controlled sets are a useful beginning. Record what you did, leave room to improve, and make the next session a small, deliberate step.
For a separate bodyweight exercise that practices holding your trunk steady, see our beginner bear-plank guide. Choose a comfortable version rather than adding fatigue before a demanding press.
Explore Workit’s workout programs and fitness challenges. View Workit on the App Store.