
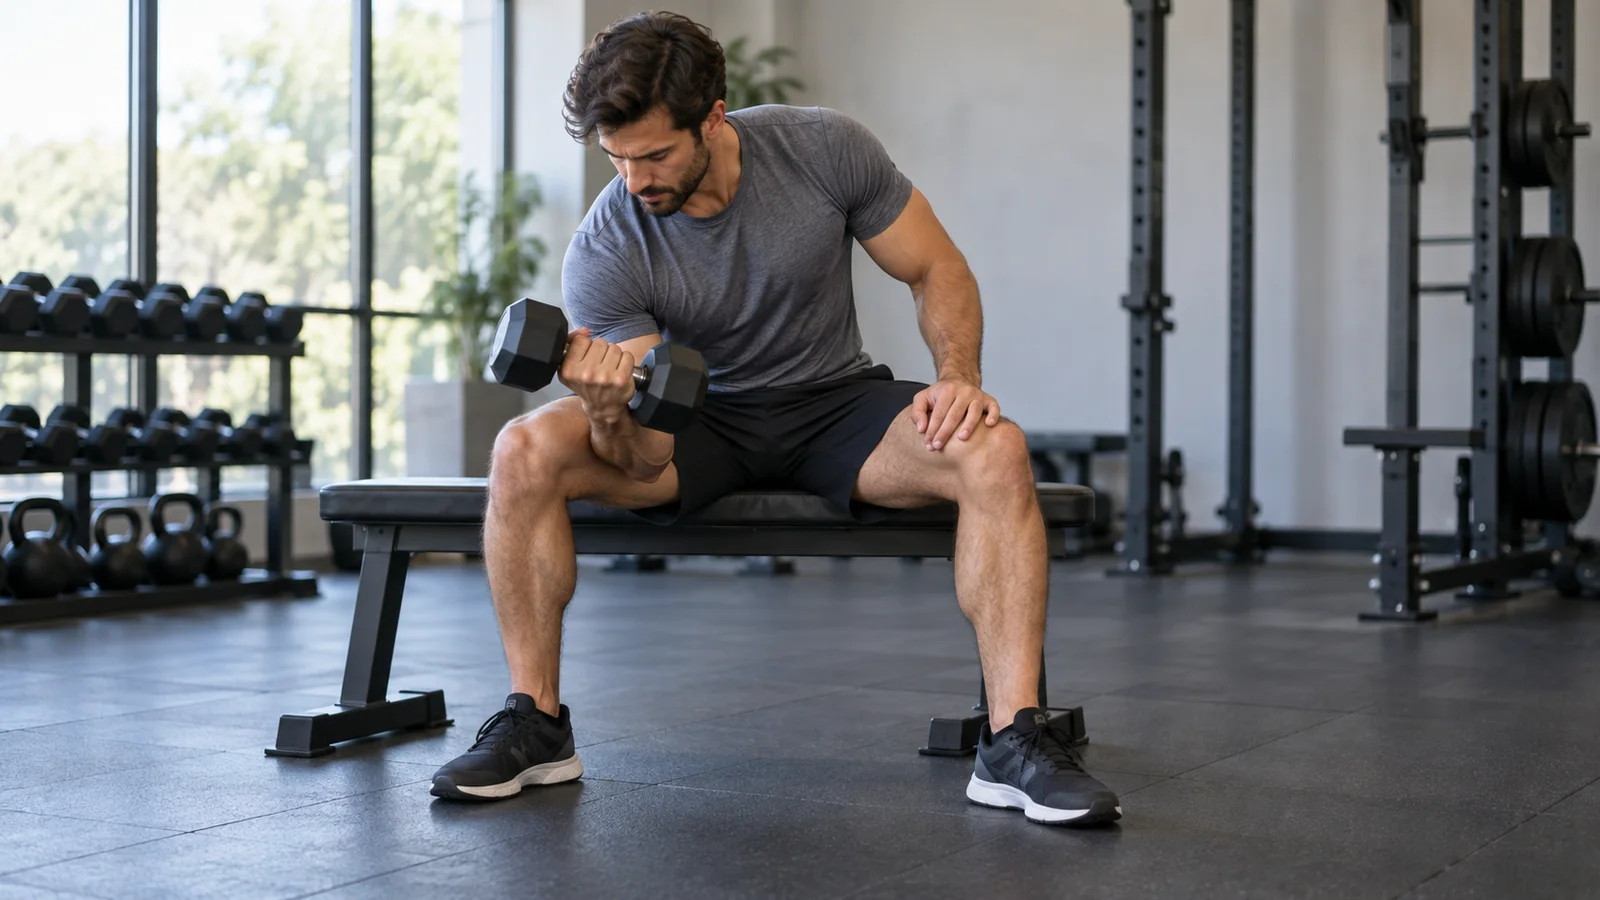
The concentration curl is a seated, one-arm dumbbell curl with the back of your upper arm supported against your inner thigh. That support makes it easier to keep the rest of your body quiet while you bend and straighten your elbow. Start with a light dumbbell, keep your wrist comfortable, and lower the weight deliberately.
Published October 16, 2026
For a beginner, two sets of 10–15 controlled repetitions per arm can be a useful starting point after the main pulling exercises in a workout. Choose a load that leaves about two or three good repetitions available when you finish. The details below explain how to find that load, where to place your arm, and when a different curl fits better.
What the concentration curl trains
The main action is elbow flexion: bringing your forearm toward your upper arm. Your biceps brachii helps produce that movement, alongside other elbow flexors including the brachialis. The biceps also helps rotate the forearm so the palm faces upward. Your hand and forearm muscles maintain your grip on the dumbbell.
Supporting the upper arm reduces the opportunity to swing the shoulder forward or use a large torso movement. It does not switch off every other muscle. You still need enough trunk control to hold your position and enough grip strength to manage the weight.
This exercise suits someone who wants a simple, repeatable direct biceps exercise and has access to one dumbbell and a stable seat. It also lets you practice each side separately. You can observe whether one arm needs a lighter weight or loses control earlier without the stronger arm moving a shared bar.
It does not replace rows or pulldowns, which involve more joints and train a broader pulling pattern. If you are building a basic routine, include those larger movements first. A chest-supported dumbbell row is one option when you want torso support for your main back exercise as well.
Set up the seat, feet, and supporting arm
Choose a stable seat at a usable height
Sit near the front of a bench or sturdy chair with your feet flat. Your legs should have room to spread enough for the dumbbell to move between them. Avoid a rolling chair, a soft couch, or anything that shifts when you lean forward.
A useful seat lets you reach the starting position without curling your whole back over the dumbbell. Your exact hip and knee angles will depend on your proportions. You do not need to reproduce someone else’s bench height if your feet become unsteady or the weight keeps hitting the floor.
Support the upper arm, not the point of the elbow
With the dumbbell in your right hand, lean forward from the hips and place the back of your right upper arm against the inside of your right thigh. Position the contact just above the elbow. Avoid grinding the elbow tip into the knee or balancing it on top of the kneecap.
The thigh is a quiet support. Do not shove your leg into the arm to help move a difficult repetition. Rest your free hand on the other thigh if that helps you hold your torso still. Keep enough space for the dumbbell to pass without brushing your shin.
Catalyst Athletics’ concentration curl demonstration uses this basic arrangement: a seated position, the back of the arm supported inside the leg, and a controlled return. Treat the support as a way to make your repetitions consistent rather than a surface to lever against.
How to do a concentration curl
- Find the bottom position. Let your forearm extend downward while the upper arm stays supported. Keep a small amount of muscular control rather than letting the weight jerk your elbow straight.
- Set your hand position. Hold the handle securely with your thumb wrapped around it. Turn the palm upward as comfortably as your forearm allows. Keep the wrist generally in line with the forearm.
- Curl through the elbow. Bring the dumbbell upward without lifting your upper arm off the thigh. Keep your chest and head quiet instead of folding toward the weight.
- Use a comfortable top position. Finish where you can still hold the upper arm steady. You do not have to touch your shoulder or force the dumbbell into your chest.
- Lower under control. Return through the same path. Take roughly two seconds if a simple count helps, but avoid making the descent so slow that every repetition becomes a separate endurance challenge.
- Reset and repeat. Continue only while the same range, support position, and wrist alignment remain available. Finish the set before swinging becomes necessary.
Exhale during the curl and inhale while lowering if that gives you an easy rhythm. Keep breathing throughout the set. A heavy strain and prolonged breath hold are unnecessary for learning this small accessory exercise.
To finish, bring the dumbbell to a supported position and put it down deliberately. Do not let it drop from an extended arm. When switching sides, reset your feet and contact point rather than twisting across your body while still holding the weight low.
How much range of motion should you use?
A useful repetition travels from a comfortably extended elbow to a comfortably bent elbow without changing the position of your upper arm. Your range may be smaller than the range shown in a video because forearm length, dumbbell size, and seat height differ.
At the bottom, avoid deliberately bouncing out of the straightest possible elbow position. At the top, avoid chasing extra height by rounding your shoulder forward. Those changes can make the dumbbell move farther without adding the elbow movement you intended to practice.
Use the lightest warm-up set to establish your repeatable endpoints. A quick side-view recording, where gym rules allow it and other people stay out of frame, can help you compare the first and final repetitions. Watch the upper arm and torso rather than judging the set only by how high the dumbbell goes.
If the handle or plates collide with your body, adjust the seat, leg spacing, or dumbbell orientation before shortening the movement. If a comfortable setup remains impossible, another curl is a sensible choice.
Choose a weight from your repetitions
There is no required starting weight based on age, sex, body size, or what you use for standing curls. Support changes the exercise, and a weight that moves easily with a little shoulder assistance may feel much harder here.
Try this three-step check:
- Perform several easy repetitions with a clearly light dumbbell to learn the path.
- After a short rest, try 10 repetitions with a potential working weight.
- Keep it if the tenth repetition is controlled and you could probably do another two or three with the same technique. Reduce it if your arm comes off the thigh or your wrist bends to finish.
These remaining repetitions are commonly called reps in reserve. Your estimate will be imperfect at first. Use visible technique and a conservative stopping point rather than testing your absolute limit to prove the number.
Suppose a lifter can perform 10 smooth repetitions with a 5 kg dumbbell, but the next available 7.5 kg dumbbell requires torso movement after six. The smaller weight remains useful. That person can build toward 15 clean repetitions before trying the larger jump again. These numbers illustrate a decision process; they are not suggested strength standards.
A beginner plan that fits into a larger workout
Use concentration curls once or twice per week initially, depending on how much pulling and direct arm work you already do. Leave a rest day between demanding sessions for the same muscles while you learn how you recover.
- Warm-up: one easy practice set per arm, especially if curls are your first arm movement.
- Working sets: two per arm.
- Repetition range: 10–15.
- Effort: finish with about two or three controlled repetitions available.
- Rest: take enough time that the next set starts with a stable grip and steady breathing, often around 60–90 seconds after both arms.
This is a conservative example, not an official concentration-curl prescription. The American College of Sports Medicine’s 2026 resistance-training guidance emphasizes consistent training of all major muscle groups and individualizing the plan. It also reports that reaching momentary muscle failure is not consistently necessary for the average healthy adult.
If you already perform several hard row and pulldown sets plus another curl, you may need only one or two additional sets here. More exercises are not automatically a better arm session. Your elbows, grip, and next workout all need to tolerate the total amount of work.
Count unilateral sets clearly
Ten repetitions on the right and 10 on the left make one set for each arm. They do not make 20 repetitions for one biceps. Write the prescription as “two sets of 10–15 per side” to avoid accidentally doubling your planned work.
You can complete a right-arm set, switch to the left, and then rest. If your torso or breathing needs a break before switching, take it. One-arm training gives the other side some recovery, but it does not require continuous movement.
An example at the end of an upper-body session
Imagine your workout already includes a chest press, a supported row, and a pulldown. After those movements, perform your concentration-curl practice set, then two working sets per side. If you also want direct triceps work, do that afterward or alternate the two exercises with enough rest to keep both controlled.
Keep the curls in roughly the same place in the session when comparing performance. Twelve repetitions after hard rows may be a different effort from twelve repetitions when you are fresh. A lower number after a more demanding back workout does not automatically mean you have lost strength.
If you have only a few minutes left, one controlled set per side is a reasonable shortened version. Do not rush four sets, skip the setup, and turn the last repetitions into swings just to complete the original plan.
Progress without changing the exercise
Keep the same seat, support position, and repetition range for several sessions. Add repetitions gradually before increasing the dumbbell. This makes progress easier to distinguish from simply finding a more helpful body position.
For example, an illustrative sequence at one weight might be:
- Session one: 11 and 10 repetitions per arm.
- Session two: 12 and 11 repetitions per arm.
- Session three: 13 and 12 repetitions per arm.
- Later sessions: gradually reach two controlled sets of 15.
You do not have to improve every session. When both arms reach the upper end comfortably, try the smallest practical weight increase and return toward the lower end. If you cannot complete the lower end with comparable form, go back to the previous load.
This is an example of double progression. A small accessory lift often progresses more slowly than a squat or row because the available dumbbell jump represents a larger proportion of the weight you currently use.
Do not add weight, sets, and extra sessions all at once. Change one variable, see how your technique and recovery respond, and then decide whether another change is useful.
Common problems and practical fixes
Your elbow slides across your thigh
First reduce the load and check your seating position. The contact point should feel stable before the first repetition. If the bench is too high, your feet may not provide enough support. If your legs are too narrow, the weight may pull your arm away as it brushes your shin.
A small adjustment between sets is normal. Repeatedly chasing a moving elbow during the set usually means the setup or load needs attention.
Your shoulder moves toward the dumbbell
Finish the curl where your elbow can bend without the upper arm coming forward. You may be trying to touch the dumbbell to your shoulder simply because that looks like a complete repetition. The endpoint should follow your available elbow movement, not an arbitrary contact target.
Your wrist curls inward
Check that the handle sits securely across your palm and that you are not trying to finish by bending the hand toward the forearm. Reduce the weight if you cannot keep the wrist comfortable. A small natural wrist angle is different from a deliberate wrist curl on every repetition.
You move your leg to finish
Watch the supporting thigh as well as the arm. Raising the heel, pressing the thigh outward, or shifting your hips can supply help without an obvious torso swing. Keep the foot planted and stop the set when the leg begins assisting.
You feel only your forearm
Your forearm works during any dumbbell curl because it holds the handle. Check whether you are gripping a very thick handle, bending the wrist, or forcing an uncomfortable palm-up position. Use a manageable weight and a secure grip without deliberately crushing the handle as hard as possible.
A strong sensation in one area does not precisely measure which muscle received the most useful training. Judge the exercise through comfort, repeatable movement, and gradual progress rather than requiring a particular burning feeling.
Concentration curl versus other curl options
Concentration curl versus preacher curl
Both support the upper arm, but the support surface and shoulder position differ. A concentration curl uses your thigh and works one side at a time. A preacher setup uses an angled pad and may allow a bar, dumbbells, or a machine.
Choose the concentration curl when a single dumbbell and a seat are convenient. Choose a preacher curl when the pad fits you well and you prefer a more fixed setup. Neither option earns an automatic advantage simply because the arm is supported.
Concentration curl versus hammer curl
A hammer curl keeps the palm facing inward in a neutral grip. It changes the hand position while still training elbow flexion. Some people find it easier to keep the wrist comfortable this way, although comfort is individual.
If turning the palm upward feels awkward, consider hammer curls rather than forcing rotation. You can use one curl variation on each of two weekly sessions, but you do not need both in every workout.
Concentration curl versus standing dumbbell curl
Standing curls allow both arms to work together and can be quicker when time is limited. They also leave more room for torso and shoulder movement. Concentration curls take longer because you reset each side, but their support can make technique easier to observe.
Pick the variation you can perform comfortably and repeat consistently. Keeping one familiar curl for a few weeks gives you better training information than replacing it every time you see a new ranking.
Does research prove it is the best biceps exercise?
An ACE-sponsored study reported in 2014 measured electrical muscle activity during eight biceps exercises in 16 volunteers. Concentration curls produced higher measured biceps activity than the other exercises under those test conditions.
That finding concerns an acute electrical signal. It does not establish that concentration curls produce the greatest long-term muscle growth for everyone. The study was not a months-long comparison of changes in biceps size. Exercise comfort, progressive training, total workload, and consistency still matter.
You can reasonably use the concentration curl as a direct biceps option without promising a special “peak” shape, complete isolation of one biceps head, or a guaranteed rate of growth. Those claims go beyond what the exercise setup and this study can establish.
Frequently asked questions
Should I start with my weaker arm?
That is a useful default when the difference is modest and neither side hurts. Let the less capable side set the number of clean repetitions, then match it on the other side. Do not automatically add extra sets to the weaker side. A new or pronounced loss of strength deserves professional assessment rather than an improvised correction plan.
Can I do concentration curls every day?
You usually do not need to. Start with the once- or twice-weekly approach above and consider the arm work already present in rows, pulldowns, and other curls. Daily hard sets can make it difficult to separate training fatigue from a setup problem, especially when you are new.
Do I need a long squeeze at the top?
No. A brief, deliberate turnaround can help prevent bouncing, but a long hold is optional. Keep the timing similar between sessions so the weight and repetition numbers remain meaningful. If you add a pause, expect the same weight to feel harder.
What if the exercise hurts?
Stop if you feel sharp pain, joint pain, tingling, or symptoms spreading down the arm. Do not repeatedly test a painful position with heavier weights. Adjusting the load or support may help ordinary discomfort, but persistent symptoms or an existing injury call for individualized guidance from a qualified healthcare professional.
Make the next session easy to repeat
Record the dumbbell weight, repetitions for each side, and any setup change that affected the set. “5 kg, left 12/11, right 12/11, same bench” is more useful than “good arm workout.” Keep the units clear and record the weight of the single dumbbell.
You can log your sets, reps, and weights in Workit (subscription required), or use a simple workout log template. At the next session, repeat the setup and aim for the same quality before adding anything. A stable thigh support, a comfortable wrist, and a controlled lowering phase are the main things to carry forward.