
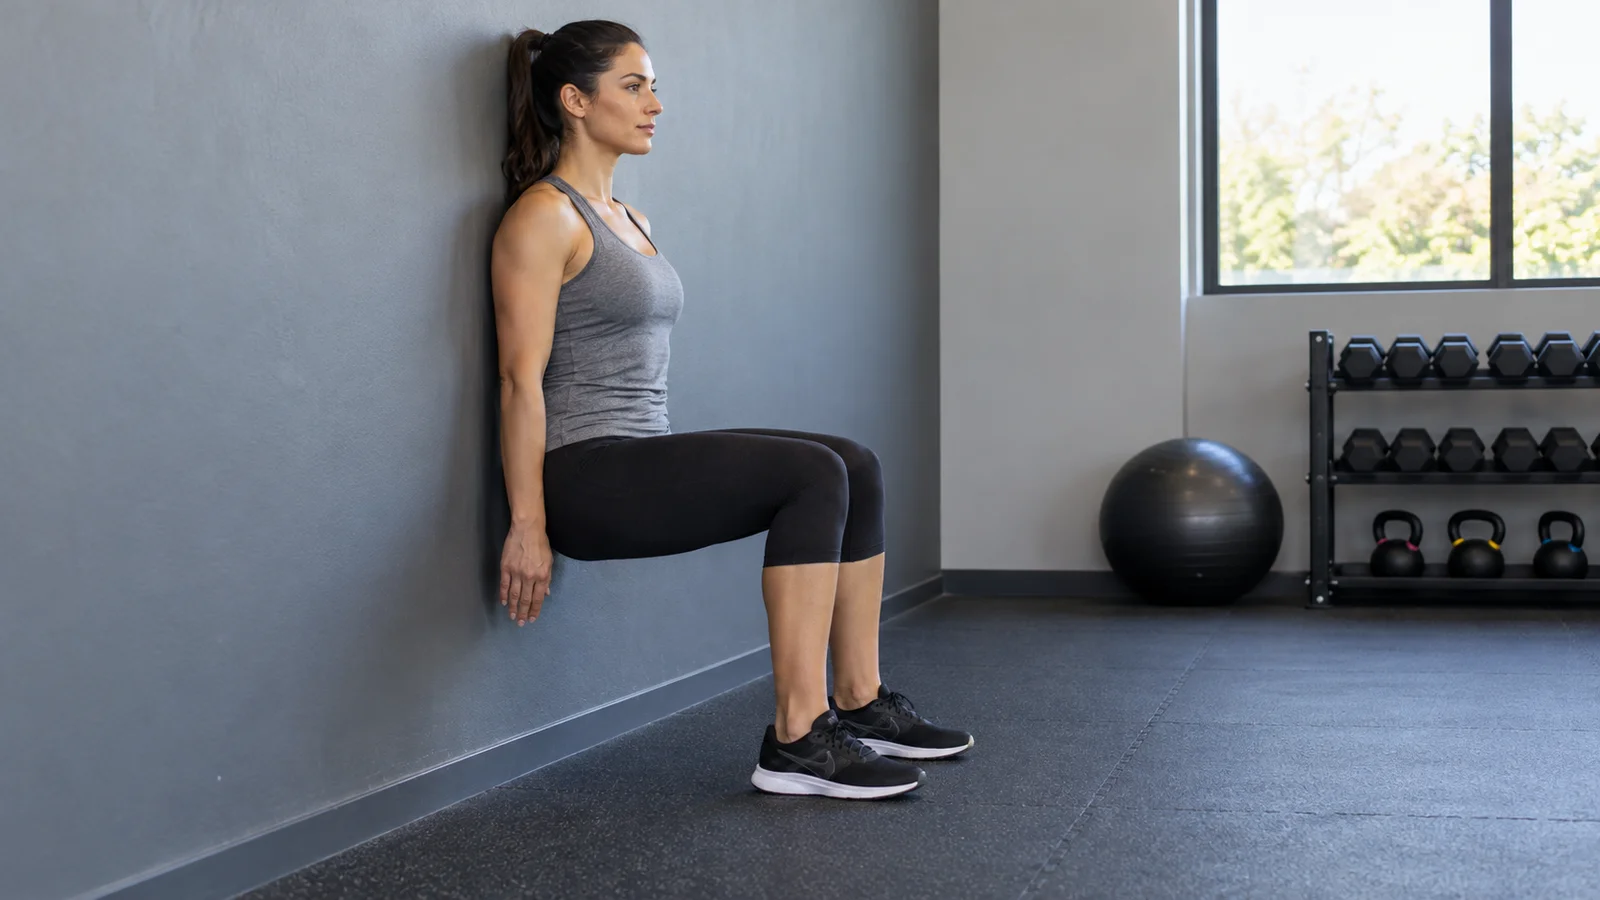
To do a wall sit, lean your back against a stable wall, walk your feet forward, and lower into a comfortable partial squat. Keep both feet planted, let your knees point in the same general direction as your toes, and breathe throughout the hold. Start with a shallow position and a brief hold rather than forcing your thighs parallel to the floor.
Published October 15, 2026
A wall sit is a simple way to challenge your thighs without equipment or repeated movement. The useful part is choosing a position you can maintain and leave under control. You do not need a two-minute record, shaking legs, or a daily challenge to make it worthwhile.
What is a wall sit, and which muscles does it work?
A wall sit is an isometric exercise: you produce muscular effort while holding a largely fixed position. Your back rests against the wall, your feet stay on the floor, and your legs support you in a bent-knee stance. Unlike a chair, the wall does not provide a seat underneath your hips.
The quadriceps, the muscles at the front of your thighs, are the main focus. Your hips, trunk, and lower legs also contribute to maintaining your position. The precise demands change with depth, foot placement, body proportions, and any external load. Feeling the greatest effort in your thighs is normal; feeling an equal burn everywhere is unnecessary.
A wall squat sometimes means the same static hold, but it can also describe sliding down and back up for repetitions. Check the instructions before following a routine. Three wall-sit holds and three sets of moving wall squats are different amounts and types of work.
Set up your space before starting
Choose a solid, flat wall with enough clear space for your back and feet. Avoid a movable partition, glass panel, door that could open, or surface with protruding fixtures. Remove anything you could step on or trip over when you finish.
Use a dry, nonslip floor and secure footwear. Socks on polished flooring may slide as pressure builds through your feet. A loose rug can create the same problem. Test the surface with a gentle partial bend before committing to a longer hold.
Keep your timer visible without twisting your neck. An audible timer works well, but choose a short target you can stop before if needed. The alarm is a ceiling for the set, not a command to remain in an uncomfortable position.
Warm up with a few minutes of easy movement, such as walking, followed by several comfortable bends of your knees and hips. Rehearse a very shallow wall sit and the return to standing. Being able to exit smoothly matters as much as being able to get into position.
How to do a wall sit step by step
- Start upright. Place your back against the wall and stand with your feet approximately hip-width apart. Let your arms hang comfortably or keep your hands lightly at your sides.
- Move your feet forward. Take small steps away from the wall while keeping your back supported. The correct distance depends on your leg length and intended depth.
- Lower gradually. Bend your knees and slide down a short distance. For your first attempt, stay noticeably higher than a thighs-parallel position.
- Check your base. Keep your whole feet on the floor. Your knees should generally follow the direction of your toes rather than collapsing together.
- Settle your upper body. Keep comfortable contact with the wall, relax your shoulders, and look ahead. Avoid forcing your spine flat or pushing your head backward.
- Hold and breathe. Maintain the chosen height while taking ordinary, continuous breaths. Finish before your posture, foot contact, or breathing becomes difficult to control.
- Stand smoothly. Push through your feet and slide back up the wall. Once upright and steady, step back into a comfortable standing position.
During practice, give yourself permission to stand up and reposition. Shuffling your feet while already fatigued is less reliable than resetting between attempts. A short, repeatable hold is more useful for learning than a long hold spent searching for a workable stance.
Do your knees have to bend to 90 degrees?
No. The familiar photograph of a wall sit usually shows thighs approximately parallel to the floor and knees near a right angle. That is one version, not an entry requirement. A shallower position can provide a meaningful challenge and may be a better place to learn.
Think of depth as a difficulty setting. Lowering your hips generally makes the hold more demanding, so a change of only a few centimeters may be enough. There is no need to measure your knee angle precisely for ordinary fitness practice.
The NHS wall-squat example uses a modest knee bend and brief holds. It also cautions that its routine is not intended for an existing knee injury. This is a useful reminder that a deeper position is not automatically a better exercise and that rehabilitation needs individual guidance.
At a deeper wall sit, having your ankles roughly beneath your knees can be a practical starting check. Do not force an exact geometry that makes your feet slide or your joints uncomfortable. Knee travel over the toes is not a universal danger rule across exercises; here, the goal is a stable, repeatable hold.
Breathing is part of good wall-sit form
It is easy to hold your breath when the effort builds, particularly while watching a timer. Keep breathing from the beginning instead of waiting until you feel strained. Relax your jaw and shoulders, and avoid squeezing your entire body as hard as possible.
A simple practice cue is to count a few seconds aloud at an ordinary volume. If you can only do this by gasping or releasing a long-held breath, shorten the set or choose a shallower position. Speaking is a breathing reminder here, not a medical test of exercise safety.
You do not need a rigid inhale-for-four, exhale-for-four pattern. Natural breathing is sufficient. If a prescribed breathing rhythm makes the exercise harder to coordinate, remove that extra task and focus on a comfortable position.
Stop if you become dizzy, faint, unusually breathless, or unwell. Chest pain or pressure during exercise warrants urgent medical attention. Do not try to solve these symptoms by simply holding a little higher on the wall.
How long should a beginner hold a wall sit?
As a conservative practice option, try two shallow holds of 5–10 seconds, resting fully between them. If that feels comfortable and you can stand smoothly, later sessions might use 10–20-second holds. These are flexible starting examples, not a research-established dose for every person.
Choose your time by the quality of the final seconds. Your feet should remain planted, your height reasonably steady, and your breathing continuous. Finish with enough control to stand without dropping toward the floor or scrambling for help.
For example, suppose you can hold a shallow position for 12 seconds comfortably but begin holding your breath at 15 seconds. A 10-second target is more appropriate than repeatedly pushing for 20. Practice the successful version, then reassess when it feels easier.
Rest roughly 45–90 seconds as a starting point, or longer if needed. Begin the next set when your legs and breathing feel ready. A timer should help you organize the session without forcing a rest period that is too short.
Once familiar with the exercise, two or three holds of about 15–30 seconds may fit a general strength session. Some people will need less; others will prefer a harder variation rather than longer durations. There is no required one-minute milestone.
A simple way to build up over several sessions
Progress when the current version is repeatable and your recovery is manageable. You do not need to increase something at every workout. Repeating a successful session is useful practice, especially when you are also adding other exercises.
- First sessions: establish a comfortable wall position and complete two short holds.
- Next step: add a few seconds to each hold while keeping the same depth and rest.
- Alternative step: add one additional short hold instead of lengthening both existing holds.
- Later option: lower slightly, then shorten the hold while learning the new position.
Change only one main variable at a time. Adding depth, duration, and extra sets together makes it harder to know what caused a difficult session. The same principle applies when you add wall sits to a week that already contains running, squats, or long hikes.
Keep a small record: “Two holds, 15 seconds, shallow, comfortable breathing.” A quick description of depth is often more useful than the duration alone. Holding higher for 40 seconds is not directly comparable with holding lower for 20.
If your second set is consistently much shorter than your first, try more rest or reduce the first hold. You are practicing repeatable effort rather than spending all your capacity on the opening attempt.
Common wall-sit problems and practical fixes
Your feet slide forward
End the hold and check the floor and footwear. Do not keep pushing harder against a slippery surface. Reposition your feet, choose a shallower bend, and test a short hold. If the surface remains unreliable, choose another exercise.
Your heels lift
Stand up and reset your stance. You may have placed your feet awkwardly or lowered beyond a position you can maintain. Keep the entire foot grounded rather than deliberately balancing on the forefoot to extend the timer.
Your knees drift inward
Reduce the difficulty and check that your feet are spaced comfortably. Aim your knees generally along your toes. You do not need to force them as far outward as possible; the goal is controlled alignment rather than a dramatic pose.
You press your hands hard into your thighs
That assistance changes the exercise. If it happens unintentionally near the end, stop earlier next time. Keep your arms relaxed when you want to compare unassisted holds. Assistance can be a deliberate modification, but record it rather than treating every version as identical.
Your lower back feels uncomfortable
Check that you are not aggressively tucking your pelvis, arching, or flattening your spine against the wall. Try a higher position and ordinary breathing. Stop if discomfort persists; a wall sit is optional, and repeated back symptoms deserve individual assessment.
You start shaking
A little trembling can accompany a challenging hold, but it is not a target or proof of an effective workout. If shaking makes your feet, knees, or exit unreliable, finish the set. Next time, use less depth, less time, or more rest.
The front of your knee hurts
Stop the exercise instead of treating joint pain as the same thing as muscular effort. A shorter or shallower version may be more comfortable on another attempt, but recurring pain needs assessment. Follow your clinician’s instructions if you are using wall squats as part of rehabilitation.
Where wall sits fit in a workout
Wall sits can be a brief lower-body exercise within a wider routine. They are especially convenient when you have a stable wall but little equipment. They are less useful as the sole answer to every strength, balance, or conditioning goal.
If you are learning the hold, practice while reasonably fresh. If you already do demanding lower-body training, a small amount near the end can be enough. Avoid exhausting your thighs immediately before an activity that needs reliable balance or careful foot placement.
One beginner session could include an easy warm-up, a few controlled sit-to-stands, two short wall-sit holds, and familiar upper-body exercises. Keep the overall session manageable. You do not need to combine every leg exercise you know on the same day.
For general health, the CDC recommends both aerobic activity and muscle-strengthening activity, including strengthening on at least two days each week. A wall sit can contribute to leg training, but it does not train every major muscle group or replace aerobic movement.
Start with wall sits on one or two nonconsecutive days if they are new to you, then adjust around your other training and recovery. This is a practical scheduling suggestion, not a requirement to perform this particular exercise twice weekly.
Wall sits versus squats and step-ups
A wall sit holds one position. A squat practices lowering and standing through a range of motion. A step-up adds climbing onto a raised surface and controlling the return. Each offers a different task, so the best choice depends on what you want to practice.
If your goal is to become more comfortable getting out of a chair, practicing an appropriate sit-to-stand may be more directly relevant. If you want to learn a loaded squat, our goblet squat form guide explains setup, depth, and manageable loading.
If you have a suitable platform and want to practice stepping, see the step-up exercise guide. Choose the platform based on control, not height. A wall sit is an alternative when a safe platform is unavailable, though it does not reproduce the balance demands of stepping.
You can use more than one movement across the week. There is no need to declare wall sits superior to squats because they feel intense. A strong local burn describes your experience during the set; it does not establish which exercise best serves every goal.
How to make wall sits harder without chasing a record
First consider a modest increase in duration or depth. If you can repeat the current version comfortably, an extra few seconds may be enough. Keep your breathing and exit as controlled as before.
External weight is optional. Only consider it after your bodyweight setup is reliable, and use a load you can manage safely while entering and leaving the position. An awkward object balanced on your thighs can create more setup trouble than training value.
Single-leg wall sits add a substantially different challenge. Removing one foot reduces your base of support and increases the demand on the remaining leg. They are not the automatic next step for a beginner and are unnecessary for a useful routine.
If making the hold harder creates awkwardness, progress another exercise instead. A controlled squat, supported split squat, or appropriate machine exercise may offer a simpler way to increase resistance. Exercise progression should solve a training need rather than make a familiar movement complicated.
Do wall sits lower blood pressure?
Research on isometric training is promising, but headlines often remove important context. A 2023 systematic review and network meta-analysis found that several types of exercise reduced resting blood pressure, with isometric training performing particularly well. This was evidence about training programs over time, not a guarantee from one wall sit.
A key distinction is resting blood pressure versus the cardiovascular response during a strenuous hold. An exercise can improve a resting measure over weeks while temporarily increasing cardiovascular demands during the session. Holding your breath or performing an all-out endurance test is not a substitute for an individualized program.
A primary study investigating isometric exercise in people with stage 1 hypertension used an incremental assessment to set the wall-squat intensity before a structured training session. That process differs from telling everyone to copy the same depth and duration from a social-media challenge.
If you have high blood pressure, cardiovascular disease, or instructions limiting exertion, ask your healthcare professional whether and how isometric exercise fits your care. Do not change medication or replace prescribed activity based on a wall-sit headline. The short beginner examples in this article are general fitness suggestions, not a blood-pressure treatment protocol.
Frequently asked questions
Are wall sits good for beginners?
They can be, provided you choose a shallow, brief hold and a safe surface. A wall gives support, but getting out of the position still requires leg effort. If standing back up feels uncertain, choose an easier exercise or get guidance before continuing.
Can I do wall sits every day?
You do not need to. Consider their effort alongside your other leg training and how you recover. Short practice and demanding endurance sets are different workloads. If your legs remain sore or your performance worsens, allow more recovery rather than protecting a daily streak.
Will wall sits burn thigh fat?
They are not a targeted fat-loss method. Training a body part does not let you choose where body fat is lost. Use wall sits for a manageable leg challenge, and assess broader fitness or body-composition goals through your overall activity and habits.
Is a one-minute wall sit good?
It can be a personal benchmark if you keep the setup consistent. It is not a universal fitness score. Depth, footwear, wall surface, body proportions, and assistance all affect the task, so comparisons with someone else’s stopwatch result can be misleading.
Should wall sits feel painful?
Muscular effort may feel intense, but sharp pain, joint pain, numbness, or feeling unwell are reasons to stop. You do not need to endure maximum discomfort. If symptoms return, seek professional advice rather than repeatedly testing your tolerance.
Start with a hold you can repeat
Choose a reliable wall, keep the first position shallow, and practice a brief hold with continuous breathing. Build duration or depth gradually while preserving a smooth return to standing. Wall sits work best as one useful option within a balanced routine. If you would like to look at the app, explore Workit.
For a different full-body challenge involving walking with one weight, see the suitcase carry guide. Start each exercise separately with a manageable dose rather than adding every new drill at once.